TRENDnet TV-H500 Support and Manuals
Get Help and Manuals for this TRENDnet item
View All Support Options Below
Free TRENDnet TV-H500 manuals!
Problems with TRENDnet TV-H500?
Ask a Question
Free TRENDnet TV-H500 manuals!
Problems with TRENDnet TV-H500?
Ask a Question
Popular TRENDnet TV-H500 Manual Pages
Datasheet - Page 1
... rating. internet cameras
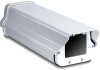
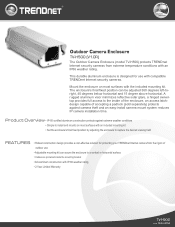
Outdoor Camera Enclosure
TV-H500 (V1.0R)
The Outdoor Camera Enclosure (model TV-H500) protects TRENDnet Internet security cameras from the rigors of accepting a padlock (sold separately) protects against extreme weather conditions
• Simple to install and mounts on most surfaces with an included mounting kit • Set the enclosure's final fixed position...
Datasheet - Page 2
..., without notice. Copyright © TRENDnet. All Rights Reserved. Outdoor Camera Enclosure
TV-H500 (V1.0R)
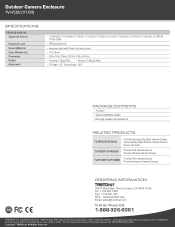
SPECIFICATIONS
Hardware
Supported Devices
Protection Level Housing Material Glass Window Size Dimensions Weight Adjustment
• TV-IP100-N, TV-IP100W-N, TV-IP201, TV-IP201P, TV-IP201W, TV-IP301, TV-IP301W, TV-IP501P, TV-IP501W, TV-IP512P, TV-IP512WN
• IP66 weatherproof
•...
Quick Installation Guide - Page 3

...use the Cable Strain Relief Plug. TV-H500 ? Ethernet cable (For wired IP cameras) ? Make sure to use
this, you start
Package Contents
? Phillips Screwdriver ? The TV-IP100W-N, TV-IP201W, TV-IP301W and TV-IP501W only require one surge arrester, one antenna cable and one external antenna.
1
English External antenna (e.g. Quick Installation Guide ? 1 x Wall Mount Bracket...
Quick Installation Guide - Page 4
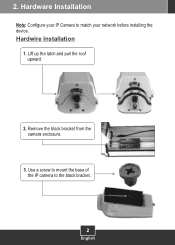
Lift up the latch and pull the roof upward.
2. Use a screw to mount the base of the IP camera to match your network before installing the device. Hardwire Installation
1. 2.
Hardware Installation
Note: Configure your IP Camera to the black bracket.
2
English Remove the black bracket from the camera enclosure.
3.
Quick Installation Guide - Page 5

Move the camera as close to the camera.
3
English Connect the Ethernet cable and power adapter to the glass as possible. 4. Insert the IP Camera's power adapter and Ethernet cable through the hole.
7. Connect the black bracket back inside the enclosure. This example shows a TRENDnet TV-IP100W-N.
5. Insert the IP Camera's power adapter and Ethernet cable through the mounting...
Quick Installation Guide - Page 6
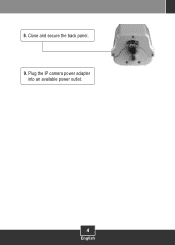
Close and secure the back panel. 9. 8. Plug the IP camera power adapter
into an available power outlet.
4
English
Quick Installation Guide - Page 7
...-ASAK).
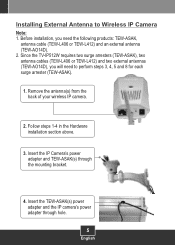
1. Since the TV-IP512W requires two surge arresters (TEW-ASAK), two antenna cables (TEW-L406 or TEW-L412) and two external antennas (TEW-AO14D), you need to Wireless IP Camera
Note: 1. Insert the TEW-ASAK(s) power adapter and the IP camera's power adapter through the mounting bracket.
4. Before installation, you will need the...
Quick Installation Guide - Page 8
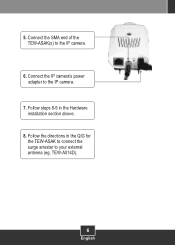
Follow steps 8-9 in the QIG for the TEW-ASAK to connect the surge arrester to the IP camera.
7. Follow the directions in the Hardware installation section above.
8. TEW-A014D).
6
English Connect the IP camera's power adapter to your external antenna (eg. 5. Connect the SMA end of the TEW-ASAK(s) to the IP camera.
6.
Quick Installation Guide - Page 9
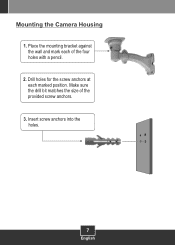
Insert screw anchors into the holes.
7
English Place the mounting bracket against the wall and mark each marked position. Make sure the drill bit matches the size of the four holes with a pencil.
2. Mounting the Camera Housing
1. Drill holes for the screw anchors at each of the provided screw anchors.
3.
Quick Installation Guide - Page 10

...information regarding the TV-H500 configuration and advanced settings, please visit TRENDnet's website at www.trendnet.com
Register Your Product
To ensure the highest level of customer service and support, please take... www.trendnet.com/register Thank you for choosing TRENDnet
8
English Use the hex screws and Allen wrench to secure the mounting bracket to the enclosure.
5. 4. Your installation is ...
Quick Installation Guide - Page 11
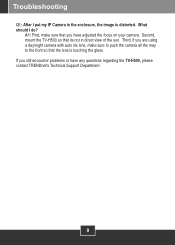
... enclosure, the image is touching the glass. If you have any questions regarding the TV-H500, please contact TRENDnet's Technical Support Department.
9 Second, mount the TV-H500 so that the lens is distorted. Third, if you are using a day/night camera with auto iris lens, make sure that you still encounter problems or have adjusted the focus on your camera.
Troubleshooting...
Quick Installation Guide - Page 12
..., INSTALLATION MAINTENANCE OR USE OF TRENDNET'S PRODUCTS.
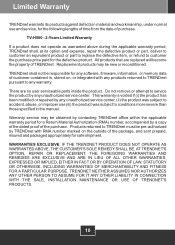
10 There are replaced will become the property of TRENDnet. TRENDnet shall not be new or reconditioned. This warranty is voided if (i) the product has been modified or repaired by contacting TRENDnet office within the applicable warranty period for the following lengths of time from the date of the purchase. TV-H500...
Quick Installation Guide - Page 13
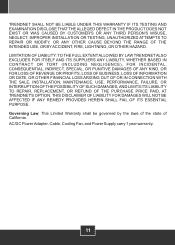
..., OR OTHER FINANCIAL LOSS ARISING OUT OF OR IN CONNECTION WITH THE SALE, INSTALLATION, MAINTENANCE, USE, PERFORMANCE, FAILURE, OR INTERRUPTION OF THE POSSIBILITY OF SUCH DAMAGES, AND LIMITS ITS LIABILITY TO REPAIR, REPLACEMENT, OR REFUND OF THE PURCHASE PRICE PAID, AT TRENDNET'S OPTION. AC/DC Power Adapter, Cable, Cooling Fan, and Power Supply carry 1 year...
Quick Installation Guide - Page 14
...ños al equipo conectado. Waste electrical and electronic products must accept any interference received.
NOTE: THE MANUFACTURER IS NOT RESPONSIBLE FOR ANY RADIO OR TV INTERFERENCE CAUSED BY UNAUTHORIZED MODIFICATIONS TO THIS EQUIPMENT. El adaptador de alimentación debe operar con voltaje y frecuencia de la energia electrica domiciliaria existente en...
Quick Installation Guide - Page 15

TRENDnet. Product Warranty Registration
Please take a moment to TRENDnet's website at http://www.trendnet.com/register
20675 Manhattan Place Torrance, CA 90501 USA
Copyright ©2009. Go to register your product online. All Rights Reserved.
TRENDnet TV-H500 Reviews
We have not received any reviews for TRENDnet yet.