

Quick Installation Guide
Page 2
Introduction 2 3. Product Features 3 4. Hardware Installation 4 5. Table of Contents English 1 1. Install Drivers 5 6. Verify Installation 10 Troubleshooting 12 Prepare for Installation 1 2.
Introduction 2 3. Product Features 3 4. Hardware Installation 4 5. Table of Contents English 1 1. Install Drivers 5 6. Verify Installation 10 Troubleshooting 12 Prepare for Installation 1 2.
Quick Installation Guide
Page 3
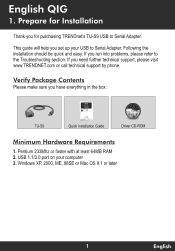
...TU-S9 Quick Installation Guide Driver CD-ROM Minimum Hardware Requirements 1. USB 1.1/2.0 port on your USB to Serial Adapter. Verify Package Contents Please make sure you run into problems, please refer to Serial Adapter. Windows XP, 2000, ME, 98SE or Mac OS 9.1 or later 1 English This guide will help you for purchasing TRENDnet's TU-S9... USB to the Troubleshooting section. Prepare for Installation Thank you set up your computer 3. If you need further technical support, please visit www.TRENDNET.com or call technical support by...
...TU-S9 Quick Installation Guide Driver CD-ROM Minimum Hardware Requirements 1. USB 1.1/2.0 port on your USB to Serial Adapter. Verify Package Contents Please make sure you run into problems, please refer to Serial Adapter. Windows XP, 2000, ME, 98SE or Mac OS 9.1 or later 1 English This guide will help you for purchasing TRENDnet's TU-S9... USB to the Troubleshooting section. Prepare for Installation Thank you set up your computer 3. If you need further technical support, please visit www.TRENDNET.com or call technical support by...
Quick Installation Guide
Page 7
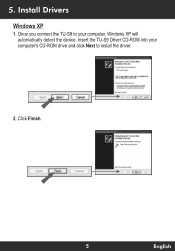
Once you connect the TU-S9 to your computers CD-ROM drive and click Next to the Found New Hardware Wizard ilasweertlhelp, pt. Click Finish. fraleigels schowe ler Paw LISNoSaCown 5 English round 'New Hanlware Welcome to install the driver. Install Drivers Windows XP 1. FounA New ...are Completing the Found New Hardware wizard The MM. telpuerefor USEI.Septl Co* Next Cancel OL wwwwm,,, olwanwewevwsuszentaal Cick Nat.* 2. Insert the TU-S9 Driver CD-ROM into your computer, Windows XP will automatically detect the device. 5.
Once you connect the TU-S9 to your computers CD-ROM drive and click Next to the Found New Hardware Wizard ilasweertlhelp, pt. Click Finish. fraleigels schowe ler Paw LISNoSaCown 5 English round 'New Hanlware Welcome to install the driver. Install Drivers Windows XP 1. FounA New ...are Completing the Found New Hardware wizard The MM. telpuerefor USEI.Septl Co* Next Cancel OL wwwwm,,, olwanwewevwsuszentaal Cick Nat.* 2. Insert the TU-S9 Driver CD-ROM into your computer, Windows XP will automatically detect the device. 5.
Quick Installation Guide
Page 8
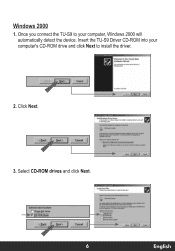
...°WOW efeeltelaramedivenlm.derleeteeull eenehapsee emcee I 6 En • fish Select CD-ROM drives and click Next. Once you connect the TU-S9 to your computers CD-ROM drive and click Next to the Found New Hardware Wizard I Cancel I eD wiese cemp.IleDOA..ler ea... 6a. Welcome to install the driver. Optional search locations: r Floppy .disk drives ►r ROM drives < flack Hext > I Cancel Sewell leterDet Bee thelebeng Memo de.. 6a. ----"^ Dennal seed beaues Deede a bake 7 Hizmawicio.... ,Deola I Nee, I Lincd I 3. Insert the TU-S9 Driver CD-ROM into your computer, ...
...°WOW efeeltelaramedivenlm.derleeteeull eenehapsee emcee I 6 En • fish Select CD-ROM drives and click Next. Once you connect the TU-S9 to your computers CD-ROM drive and click Next to the Found New Hardware Wizard I Cancel I eD wiese cemp.IleDOA..ler ea... 6a. Welcome to install the driver. Optional search locations: r Floppy .disk drives ►r ROM drives < flack Hext > I Cancel Sewell leterDet Bee thelebeng Memo de.. 6a. ----"^ Dennal seed beaues Deede a bake 7 Hizmawicio.... ,Deola I Nee, I Lincd I 3. Insert the TU-S9 Driver CD-ROM into your computer, ...
Quick Installation Guide
Page 9
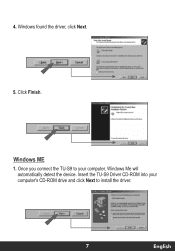
Windows found the driver, click Next. I 5. Once you connect the TU-S9 to your computer's CD-ROM drive and click Next to dos 6 di I Cancel USB.SenalContolter 7 En • lish 4. Click Finish. et I Cancel 10 F7 2 dIun_sen,..3.5.1. Insert the TU-S9 Driver CD-ROM into your computer, Windows Me will automatically detect the device. PM...1MM < flack rog_ivLak Cancel r Cornpie4.010FOLInfitiM HaNNIMWI3ard n,q,usp.s,,,,,„ vm \./ In to install the driver. Bach Next > I Windows ME 1.
Windows found the driver, click Next. I 5. Once you connect the TU-S9 to your computer's CD-ROM drive and click Next to dos 6 di I Cancel USB.SenalContolter 7 En • lish 4. Click Finish. et I Cancel 10 F7 2 dIun_sen,..3.5.1. Insert the TU-S9 Driver CD-ROM into your computer, Windows Me will automatically detect the device. PM...1MM < flack rog_ivLak Cancel r Cornpie4.010FOLInfitiM HaNNIMWI3ard n,q,usp.s,,,,,„ vm \./ In to install the driver. Bach Next > I Windows ME 1.
Quick Installation Guide
Page 10
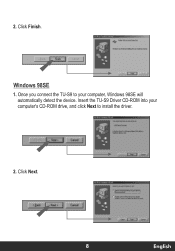
2. Click Next. r Fl Windows 98SE 1. Once you wareNnlows to do you connect the TU-S9 to install the driver. W. do , Cancel ,flaok I - _11 co, 2. Click Finish. _BacI, Rolific USR.Seriel Dna Putt Widows Imfinisbedindelnplhenexhadowe device. r LIle1_1 Cancel =12211=0: Dia wkarciseactre, he new drkts lac USIMmialConrydel Adevimm.....powant.Prn I NW> 8 En • lish Insert the TU-S9 Driver CD-ROM into your computer's CD-ROM drive, and click Next to your computer, Windows 98SE will automatically detect the device.
2. Click Next. r Fl Windows 98SE 1. Once you wareNnlows to do you connect the TU-S9 to install the driver. W. do , Cancel ,flaok I - _11 co, 2. Click Finish. _BacI, Rolific USR.Seriel Dna Putt Widows Imfinisbedindelnplhenexhadowe device. r LIle1_1 Cancel =12211=0: Dia wkarciseactre, he new drkts lac USIMmialConrydel Adevimm.....powant.Prn I NW> 8 En • lish Insert the TU-S9 Driver CD-ROM into your computer's CD-ROM drive, and click Next to your computer, Windows 98SE will automatically detect the device.
Quick Installation Guide
Page 11
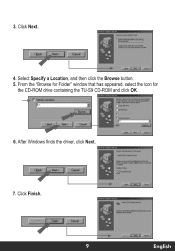
W.nt to tl, t < Back o Next> I 7. USPoSerie, Comm Pod location of dim \SEFIWPI. fc _j I Cancel I Cancel 0,OOadolealladtivershape. Click Finish. 3. Ro. Click Next. ==== Wh. do you w.
W.nt to tl, t < Back o Next> I 7. USPoSerie, Comm Pod location of dim \SEFIWPI. fc _j I Cancel I Cancel 0,OOadolealladtivershape. Click Finish. 3. Ro. Click Next. ==== Wh. do you w.
Quick Installation Guide
Page 13
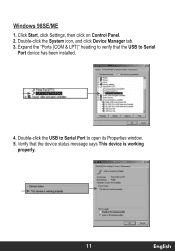
Click Start, click Settings, then click on Control Panel. 2. Moo. General Pot SeNS96 I Driver I ,14 USB M Serial Port [COMP) Device Soo Ports (COM EaPT1 Marniaoluer. Ss_A1O. Device status This device is working properly. I Ream.. Sound, video and game contioiers M=0=...
Click Start, click Settings, then click on Control Panel. 2. Moo. General Pot SeNS96 I Driver I ,14 USB M Serial Port [COMP) Device Soo Ports (COM EaPT1 Marniaoluer. Ss_A1O. Device status This device is working properly. I Ream.. Sound, video and game contioiers M=0=...

