Data Sheet
Page 1
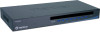
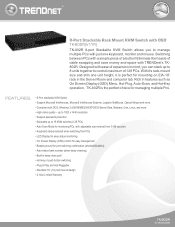
... 3.x/95/98/ME/2000/XP/2003 Server/Vista, Netware, Unix, Linux, and more . • Compliant with TRENDnet's TK802R. kvm 8-Port Stackable Rack Mount KVM Switch with OSD TK-802R(V1.1R) TK-802R 8-port Stackable KVM Switch allows you can stack up to 16 KVM switches (128 PCs) • Auto-Scan Mode for monitoring PCs, with just one unit height, it...
... 3.x/95/98/ME/2000/XP/2003 Server/Vista, Netware, Unix, Linux, and more . • Compliant with TRENDnet's TK802R. kvm 8-Port Stackable Rack Mount KVM Switch with OSD TK-802R(V1.1R) TK-802R 8-port Stackable KVM Switch allows you can stack up to 16 KVM switches (128 PCs) • Auto-Scan Mode for monitoring PCs, with just one unit height, it...
Data Sheet
Page 2
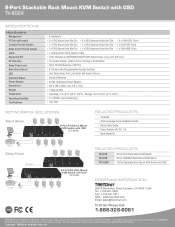
.... Information provided in this document pertain to TRENDnet products and is subject to 16 KVM Switches (128 PCs) • 5-100 seconds (Programmable through Hot-Key) • Unit: Bank (Red) Port: Link (Red) and Select (Green) ...Port PS/2 Rack Mount KVM Switch with OSD (TK-802R) Keyboard Mouse PC 7 PC 5 PC 3 PC 1 RELATED PRODUCTS TK-801R TK-803R TK-1602R 8-Port PC/2 Rack Mount KVM Switch 8-Port USB/PC/2 Rack Mount KVM Switch 16-Port Stackable Rack Mount KVM Switch with OSD TK-802R SPECIFICATIONS Hardware Management PC Port (all female) Console Port (all female) Daisy Chain Port...
.... Information provided in this document pertain to TRENDnet products and is subject to 16 KVM Switches (128 PCs) • 5-100 seconds (Programmable through Hot-Key) • Unit: Bank (Red) Port: Link (Red) and Select (Green) ...Port PS/2 Rack Mount KVM Switch with OSD (TK-802R) Keyboard Mouse PC 7 PC 5 PC 3 PC 1 RELATED PRODUCTS TK-801R TK-803R TK-1602R 8-Port PC/2 Rack Mount KVM Switch 8-Port USB/PC/2 Rack Mount KVM Switch 16-Port Stackable Rack Mount KVM Switch with OSD TK-802R SPECIFICATIONS Hardware Management PC Port (all female) Console Port (all female) Daisy Chain Port...
Quick Installation Guide
Page 4
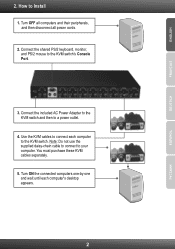
Connect the included AC Power Adapter to the KVM switch and then to the KVM switch. You must purchase these KVM cables separately. 5. Use the KVM cables to connect each computer's desktop appears. 2 ESPAÑOL Turn ON the connected computers one-by-one and wait until each computer to a power ..., and then disconnect all power cords. 2. Connect the shared PS/2 keyboard, monitor, and PS/2 mouse to Install 1. ENGLISH FRANÇAIS DEUTSCH 2. How to the KVM switch's Console Port. 3. Note: Do not use the supplied daisy-chain cable to connect to your computer.
Connect the included AC Power Adapter to the KVM switch and then to the KVM switch. You must purchase these KVM cables separately. 5. Use the KVM cables to connect each computer's desktop appears. 2 ESPAÑOL Turn ON the connected computers one-by-one and wait until each computer to a power ..., and then disconnect all power cords. 2. Connect the shared PS/2 keyboard, monitor, and PS/2 mouse to Install 1. ENGLISH FRANÇAIS DEUTSCH 2. How to the KVM switch's Console Port. 3. Note: Do not use the supplied daisy-chain cable to connect to your computer.
Quick Installation Guide
Page 5
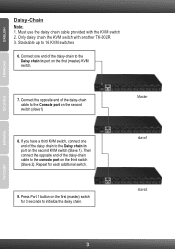
...(slave1) 8. Must use the daisy chain cable provided with another TK-802R 3. Stackable up to the console port on the first (master) switch for each additional switch. 9. Repeat for 3 seconds to the Console port on the second KVM switch (Slave 1). ENGLISH FRANÇAIS DEUTSCH Daisy-Chain Note...: 1. Only daisy chain the KVM switch with the KVM switch 2. If you have a third KVM switch, connect one end of the daisy-chain cable ...
...(slave1) 8. Must use the daisy chain cable provided with another TK-802R 3. Stackable up to the console port on the first (master) switch for each additional switch. 9. Repeat for 3 seconds to the Console port on the second KVM switch (Slave 1). ENGLISH FRANÇAIS DEUTSCH Daisy-Chain Note...: 1. Only daisy chain the KVM switch with the KVM switch 2. If you have a third KVM switch, connect one end of the daisy-chain cable ...
Quick Installation Guide
Page 6
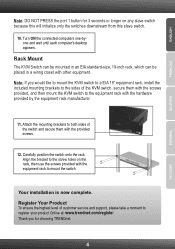
... NOT PRESS the port 1 button for choosing TRENDnet. 4 Note: If you for 3 seconds or longer on the rack, then use the screws provided with the hardware provided by the equipment rack manufacturer. 11. Carefully position the switch onto the rack. Your installation is now complete. Rack Mount The KVM Switch can be mounted...
... NOT PRESS the port 1 button for choosing TRENDnet. 4 Note: If you for 3 seconds or longer on the rack, then use the screws provided with the hardware provided by the equipment rack manufacturer. 11. Carefully position the switch onto the rack. Your installation is now complete. Rack Mount The KVM Switch can be mounted...
Quick Installation Guide
Page 7
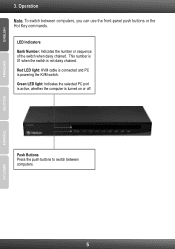
ENGLISH FRANÇAIS DEUTSCH 3. Green LED light: Indicates the selected PC port is active, whether the computer is not daisy chained. This number is 01 when the switch is turned on or off. LED Indicators Bank Number: Indicates the number or sequence of the switch when daisy chained. Push Buttons Press the push buttons to switch between computers, you can use the front-panel push buttons or the Hot Key commands. Red LED light: KVM cable is connected and PC is powering the KVM switch. Operation Note: To switch between computers. 5 ESPAÑOL
ENGLISH FRANÇAIS DEUTSCH 3. Green LED light: Indicates the selected PC port is active, whether the computer is not daisy chained. This number is 01 when the switch is turned on or off. LED Indicators Bank Number: Indicates the number or sequence of the switch when daisy chained. Push Buttons Press the push buttons to switch between computers, you can use the front-panel push buttons or the Hot Key commands. Red LED light: KVM cable is connected and PC is powering the KVM switch. Operation Note: To switch between computers. 5 ESPAÑOL
Quick Installation Guide
Page 8
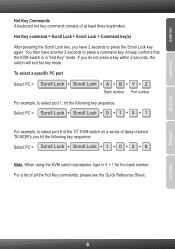
... PC = Scroll Lock + Scroll Lock + A + B + Y + Z Bank number Port number For example, to select port 1, hit the following key sequence: Select PC = Scroll Lock + Scroll Lock + 1 + 0 + 0 + 8 Note: When using the KVM switch standalone, type in "Hot Key" mode. If you hit the following key sequence: Select PC = Scroll Lock + Scroll...beep confirms that the KVM switch is in 0 + 1 for the bank number. You then have 2 seconds to select port 8 of the 10th KVM switch on a series of all the Hot Key commands, please see the Quick Reference Sheet. 6 For a list of daisy chained TK-802R's you do not...
... PC = Scroll Lock + Scroll Lock + A + B + Y + Z Bank number Port number For example, to select port 1, hit the following key sequence: Select PC = Scroll Lock + Scroll Lock + 1 + 0 + 0 + 8 Note: When using the KVM switch standalone, type in "Hot Key" mode. If you hit the following key sequence: Select PC = Scroll Lock + Scroll...beep confirms that the KVM switch is in 0 + 1 for the bank number. You then have 2 seconds to select port 8 of the 10th KVM switch on a series of all the Hot Key commands, please see the Quick Reference Sheet. 6 For a list of daisy chained TK-802R's you do not...

