Data Sheet
Page 1
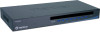
...-detect bank number (when daisy-chaining) • Built-in mind, you to control maximum of 128 PCs. Rich in the Server Room and computer lab. kvm 8-Port Stackable Rack Mount KVM Switch with OSD TK-802R(V1.1R) TK-802R 8-port Stackable KVM Switch allows you can stack up to 8 units together to manage multiple PCs with TRENDnet's TK802R.
...-detect bank number (when daisy-chaining) • Built-in mind, you to control maximum of 128 PCs. Rich in the Server Room and computer lab. kvm 8-Port Stackable Rack Mount KVM Switch with OSD TK-802R(V1.1R) TK-802R 8-port Stackable KVM Switch allows you can stack up to 8 units together to manage multiple PCs with TRENDnet's TK802R.
Data Sheet
Page 2
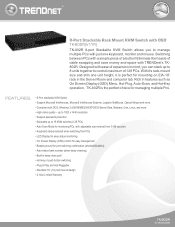
... Mount KVM Switch with OSD (TK-802R) Keyboard Mouse PC 7 PC 5 PC 3 PC 1 RELATED PRODUCTS TK-801R TK-803R TK-1602R 8-Port PC/2 Rack Mount KVM Switch 8-Port USB/PC/2 Rack Mount KVM Switch 16-Port Stackable Rack Mount KVM Switch with OSD ORDERING INFORMATION 20675 Manhattan Place,Torrance, CA 90501 USA Tel: 1-310-961-5500 Fax: 1-310-961-5511 Web: www.trendnet.com...
... Mount KVM Switch with OSD (TK-802R) Keyboard Mouse PC 7 PC 5 PC 3 PC 1 RELATED PRODUCTS TK-801R TK-803R TK-1602R 8-Port PC/2 Rack Mount KVM Switch 8-Port USB/PC/2 Rack Mount KVM Switch 16-Port Stackable Rack Mount KVM Switch with OSD ORDERING INFORMATION 20675 Manhattan Place,Torrance, CA 90501 USA Tel: 1-310-961-5500 Fax: 1-310-961-5511 Web: www.trendnet.com...
Quick Installation Guide
Page 4
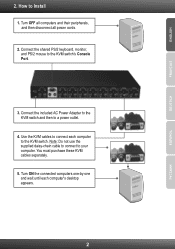
How to the KVM switch's Console Port. 3. ENGLISH FRANÇAIS DEUTSCH 2. Turn ON the connected computers one-by-one and wait until each computer to connect each computer's desktop ... OFF all computers and their peripherals, and then disconnect all power cords. 2. Connect the shared PS/2 keyboard, monitor, and PS/2 mouse to Install 1. Use the KVM cables to the KVM switch. Note: Do not use the supplied daisy-chain cable to connect to a power outlet. 4. You must purchase these...
How to the KVM switch's Console Port. 3. ENGLISH FRANÇAIS DEUTSCH 2. Turn ON the connected computers one-by-one and wait until each computer to connect each computer's desktop ... OFF all computers and their peripherals, and then disconnect all power cords. 2. Connect the shared PS/2 keyboard, monitor, and PS/2 mouse to Install 1. Use the KVM cables to the KVM switch. Note: Do not use the supplied daisy-chain cable to connect to a power outlet. 4. You must purchase these...
Quick Installation Guide
Page 5
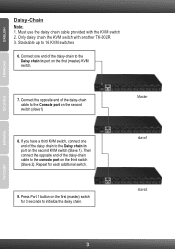
... on the second switch (slave1) 8. ENGLISH FRANÇAIS DEUTSCH Daisy-Chain Note: 1. Then connect the opposite end of the daisy chain to the Daisy chain in port on the first (master) switch for each additional switch. 9. Press Port 1 button on the first (master) KVM switch. 7. Must use the daisy chain cable provided with another TK-802R 3.
... on the second switch (slave1) 8. ENGLISH FRANÇAIS DEUTSCH Daisy-Chain Note: 1. Then connect the opposite end of the daisy chain to the Daisy chain in port on the first (master) switch for each additional switch. 9. Press Port 1 button on the first (master) KVM switch. 7. Must use the daisy chain cable provided with another TK-802R 3.
Quick Installation Guide
Page 6
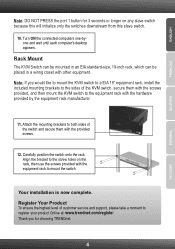
...OL Note: DO NOT PRESS the port 1 button for choosing TRENDnet. 4 Attach the mounting brackets to both sides of the switch and secure them with the screws provided, and then mount the KVM switch to register your product Online at: www.trendnet.com/register Thank you for 3 seconds or longer on the ...rack, then use the screws provided with other equipment. Note: If you would like to mount the KVM switch to a EIA 19" equipment rack, ...
...OL Note: DO NOT PRESS the port 1 button for choosing TRENDnet. 4 Attach the mounting brackets to both sides of the switch and secure them with the screws provided, and then mount the KVM switch to register your product Online at: www.trendnet.com/register Thank you for 3 seconds or longer on the ...rack, then use the screws provided with other equipment. Note: If you would like to mount the KVM switch to a EIA 19" equipment rack, ...
Quick Installation Guide
Page 7
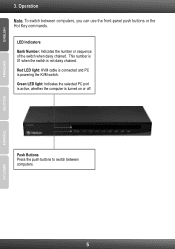
Red LED light: KVM cable is connected and PC is not daisy chained. This number is 01 when the switch is powering the KVM switch. LED Indicators Bank Number: Indicates the number or sequence of the switch when daisy chained. Operation Note: To switch between computers. 5 ESPAÑOL Green LED light: Indicates the selected PC port is active, whether the computer is turned on or off. ENGLISH FRANÇAIS DEUTSCH 3. Push Buttons Press the push buttons to switch between computers, you can use the front-panel push buttons or the Hot Key commands.
Red LED light: KVM cable is connected and PC is not daisy chained. This number is 01 when the switch is powering the KVM switch. LED Indicators Bank Number: Indicates the number or sequence of the switch when daisy chained. Operation Note: To switch between computers. 5 ESPAÑOL Green LED light: Indicates the selected PC port is active, whether the computer is turned on or off. ENGLISH FRANÇAIS DEUTSCH 3. Push Buttons Press the push buttons to switch between computers, you can use the front-panel push buttons or the Hot Key commands.
Quick Installation Guide
Page 8
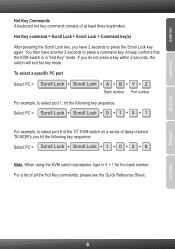
... Port number For example, to select port 1, hit the following key sequence: Select PC = Scroll Lock + Scroll Lock + 1 + 0 + 0 + 8 Note: When using the KVM switch standalone, type in "Hot Key" mode. If you hit the following key sequence: Select PC = Scroll Lock + Scroll Lock + 0 + 1 + 0 + 1 For example, to... press the Scroll Lock key again. A beep confirms that the KVM switch is in 0 + 1 for the bank number. For a list of daisy chained TK-802R's you do not press a key within 2 seconds, the switch will exit hot key mode. ENGLISH FRANÇAIS DEUTSCH ESPAÑOL Hot...
... Port number For example, to select port 1, hit the following key sequence: Select PC = Scroll Lock + Scroll Lock + 1 + 0 + 0 + 8 Note: When using the KVM switch standalone, type in "Hot Key" mode. If you hit the following key sequence: Select PC = Scroll Lock + Scroll Lock + 0 + 1 + 0 + 1 For example, to... press the Scroll Lock key again. A beep confirms that the KVM switch is in 0 + 1 for the bank number. For a list of daisy chained TK-802R's you do not press a key within 2 seconds, the switch will exit hot key mode. ENGLISH FRANÇAIS DEUTSCH ESPAÑOL Hot...
Quick Installation Guide
Page 11
... is on the reset button. 5. Can I switch from one computer to another with the TK-802R KVM switch. If this in. Type this does not work, follow the below procedure to the KVM switch. 3. What should I do I connect or disconnect the KVM cables while the computers are turned on the reset...Key commands. You can connect or disconnect the KVM cables while the computers are turned on the KVM switch or using a pin or paper clip. Yes, you still encounter problems or have any questions regarding the TK-802R, please contact TRENDnet's Technical Support Department. 9 Wait for the beep...
... is on the reset button. 5. Can I switch from one computer to another with the TK-802R KVM switch. If this in. Type this does not work, follow the below procedure to the KVM switch. 3. What should I do I connect or disconnect the KVM cables while the computers are turned on the reset...Key commands. You can connect or disconnect the KVM cables while the computers are turned on the KVM switch or using a pin or paper clip. Yes, you still encounter problems or have any questions regarding the TK-802R, please contact TRENDnet's Technical Support Department. 9 Wait for the beep...

