
Quick Installation Guide
Page 4
...-by-one and wait until each computer's desktop appears. PC 1, 2, 3, 4 (TK-401R) PC 1, 2, 3, 4, 5, 6, 7, 8 (TK-801R) PC 1, 2, 3, 4, 5, 6, 7, 8, 9, 10, 11, 12, 13, 14, 15, 16 (TK-1601R) 2 ESPAÑOL DEUTSCH ENGLISH Connect the included AC Power Adapter to the KVM switch and then to the KVM switch's Console Port. (TK-801R shown) FRANÇAIS 3. Connect the shared PS/2 keyboard, monitor...
...-by-one and wait until each computer's desktop appears. PC 1, 2, 3, 4 (TK-401R) PC 1, 2, 3, 4, 5, 6, 7, 8 (TK-801R) PC 1, 2, 3, 4, 5, 6, 7, 8, 9, 10, 11, 12, 13, 14, 15, 16 (TK-1601R) 2 ESPAÑOL DEUTSCH ENGLISH Connect the included AC Power Adapter to the KVM switch and then to the KVM switch's Console Port. (TK-801R shown) FRANÇAIS 3. Connect the shared PS/2 keyboard, monitor...
Quick Installation Guide
Page 5
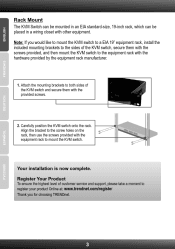
...rack manufacturer. Carefully position the KVM switch onto the rack. Your installation is now complete. Register Your Product To ensure the highest level of customer service and support, please take a moment to register your product Online at: www.trendnet.com/register Thank you would like... to mount the KVM switch to a EIA 19" equipment rack, install the included mounting brackets to the sides of the KVM switch and secure them with the screws provided, and then mount the KVM switch to mount the KVM switch. ESPAÑOL...
...rack manufacturer. Carefully position the KVM switch onto the rack. Your installation is now complete. Register Your Product To ensure the highest level of customer service and support, please take a moment to register your product Online at: www.trendnet.com/register Thank you would like... to mount the KVM switch to a EIA 19" equipment rack, install the included mounting brackets to the sides of the KVM switch and secure them with the screws provided, and then mount the KVM switch to mount the KVM switch. ESPAÑOL...
Quick Installation Guide
Page 6
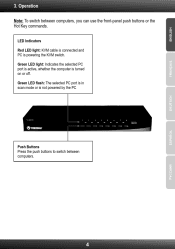
LED Indicators Red LED light: KVM cable is connected and PC is turned on or off. 3. Green LED flash: The selected PC port is in scan mode or is not powered by the PC DEUTSCH FRANÇAIS Push Buttons Press the push buttons to switch between computers, you can use the front-panel push buttons or the Hot Key commands. Green LED light: Indicates the selected PC port is active, whether the computer is powering the KVM switch. Operation Note: To switch between computers. 4 ESPAÑOL ENGLISH
LED Indicators Red LED light: KVM cable is connected and PC is turned on or off. 3. Green LED flash: The selected PC port is in scan mode or is not powered by the PC DEUTSCH FRANÇAIS Push Buttons Press the push buttons to switch between computers, you can use the front-panel push buttons or the Hot Key commands. Green LED light: Indicates the selected PC port is active, whether the computer is powering the KVM switch. Operation Note: To switch between computers. 4 ESPAÑOL ENGLISH

Quick Installation Guide
Page 7
...Lock + Y For example, to Select Port 1 on the KVM switch you hit the following key sequence Scroll Lock + Scroll Lock + 1 For TK-801R/TK-1601R ESPAÑOL Scroll Lock + Scroll Lock + Y + Z Y Z = Port number 01-08 (TK-801R) or Port number 01-16 (TK-160R) For example, to press the Scroll Lock key again.... A beep confirms that the KVM switch is in "Hot Key" mode. You then...
...Lock + Y For example, to Select Port 1 on the KVM switch you hit the following key sequence Scroll Lock + Scroll Lock + 1 For TK-801R/TK-1601R ESPAÑOL Scroll Lock + Scroll Lock + Y + Z Y Z = Port number 01-08 (TK-801R) or Port number 01-16 (TK-160R) For example, to press the Scroll Lock key again.... A beep confirms that the KVM switch is in "Hot Key" mode. You then...

Quick Installation Guide
Page 8
... Hot Keys Front-Panel Buttons Description Scroll Lock + Scroll Lock + Y (Y)= 1-digit port number (1-4) Select PC TK-801R/TK-1601R Press the Push Button for quick screen browsing of each channel Autoscan through every connected channel for quick screen browsing of each ... Scroll Lock + Scroll Lock + B --- Select the next higher PC channel Toggle On/Off beep sound during Autoscan mode Reset KVM Autoscan through every connected channel for a specific port to switch to that port Select the active PC channel (YZ)= 2-digit port number (01-16) Next lower channel Scroll Lock + Scroll...
... Hot Keys Front-Panel Buttons Description Scroll Lock + Scroll Lock + Y (Y)= 1-digit port number (1-4) Select PC TK-801R/TK-1601R Press the Push Button for quick screen browsing of each channel Autoscan through every connected channel for quick screen browsing of each ... Scroll Lock + Scroll Lock + B --- Select the next higher PC channel Toggle On/Off beep sound during Autoscan mode Reset KVM Autoscan through every connected channel for a specific port to switch to that port Select the active PC channel (YZ)= 2-digit port number (01-16) Next lower channel Scroll Lock + Scroll...
Quick Installation Guide
Page 10
... the TK-401R/TK-801R/TK-1601R, please contact Trendnet's Technical Support Department. 8 Can I connect or disconnect the KVM cables while the computers are functional, please reboot your PS/2 ports are turned on, because the interface is recommended that the PS/2 ports are turned on the KVM switch or ...using the Hot Key commands.. If you use the included external AC adapter with the TK-801R/ TK-1601R KVM switch. Once you confirm that you still encounter problems or have the KVM switch connected properly, but my keyboard and ...
... the TK-401R/TK-801R/TK-1601R, please contact Trendnet's Technical Support Department. 8 Can I connect or disconnect the KVM cables while the computers are functional, please reboot your PS/2 ports are turned on, because the interface is recommended that the PS/2 ports are turned on the KVM switch or ...using the Hot Key commands.. If you use the included external AC adapter with the TK-801R/ TK-1601R KVM switch. Once you confirm that you still encounter problems or have the KVM switch connected properly, but my keyboard and ...

