
Datasheet
Page 1
... Windows 7, Vista, XP, 2000 and Mac OS X operating systems • Easy user setup and intuitive diagnostic utility • Coverage of up to 50 meters indoor (160 feet) and 100 meters outdoor (320 feet) * • 3-year llimited warranty TEW-649UB ... a US penny. Wi-Fi Multimedia (WMM) Quality of a wireless g connection. wireless Mini Wireless N Speed USB Adapter TEW-649UB (V1.0R) The Mini Wireless N Speed USB Adapter (model TEW-649UB) connects a laptop or desktop computer to a wireless n network at up to 8x the speed and 4x the coverage of Service (QoS) prioritizes important video, ...
... Windows 7, Vista, XP, 2000 and Mac OS X operating systems • Easy user setup and intuitive diagnostic utility • Coverage of up to 50 meters indoor (160 feet) and 100 meters outdoor (320 feet) * • 3-year llimited warranty TEW-649UB ... a US penny. Wi-Fi Multimedia (WMM) Quality of a wireless g connection. wireless Mini Wireless N Speed USB Adapter TEW-649UB (V1.0R) The Mini Wireless N Speed USB Adapter (model TEW-649UB) connects a laptop or desktop computer to a wireless n network at up to 8x the speed and 4x the coverage of Service (QoS) prioritizes important video, ...

Datasheet
Page 2
Transmit mode : 320mA (max) • Windows 7 (32/64-bit)/ Vista (32/64-bit)/ XP(32/64-bit)/ 2000, Mac OS X (10.4, 10.5, 10.6) • 33.9 x 17 x 7mm (1.3 x 0.66 x 0.27 in on interference, network traffic, building materials and other conditions. Mini Wireless N Speed USB Adapter TEW-649UB (V1.0R) SPECIFICATIONS Hardware Interface Standards LED Indicator WPS Button Power Consumption Supported...
Transmit mode : 320mA (max) • Windows 7 (32/64-bit)/ Vista (32/64-bit)/ XP(32/64-bit)/ 2000, Mac OS X (10.4, 10.5, 10.6) • 33.9 x 17 x 7mm (1.3 x 0.66 x 0.27 in on interference, network traffic, building materials and other conditions. Mini Wireless N Speed USB Adapter TEW-649UB (V1.0R) SPECIFICATIONS Hardware Interface Standards LED Indicator WPS Button Power Consumption Supported...

User's Guide
Page 5
TABLE OF CONTENT Introduction ...5 Unpacking and Setup 6 Unpacking ...6 System Requirements 6 IDentifying external components 7 LED ...7 WPS Button...7 Wireless Performance Considerations 8 Software Installation 9 Windows Based Utility Installation 9 Wireless Utility Setting 14 Link Information 14 Configuration ...15 Site Survey ...19 Profile ...20 WPS...22 About ...27 Technical Specifications 28 iv
TABLE OF CONTENT Introduction ...5 Unpacking and Setup 6 Unpacking ...6 System Requirements 6 IDentifying external components 7 LED ...7 WPS Button...7 Wireless Performance Considerations 8 Software Installation 9 Windows Based Utility Installation 9 Wireless Utility Setting 14 Link Information 14 Configuration ...15 Site Survey ...19 Profile ...20 WPS...22 About ...27 Technical Specifications 28 iv

User's Guide
Page 7
.... System Requirements Before installation, check the following : Windows 2000 (Service Pack 4), XP (Service Pack 2), Windows Vista, Windows 7 ‹ A draft 802.11n or 802.11b/g access point. ‹ Make sure the environment has minimal interference and obstructions. 6 Unpacking The box should contain the following items: ‹ TEW‐649UB Wireless N USB Adapter ‹ Multi‐Language Quick Installation Guide...
.... System Requirements Before installation, check the following : Windows 2000 (Service Pack 4), XP (Service Pack 2), Windows Vista, Windows 7 ‹ A draft 802.11n or 802.11b/g access point. ‹ Make sure the environment has minimal interference and obstructions. 6 Unpacking The box should contain the following items: ‹ TEW‐649UB Wireless N USB Adapter ‹ Multi‐Language Quick Installation Guide...

User's Guide
Page 10
Windows Based Utility Installation 1) Insert the Utility and Driver CD‐ROM into your computer's CD‐ROM drive and then click Install Utility. 2) Follow the InstallShield Wizard Instructions 9 SOFTWARE INSTALLATION This section describes how to install the driver and utility for the Wireless N USB Adapter.
Windows Based Utility Installation 1) Insert the Utility and Driver CD‐ROM into your computer's CD‐ROM drive and then click Install Utility. 2) Follow the InstallShield Wizard Instructions 9 SOFTWARE INSTALLATION This section describes how to install the driver and utility for the Wireless N USB Adapter.

User's Guide
Page 11
Driver Installation Windows Vista 1) Drivers will install automatically. Windows XP 1) The Found New Hardware Wizard appears Select No, not this time and then click Next. 10 3) Click Finish. 4) Plug the Wireless N USB Adapter into an available USB slot on your computer.
Driver Installation Windows Vista 1) Drivers will install automatically. Windows XP 1) The Found New Hardware Wizard appears Select No, not this time and then click Next. 10 3) Click Finish. 4) Plug the Wireless N USB Adapter into an available USB slot on your computer.

User's Guide
Page 24
4) If the WPS configuration was successful, the follow window will show on. 5) If the WPS configuration was failed, the follow window will show on. 23
4) If the WPS configuration was successful, the follow window will show on. 5) If the WPS configuration was failed, the follow window will show on. 23

User's Guide
Page 25
...a PIN into my access point", the PIN will be show on the button of the windows. 2) Enter the PIN code into the WPS "Clint PIN number" of you wireless access point or router then click the Start PIN button, the wireless access point or router will start the WPS configuration process. 3) Selected... a wireless access point or router which one will be connecting then click the Next button start...
...a PIN into my access point", the PIN will be show on the button of the windows. 2) Enter the PIN code into the WPS "Clint PIN number" of you wireless access point or router then click the Start PIN button, the wireless access point or router will start the WPS configuration process. 3) Selected... a wireless access point or router which one will be connecting then click the Next button start...

User's Guide
Page 27
4) If the WPS configuration was successful, the follow window will show on. 5) If the WPS configuration was failed, the follow window will show on. 26
4) If the WPS configuration was successful, the follow window will show on. 5) If the WPS configuration was failed, the follow window will show on. 26

User's Guide
Page 29
... Interface USB 2.0 Standards IEEE 802.11b, IEEE 802.11g and IEEE 802.11n LED Indicator Activity, WPS WPS Button Enables WPS connection Power Consumption Receive mode: 290mA (max) ; Transmit mode : 320mA (max) Supported OS Windows 2000,... XP(32/64‐bit)/Vista (32/64‐bit) Dimensions (LxWxH) 33.9 x 17 x 7mm (1.3 x 0.7 x 0.3in) Weight 3g (0.1oz) Temperature Operating: 0° ~ 40° C (32° ~ 104° F); Storage: ‐10° ~ 70° C (14° ~ 158° F) Humidity 10% ~ 95% max (non‐condensing) Certifications CE, FCC Wireless...
... Interface USB 2.0 Standards IEEE 802.11b, IEEE 802.11g and IEEE 802.11n LED Indicator Activity, WPS WPS Button Enables WPS connection Power Consumption Receive mode: 290mA (max) ; Transmit mode : 320mA (max) Supported OS Windows 2000,... XP(32/64‐bit)/Vista (32/64‐bit) Dimensions (LxWxH) 33.9 x 17 x 7mm (1.3 x 0.7 x 0.3in) Weight 3g (0.1oz) Temperature Operating: 0° ~ 40° C (32° ~ 104° F); Storage: ‐10° ~ 70° C (14° ~ 158° F) Humidity 10% ~ 95% max (non‐condensing) Certifications CE, FCC Wireless...
Quick Installation Guide
Page 4
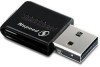
ENGLISH FRANÇAIS DEUTSCH 2. Insert the Utility & Driver CD-ROM into your computer's CD-ROM Drive. 2. How to do so 1. Click Install Utility. 4. Click Run autorun.exe (Windows Vista/7 only). 3. Click Next. Then follow the InstallShield Wizard instructions. 2 ESPAÑOL DO NOT install the USB Adapter in the computer until instructed to Install Important!
ENGLISH FRANÇAIS DEUTSCH 2. Insert the Utility & Driver CD-ROM into your computer's CD-ROM Drive. 2. How to do so 1. Click Install Utility. 4. Click Run autorun.exe (Windows Vista/7 only). 3. Click Next. Then follow the InstallShield Wizard instructions. 2 ESPAÑOL DO NOT install the USB Adapter in the computer until instructed to Install Important!
Quick Installation Guide
Page 5
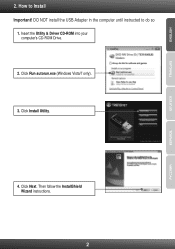
Click Yes (Windows 2000). 5. Click Continue Anyway (Windows XP). 6. ENGLISH FRANÇAIS DEUTSCH ESPAÑOL 5. Connect the wireless adapter to an available USB port on your CD-ROM drive. 8. Remove the Utility & Driver CD-ROM from your computer. 3 Click Finish. 7.
Click Yes (Windows 2000). 5. Click Continue Anyway (Windows XP). 6. ENGLISH FRANÇAIS DEUTSCH ESPAÑOL 5. Connect the wireless adapter to an available USB port on your CD-ROM drive. 8. Remove the Utility & Driver CD-ROM from your computer. 3 Click Finish. 7.

Quick Installation Guide
Page 6
For Windows 2000 and XP, continue on to Section 3 Using the Wireless Adapter. Windows XP Windows 2000 9. Select Install this time and then click Next. 9. DEUTSCH ESPAÑOL 10. The Found New Hardware Wizard appears Select No, not this software automatically (recommended) and then click Next. 4 Continue on to section 3 Using the Wireless Adapter. Proceed to step 9. Click Yes. 10. ENGLISH FRANÇAIS Note: For Windows Vista/7, drivers will install automatically. Driver installation is complete.
For Windows 2000 and XP, continue on to Section 3 Using the Wireless Adapter. Windows XP Windows 2000 9. Select Install this time and then click Next. 9. DEUTSCH ESPAÑOL 10. The Found New Hardware Wizard appears Select No, not this software automatically (recommended) and then click Next. 4 Continue on to section 3 Using the Wireless Adapter. Proceed to step 9. Click Yes. 10. ENGLISH FRANÇAIS Note: For Windows Vista/7, drivers will install automatically. Driver installation is complete.

Quick Installation Guide
Page 9
...Driver CD-ROM or contact TRENDnet's Technical Support Department. 7 Double-click the Wireless Configuration Utility icon, click Site Survey and then click Refresh to check and see a networking device with your network administrator for more information regarding the TEW-649UB, please refer to the ...Run, and type D:\autorun where "D" in Section 2) before connecting the Wireless USB Adapter to reinstall the device and/or the drivers. 1. To access the device manager on Windows 7, click on the Windows icon on Windows 2000/XP, right-click My Computer, click Properties, click the Hardware ...
...Driver CD-ROM or contact TRENDnet's Technical Support Department. 7 Double-click the Wireless Configuration Utility icon, click Site Survey and then click Refresh to check and see a networking device with your network administrator for more information regarding the TEW-649UB, please refer to the ...Run, and type D:\autorun where "D" in Section 2) before connecting the Wireless USB Adapter to reinstall the device and/or the drivers. 1. To access the device manager on Windows 7, click on the Windows icon on Windows 2000/XP, right-click My Computer, click Properties, click the Hardware ...
