User's Guide
Page 2
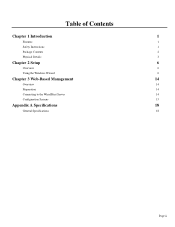
Table of Contents Chapter 1 Introduction 1 Features 1 Safety Instructions 1 Package Contents 2 Physical Details 3 Chapter 2 Setup 6 Overview 6 Using the Windows Wizard 6 Chapter 3 Web-Based Management 14 Overview 14 Preparation 14 Connecting to the WiredPrint Server 14 Configuration Screens 15 Appendix A Specifications 18 General Specifications 18 Page ii
Table of Contents Chapter 1 Introduction 1 Features 1 Safety Instructions 1 Package Contents 2 Physical Details 3 Chapter 2 Setup 6 Overview 6 Using the Windows Wizard 6 Chapter 3 Web-Based Management 14 Overview 14 Preparation 14 Connecting to the WiredPrint Server 14 Configuration Screens 15 Appendix A Specifications 18 General Specifications 18 Page ii

User's Guide
Page 3
... configuration Includes one USB 2.0 port and one RJ-45 10/100Mbps auto-sensing Fast Ethernet port 3-year limited warranty Safety Instructions For your own safety, and to protect your Print Server, please observe the following conditions: The power cord is properly shielded and ...on an unstable surface. Page 1 The device may expose you are not sure of type of your local power supply, consult your new TE100-MP1UN. Do not attempt to service this device, as opening or removing casing may fall causing serious damage to water poses an electric-shock hazard....
... configuration Includes one USB 2.0 port and one RJ-45 10/100Mbps auto-sensing Fast Ethernet port 3-year limited warranty Safety Instructions For your own safety, and to protect your Print Server, please observe the following conditions: The power cord is properly shielded and ...on an unstable surface. Page 1 The device may expose you are not sure of type of your local power supply, consult your new TE100-MP1UN. Do not attempt to service this device, as opening or removing casing may fall causing serious damage to water poses an electric-shock hazard....

Quick Installation Guide
Page 3
...: 1. CD-ROM (Utility and User's Guide) ? The utility must be installed on each computer in order to do so: 1. Do not perform the following unless instructed to use your multi-function printer. 1 Install the utility 2. TE100-MP1UN ? Connect printer to Print Server 2. Connect computer to printer server 3. 1.
...: 1. CD-ROM (Utility and User's Guide) ? The utility must be installed on each computer in order to do so: 1. Do not perform the following unless instructed to use your multi-function printer. 1 Install the utility 2. TE100-MP1UN ? Connect printer to Print Server 2. Connect computer to printer server 3. 1.

Quick Installation Guide
Page 4
2. Then click Setup Wizard. 5. Note: Please refer to your computer. Insert the Utility CD-ROM into your printer's manual for printer installation instructions. 2. Click Install Utility. Then click OK. 2 Connect the USB Printer to Installation 1. How to the USB port of the Print Server. Click Run Autorun.exe (Windows Vista only). 4. Then power down the printer and disconnect the printer from your computer. Install the printer drivers to your CD-ROM drive. 3.
2. Then click Setup Wizard. 5. Note: Please refer to your computer. Insert the Utility CD-ROM into your printer's manual for printer installation instructions. 2. Click Install Utility. Then click OK. 2 Connect the USB Printer to Installation 1. How to the USB port of the Print Server. Click Run Autorun.exe (Windows Vista only). 4. Then power down the printer and disconnect the printer from your computer. Install the printer drivers to your CD-ROM drive. 3.
Quick Installation Guide
Page 7
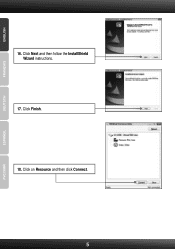
Click Next and then follow the InstallShield Wizard instructions. 17. 16. Click on Resource and then click Connect. 5 Click Finish. 18.
Click Next and then follow the InstallShield Wizard instructions. 17. 16. Click on Resource and then click Connect. 5 Click Finish. 18.
Quick Installation Guide
Page 10
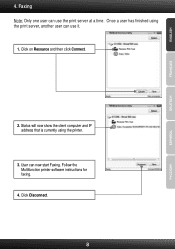
Status will now show the client computer and IP address that is currently using the print server, another user can use the print server at a time. Once a user has finished using the printer. 3. Click on Resource and then click Connect. 2. Faxing Note: Only one user can now start Faxing. Click Disconnect. 8 User can use it. 1. Follow the Multifunction printer software instructions for faxing. 4. 4.
Status will now show the client computer and IP address that is currently using the print server, another user can use the print server at a time. Once a user has finished using the printer. 3. Click on Resource and then click Connect. 2. Faxing Note: Only one user can now start Faxing. Click Disconnect. 8 User can use it. 1. Follow the Multifunction printer software instructions for faxing. 4. 4.

Quick Installation Guide
Page 11
Click on the Multi-Function Printer's Scanner bed. Scanner Note: Only one user can use the print server at a time. Then follow the Multifunction printer software instructions for scanning. 4. Click Disconnect. 9 Once a user has finished using the printer. 3. Status will now show the client computer and IP address that is currently using the print server, another user can use it. 1. Place the document on Resource and then click Connect. 2. 5.
Click on the Multi-Function Printer's Scanner bed. Scanner Note: Only one user can use the print server at a time. Then follow the Multifunction printer software instructions for scanning. 4. Click Disconnect. 9 Once a user has finished using the printer. 3. Status will now show the client computer and IP address that is currently using the print server, another user can use it. 1. Place the document on Resource and then click Connect. 2. 5.