
Surveillance Manager User Guide
Page 8
... the Remember User to the system by the manufacturer. Chapter 3 Quick Start 3.1 Install IP Camera(s) Step1: Set up the IP camera(s) by following the instruction manual provided by following the steps below. 3.2 Add IP Camera(s) Step1: Click Start → All Programs → Surveillancee_Manager →Surveillancee_Manager. Step3: Click the system setup icon...
... the Remember User to the system by the manufacturer. Chapter 3 Quick Start 3.1 Install IP Camera(s) Step1: Set up the IP camera(s) by following the instruction manual provided by following the steps below. 3.2 Add IP Camera(s) Step1: Click Start → All Programs → Surveillancee_Manager →Surveillancee_Manager. Step3: Click the system setup icon...

Surveillance Manager User Guide
Page 39
... and match the schedule setting. ) Note: The System accepts maximum 10 detection schedule settings. ¾ Event Setting/ Edit Event / Advance Setting/ Motion: 36 Detect by Manual: Once event was triggered, it from Event Report dialog. z Auto Stop Type: Alarm Stop by Schedule: The detection job will execute when Alarm Monitor is...
... and match the schedule setting. ) Note: The System accepts maximum 10 detection schedule settings. ¾ Event Setting/ Edit Event / Advance Setting/ Motion: 36 Detect by Manual: Once event was triggered, it from Event Report dialog. z Auto Stop Type: Alarm Stop by Schedule: The detection job will execute when Alarm Monitor is...
Surveillance Manager User Guide
Page 59
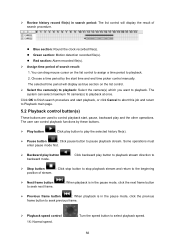
... this job and return to Playback main page. 5.2 Playback control button(s) These buttons are used to control playback start time and end time picker control manually. The user can select maximum 16 camera(s) to playback at once. The system can control playback functions by the start , pause, backward play the selected...
... this job and return to Playback main page. 5.2 Playback control button(s) These buttons are used to control playback start time and end time picker control manually. The user can select maximum 16 camera(s) to playback at once. The system can control playback functions by the start , pause, backward play the selected...
TL-SC3230 V1 QIG 7106504101
Page 2
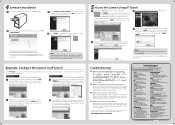
...the Resource CD. For detailed instruction, please refer to its label. Note: If the information bar does not show up and list all active TP-LINK camera devices. Click "" button to move to next page. 1 Select the camera you want to the User Guide on its MAC address, ...refer to con gure and click the "WIRELESS" button. Double click the selected camera and you will display on its user manual included. 4 If you are accessing the Camera for TL-SC3230N only. Click "SEARCH", the main page will appear. Click the "Install" button. Click ">>" to complete the setup and...
...the Resource CD. For detailed instruction, please refer to its label. Note: If the information bar does not show up and list all active TP-LINK camera devices. Click "" button to move to next page. 1 Select the camera you want to the User Guide on its MAC address, ...refer to con gure and click the "WIRELESS" button. Double click the selected camera and you will display on its user manual included. 4 If you are accessing the Camera for TL-SC3230N only. Click "SEARCH", the main page will appear. Click the "Install" button. Click ">>" to complete the setup and...

TL-SC3230N V1 User Guide
Page 8
....1 Setting 56 6.13.2 Record 60 Appendix A: Troubleshooting & FAQ 62 Appendix B: PING IP Address 67 Appendix C: Bandwidth Estimation 68 Appendix D: Specifications 69 Appendix E: Configure Port Forwarding Manually 71 Appendix F: DDNS Application 74 Appendix G: Power Line Frequency 81 Appendix H: 3GPP 82 Appendix I: Enable UPnP of Windows XP 83
....1 Setting 56 6.13.2 Record 60 Appendix A: Troubleshooting & FAQ 62 Appendix B: PING IP Address 67 Appendix C: Bandwidth Estimation 68 Appendix D: Specifications 69 Appendix E: Configure Port Forwarding Manually 71 Appendix F: DDNS Application 74 Appendix G: Power Line Frequency 81 Appendix H: 3GPP 82 Appendix I: Enable UPnP of Windows XP 83
TL-SC3230N V1 User Guide
Page 10
... instant, ondemand video streams. Within minutes you will potentially save thousands of dollars from a computer. Chapter 1 Overview The user guide explains how to operate this manual completely and carefully before operating the camera. 1.1 Introduction This camera is accessible via the LAN or Internet connection. z Image transmission using an FTP or e-mail...
... instant, ondemand video streams. Within minutes you will potentially save thousands of dollars from a computer. Chapter 1 Overview The user guide explains how to operate this manual completely and carefully before operating the camera. 1.1 Introduction This camera is accessible via the LAN or Internet connection. z Image transmission using an FTP or e-mail...

TL-SC3230N V1 User Guide
Page 12
Chapter 2 Physical Description 2.1 Front View Antenna Lens & focus ring Microphone Micro SD Card Slot Antenna: The user can insert a micro SD card into this ring to adjust focus manually. Micro SD Card Slot: The user can attach the included antenna to get higher performance. Microphone: The camera has a built-in the pinhole located on the front panel. This camera has a SMA type antenna. This microphone is hidden in internal microphone. Lens & focus ring: The user could use another high-gain antenna to antenna connector (SMA type) or use this slot for event recording. 4
Chapter 2 Physical Description 2.1 Front View Antenna Lens & focus ring Microphone Micro SD Card Slot Antenna: The user can insert a micro SD card into this ring to adjust focus manually. Micro SD Card Slot: The user can attach the included antenna to get higher performance. Microphone: The camera has a built-in the pinhole located on the front panel. This camera has a SMA type antenna. This microphone is hidden in internal microphone. Lens & focus ring: The user could use another high-gain antenna to antenna connector (SMA type) or use this slot for event recording. 4

TL-SC3230N V1 User Guide
Page 22
... broadband router to allow access to this function. To do this, enable the NAT-traversal feature, which will connect to the camera. Please check user's manual of your Desktop and click My Network Places. Most new home routers should support this camera automatically. 4.3 Install the camera behind a NAT Router Once installed...
... broadband router to allow access to this function. To do this, enable the NAT-traversal feature, which will connect to the camera. Please check user's manual of your Desktop and click My Network Places. Most new home routers should support this camera automatically. 4.3 Install the camera behind a NAT Router Once installed...
TL-SC3230N V1 User Guide
Page 31
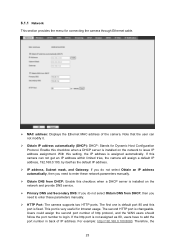
...address. ¾ IP address, Subnet mask, and Gateway: If you do not select Obtain DNS from DHCP, then you need to enter these network parameters manually. ¾ Obtain DNS from DHCP: Enable this camera can not modify it. ¾ Obtain IP address automatically (DHCP): DHCP: Stands for Dynamic Host ... service. ¾ Primary DNS and Secondary DNS: If you do not select Obtain an IP address automatically, then you need to enter these parameters manually. ¾ HTTP Port: The camera supports two HTTP ports. Note that the user can not get an IP address within limited tries, the camera...
...address. ¾ IP address, Subnet mask, and Gateway: If you do not select Obtain DNS from DHCP, then you need to enter these network parameters manually. ¾ Obtain DNS from DHCP: Enable this camera can not modify it. ¾ Obtain IP address automatically (DHCP): DHCP: Stands for Dynamic Host ... service. ¾ Primary DNS and Secondary DNS: If you do not select Obtain an IP address automatically, then you need to enter these parameters manually. ¾ HTTP Port: The camera supports two HTTP ports. Note that the user can not get an IP address within limited tries, the camera...

TL-SC3230N V1 User Guide
Page 33
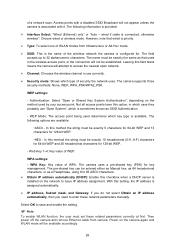
Step 2: Key in security key of the WLAN card. Then click "Submit" button to configure wireless settings manually, please follow the steps as below: ¾ MAC address: Displays the Ethernet MAC address of WEP or WPA. It will refresh information window which list the result 25 Note that the user can not change it. ¾ Site survey: Click the "Refresh" button. If the user wants to activate wireless setting.
Step 2: Key in security key of the WLAN card. Then click "Submit" button to configure wireless settings manually, please follow the steps as below: ¾ MAC address: Displays the Ethernet MAC address of WEP or WPA. It will refresh information window which list the result 25 Note that the user can not change it. ¾ Site survey: Click the "Refresh" button. If the user wants to activate wireless setting.
TL-SC3230N V1 User Guide
Page 34
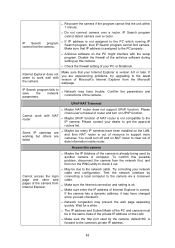
... which key type is associated with a disabled SSID Broadcast will attempt to 32 alphanumeric characters. The name must set these network parameters manually. WEP settings: - Select OK to enter these related parameters correctly at first. Then power off the camera and remove Ethernet cable ...the nearest open network. ¾ Channel: Chooses the wireless channel in the wireless access point, or the connection will be entered either as Manual hex, as 64 hexadecimal characters, or as a Passphrase, using 8 to issue IP address assignment. Access points with it. WPA Key:...
... which key type is associated with a disabled SSID Broadcast will attempt to 32 alphanumeric characters. The name must set these network parameters manually. WEP settings: - Select OK to enter these related parameters correctly at first. Then power off the camera and remove Ethernet cable ...the nearest open network. ¾ Channel: Chooses the wireless channel in the wireless access point, or the connection will be entered either as Manual hex, as 64 hexadecimal characters, or as a Passphrase, using 8 to issue IP address assignment. Access points with it. WPA Key:...

TL-SC3230N V1 User Guide
Page 47
... PC: Click this option if you want to enable time synchronization with PC or remote NTP server. 6.3.2 Date & Time You can set time and date manually. - Manual setting: Click this option to synchronize time locally. ¾ Server Date & Time: Displays the date and time of the camera. ¾ PC Time: Displays the...
... PC: Click this option if you want to enable time synchronization with PC or remote NTP server. 6.3.2 Date & Time You can set time and date manually. - Manual setting: Click this option to synchronize time locally. ¾ Server Date & Time: Displays the date and time of the camera. ¾ PC Time: Displays the...
TL-SC3230N V1 User Guide
Page 71
... address of resource to the latest version of date information inside router. If the camera has a dynamic address, it . Wait for a while. Please check user's manual of router and turn off and on NAT router to the IP camera. z The IP address and Subnet Mask of NAT router is not compatible...
... address of resource to the latest version of date information inside router. If the camera has a dynamic address, it . Wait for a while. Please check user's manual of router and turn off and on NAT router to the IP camera. z The IP address and Subnet Mask of NAT router is not compatible...

TL-SC3230N V1 User Guide
Page 72
... downloading and scripting of camera. Refer to default setting and installed it 's not working after above procedure, reset camera to your router's manual for details. z If it again. Check the camera's ActiveX is an entry for further help. Check your system or network administrator. ...Refer to reduce the required bandwidth. z The port number assigned in your camera might be available via Internet. Contact your router's manual for details. You may need to set up not to see if there is installed on your LAN. The firewall may choose lower...
... downloading and scripting of camera. Refer to default setting and installed it 's not working after above procedure, reset camera to your router's manual for details. z If it again. Check the camera's ActiveX is an entry for further help. Check your system or network administrator. ...Refer to reduce the required bandwidth. z The port number assigned in your camera might be available via Internet. Contact your router's manual for details. You may need to set up not to see if there is installed on your LAN. The firewall may choose lower...
TL-SC3230N V1 User Guide
Page 79
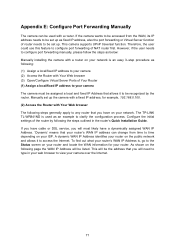
...the Internet. 71 However, if the user needs to configure port forwarding manually, please follow the steps as below: Manually installing the camera with Your Web browser (3) Open/Configure Virtual Server Ports of the router by the router. The TP-LINK TL-WR841ND is an easy 3-step procedure as following: (1) Assign a ... port forwarding of router needs to be set up as an example to clarify the configuration process. Appendix E: Configure Port Forwarding Manually The camera can change from the WAN, its IP address needs to be set up. This camera supports UPnP traversal function.
...the Internet. 71 However, if the user needs to configure port forwarding manually, please follow the steps as below: Manually installing the camera with Your Web browser (3) Open/Configure Virtual Server Ports of the router by the router. The TP-LINK TL-WR841ND is an easy 3-step procedure as following: (1) Assign a ... port forwarding of router needs to be set up as an example to clarify the configuration process. Appendix E: Configure Port Forwarding Manually The camera can change from the WAN, its IP address needs to be set up. This camera supports UPnP traversal function.

TL-SC3230N V1 User Guide
Page 81
... service port range (e.g., 80) in the IP Address box. 4. Click the Save button. By now, you have the service that you want to your user manual for specific instructions on Forwarding→Virtual Server. the video from WAN by the router's WAN IP Address. The Virtual Server ports used by clicking...
... service port range (e.g., 80) in the IP Address box. 4. Click the Save button. By now, you have the service that you want to your user manual for specific instructions on Forwarding→Virtual Server. the video from WAN by the router's WAN IP Address. The Virtual Server ports used by clicking...

TL-SC3230N V1 User Guide
Page 87
Set up the DDNS and PPPoE of Camera At last, users have to 79 (11) We could create a domain name without any charge at this step. Please check the user manual to enter the web page of camera and set up the necessary information of DDNS and PPPoE after the application of DDNS service. First, we input the host name. (Pink No.1) Then we pick a domain that is easy to remember. (Pink No.2) The 3rd step is to click "Offline Hostname" from Service Type. (Pink No.3) Finally, click the "Create Host" to submit the domain name information and finish DDNS application. (Pink No.4) 1 2 3 4 4.
Set up the DDNS and PPPoE of Camera At last, users have to 79 (11) We could create a domain name without any charge at this step. Please check the user manual to enter the web page of camera and set up the necessary information of DDNS and PPPoE after the application of DDNS service. First, we input the host name. (Pink No.1) Then we pick a domain that is easy to remember. (Pink No.2) The 3rd step is to click "Offline Hostname" from Service Type. (Pink No.3) Finally, click the "Create Host" to submit the domain name information and finish DDNS application. (Pink No.4) 1 2 3 4 4.