User Guide
Page 2
Camera ...4 3.1 Setup...5 3.2 Upgrade ...12 3.3 Factory Default ...13 3.4 Reboot ...14 4. How to Use Intelligent IP Installer 1 1. About...25 User ...15 4.1 Info ...18 4.2 User ...19 4.3 Date/Time ...20 4.4 TCP/IP ...21 4.5 PPPoE...23 4.6 DDNS ...24 5. Initial use Intelligent IP Installer 2 2. Configuration of Main Menu 3 3.
Camera ...4 3.1 Setup...5 3.2 Upgrade ...12 3.3 Factory Default ...13 3.4 Reboot ...14 4. How to Use Intelligent IP Installer 1 1. About...25 User ...15 4.1 Info ...18 4.2 User ...19 4.3 Date/Time ...20 4.4 TCP/IP ...21 4.5 PPPoE...23 4.6 DDNS ...24 5. Initial use Intelligent IP Installer 2 2. Configuration of Main Menu 3 3.

User Guide
Page 7
... Information: The system information is displayed. Press Next to continue, Previous to go back, Cancel to go to the main page. 5 Link to IE:After searching Network Cameras in network, you can click to specific Network Cameras in search area and press Link to IE to use setup to change the configurations.
... Information: The system information is displayed. Press Next to continue, Previous to go back, Cancel to go to the main page. 5 Link to IE:After searching Network Cameras in network, you can click to specific Network Cameras in search area and press Link to IE to use setup to change the configurations.

User Guide
Page 23
... and 65535. ) Note: When you have set the HTTP port number to a number other than 80 on the Network setting page or in the Setup Program, access the camera by typing the IP address of the camera on the web browser as follows: Example: when HTTP port number is set...
... and 65535. ) Note: When you have set the HTTP port number to a number other than 80 on the Network setting page or in the Setup Program, access the camera by typing the IP address of the camera on the web browser as follows: Example: when HTTP port number is set...

User Guide
Page 4
Live Streaming Server 50 6.11 About Main Console 53 7.1 Setup Panel...55 7.1.1. Setup Panel-Server 56 7.2 Show Camera(s) On the Display Screen 56 7.2.1. Log In/ Log Out 57 7.2.2. PTZ Camera Control 57 7.2.4. Digital Zoom:...58 7.2.5. Information Display Window 58 8.1 Server IP...59 8.2 Remote Live Viewer 59 8.3 Remote Playback ...60 Backup...46 6.9.2. Delete Recorded Information from the System 48 6.10 Network Service ...50 6.10.1. Server and Camera List 57 7.2.3. Play/ Stop/Drop 58 7.2.6. 6.9 Backup ...46 6.9.1.
Live Streaming Server 50 6.11 About Main Console 53 7.1 Setup Panel...55 7.1.1. Setup Panel-Server 56 7.2 Show Camera(s) On the Display Screen 56 7.2.1. Log In/ Log Out 57 7.2.2. PTZ Camera Control 57 7.2.4. Digital Zoom:...58 7.2.5. Information Display Window 58 8.1 Server IP...59 8.2 Remote Live Viewer 59 8.3 Remote Playback ...60 Backup...46 6.9.2. Delete Recorded Information from the System 48 6.10 Network Service ...50 6.10.1. Server and Camera List 57 7.2.3. Play/ Stop/Drop 58 7.2.6. 6.9 Backup ...46 6.9.1.
User Guide
Page 5
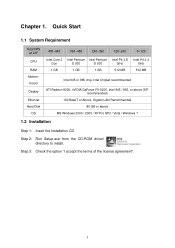
... Above, Gigabit LAN Recommended 80 GB or above MS Windows 2000 / 2003 / XP Pro SP2 / Vista / Windows 7 1.2 Installation Step 1: Insert the Installation CD. Step 2: Run Setup.exe from the CD-ROM driver/ directory to install. Step 3: Check the option "I accept the terms of the license agreement". 1
... Above, Gigabit LAN Recommended 80 GB or above MS Windows 2000 / 2003 / XP Pro SP2 / Vista / Windows 7 1.2 Installation Step 1: Insert the Installation CD. Step 2: Run Setup.exe from the CD-ROM driver/ directory to install. Step 3: Check the option "I accept the terms of the license agreement". 1
User Guide
Page 7
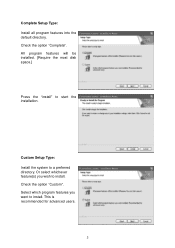
Check the option "Complete". Custom Setup Type: Install the system to install. Check the option "Custom". Select which program features you wish to start the installation. Complete Setup Type: Install all program features into the default directory. This is recommended for advanced users. 3 Or select whichever feature(s) you want to a preferred directory. All program features will be installed. [Require the most disk space.] Press the "install" to install.
Check the option "Complete". Custom Setup Type: Install the system to install. Check the option "Custom". Select which program features you wish to start the installation. Complete Setup Type: Install all program features into the default directory. This is recommended for advanced users. 3 Or select whichever feature(s) you want to a preferred directory. All program features will be installed. [Require the most disk space.] Press the "install" to install.

User Guide
Page 8
Select the features setup will install files. Press "Finish" to finish the installation. 4 Hint: For example, select only Playback and LiveView for installation. Install and use only these features on multiple remote sites at home or anywhere with a PC. Select folder where setup will install.
Select the features setup will install files. Press "Finish" to finish the installation. 4 Hint: For example, select only Playback and LiveView for installation. Install and use only these features on multiple remote sites at home or anywhere with a PC. Select folder where setup will install.

User Guide
Page 9
... Console. Step 3 5 Step 2: Check the network between the IP camera(s) and the system. Now enjoy our Intelligent Surveillance Solution. 1.3 Quick Start Install IP camera(s) Step 1: Setup the IP camera(s) following below steps. Step 2: Type in user name and password and log on to the system following by the instruction manual provided...
... Console. Step 3 5 Step 2: Check the network between the IP camera(s) and the system. Now enjoy our Intelligent Surveillance Solution. 1.3 Quick Start Install IP camera(s) Step 1: Setup the IP camera(s) following below steps. Step 2: Type in user name and password and log on to the system following by the instruction manual provided...
User Guide
Page 14
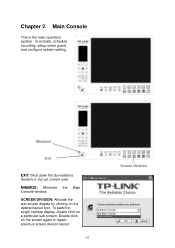
Main Console This is the main operation system - SCREEN DIVISION: Allocate the sub-screen display by clicking on the screen again to regain previous screen division layout. 10 Screen Division to single camera display, double click on a particular sub-screen. Chapter 2. To switch to activate, schedule recording, setup smart guard and configure system setting. Minimize Exit EXIT: Shut down the Surveillance System or log out current user. Double click on the desired layout icon. MINIMIZE: Minimize the Main Console window.
Main Console This is the main operation system - SCREEN DIVISION: Allocate the sub-screen display by clicking on the screen again to regain previous screen division layout. 10 Screen Division to single camera display, double click on a particular sub-screen. Chapter 2. To switch to activate, schedule recording, setup smart guard and configure system setting. Minimize Exit EXIT: Shut down the Surveillance System or log out current user. Double click on the desired layout icon. MINIMIZE: Minimize the Main Console window.

User Guide
Page 16
... for detail. GUARD: Add/edit type(s) of the stored data, save / load configuration settings, start counting application, access log viewer and backup files, or setup network services. Guard Schedule Playback Config PLAYBACK: Click on page 36 for detail. See Schedule on page 42 for detail.... setup reaction(s) responding to detect; See Config on page 30 for detail. See Guard on the icon to modify general setting, save video/ pictures, print ...
... for detail. GUARD: Add/edit type(s) of the stored data, save / load configuration settings, start counting application, access log viewer and backup files, or setup network services. Guard Schedule Playback Config PLAYBACK: Click on page 36 for detail. See Schedule on page 42 for detail.... setup reaction(s) responding to detect; See Config on page 30 for detail. See Guard on the icon to modify general setting, save video/ pictures, print ...
User Guide
Page 17
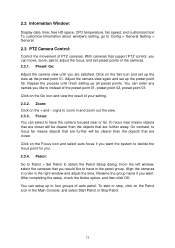
... that you want the system to decide the focus point for you like to zoom in the right window and adjust the time. You can setup up all preset points. Click on the + and - Patrol: Go to Patrol > Set Patrol to Config > General Setting > General 2.3 PTZ Camera Control: Control ...the movement of the preset point 01, preset point 02, preset point 03. To customize Information about window's setting, go to obtain the Patrol Setup dialog. Preset/ Go: Adjust the camera view until finish setting up to instead of PTZ cameras. Adjust the camera view again and set preset points...
... that you want the system to decide the focus point for you like to zoom in the right window and adjust the time. You can setup up all preset points. Click on the + and - Patrol: Go to Patrol > Set Patrol to Config > General Setting > General 2.3 PTZ Camera Control: Control ...the movement of the preset point 01, preset point 02, preset point 03. To customize Information about window's setting, go to obtain the Patrol Setup dialog. Preset/ Go: Adjust the camera view until finish setting up to instead of PTZ cameras. Adjust the camera view again and set preset points...

User Guide
Page 28
... Load icon for each camera, you may 1. High Security Mode: Video recording 24 hours a day with 30 FPS, Normal video quality, and Normal resolution. To setup the time schedule for the drop-down menu. Load the preset modes or 2. Shop Mode: Video recording from 8 am to your setting. Regular Mode: Video...
... Load icon for each camera, you may 1. High Security Mode: Video recording 24 hours a day with 30 FPS, Normal video quality, and Normal resolution. To setup the time schedule for the drop-down menu. Load the preset modes or 2. Shop Mode: Video recording from 8 am to your setting. Regular Mode: Video...

User Guide
Page 31
... configure icon to a special schedule(s) different from the others. 4.6 Adjust the Scheduled Setting You can assign a particular date(s) on the screen (highlighted in blue) to setup the schedule for every day in a week. 4.5.2. Default: Follow the same process to obtain the Encoding Option panel (see page 42) and change the setting...
... configure icon to a special schedule(s) different from the others. 4.6 Adjust the Scheduled Setting You can assign a particular date(s) on the screen (highlighted in blue) to setup the schedule for every day in a week. 4.5.2. Default: Follow the same process to obtain the Encoding Option panel (see page 42) and change the setting...

User Guide
Page 37
... warning. Select the action you want on the screen of Main Console, indicating which type of unusual event is detected. 33 5.2 Action Insert Action: To setup actions responding to an unusual event.
... warning. Select the action you want on the screen of Main Console, indicating which type of unusual event is detected. 33 5.2 Action Insert Action: To setup actions responding to an unusual event.

User Guide
Page 46
User Account User Account: The administrator may setup the pan speed, tilt speed, zoom speed and auto pan speed. From the list on the right, highlight each account and modify the privilege setting. 6.6 Setting - according to your PTZ camera. Monitor Display Cameras List Auto Scan Layout 42 Advanced Setting: You may manage the user accounts here. Adjust the settings by dragging the bars. 6.5 Setting -
User Account User Account: The administrator may setup the pan speed, tilt speed, zoom speed and auto pan speed. From the list on the right, highlight each account and modify the privilege setting. 6.6 Setting - according to your PTZ camera. Monitor Display Cameras List Auto Scan Layout 42 Advanced Setting: You may manage the user accounts here. Adjust the settings by dragging the bars. 6.5 Setting -

User Guide
Page 59
Chapter 7. Remote Live Viewer With the Remote Live Viewer console, remote users may watch real-time video from remote live streaming servers. 7.1 Setup Panel 55
Chapter 7. Remote Live Viewer With the Remote Live Viewer console, remote users may watch real-time video from remote live streaming servers. 7.1 Setup Panel 55

User Guide
Page 60
Setup Panel-Server Name the server Enter the server IP Address Enter the connecting port of the server Enter the user name and password Check the box to automatically log in the server when starting Live Viewer Test the server first to see if the settings are correct Click "Add" and the sever will appear on the list 7.2 Show Camera(s) On the Display Screen Select a camera(s) from the server/ camera list on a camera to be displayed. On the server/ camera list, right click on the right and then drag it to where you want the image to connect/ disconnect it. 56 7.1.1.
Setup Panel-Server Name the server Enter the server IP Address Enter the connecting port of the server Enter the user name and password Check the box to automatically log in the server when starting Live Viewer Test the server first to see if the settings are correct Click "Add" and the sever will appear on the list 7.2 Show Camera(s) On the Display Screen Select a camera(s) from the server/ camera list on a camera to be displayed. On the server/ camera list, right click on the right and then drag it to where you want the image to connect/ disconnect it. 56 7.1.1.

Quick Installation Guide
Page 2
... User Manual Language Pack o The Intelligent IP Installer window will show up listing all other parameters,plesae refer to the TL-SC3130G's manual on the "Next" button to specify its security settings 0 _opal Intranet Trusted ples 0 Restricted Internet rtPas renege... Service time: 24hrs, 7days a week TP-LINK TECHNOLOGIES CO., LTD. I IP IP I I Programsp Advanc di Select a Web content zone to continue the program. Click " Next". 3 ifeeeieeree 5 me, U SPainee 6 stmeugniiumsti An', +ill Os0 11 ofe Setup is Complete! 1. waiting M=IMENIE Information Bar Help Setting ...
... User Manual Language Pack o The Intelligent IP Installer window will show up listing all other parameters,plesae refer to the TL-SC3130G's manual on the "Next" button to specify its security settings 0 _opal Intranet Trusted ples 0 Restricted Internet rtPas renege... Service time: 24hrs, 7days a week TP-LINK TECHNOLOGIES CO., LTD. I IP IP I I Programsp Advanc di Select a Web content zone to continue the program. Click " Next". 3 ifeeeieeree 5 me, U SPainee 6 stmeugniiumsti An', +ill Os0 11 ofe Setup is Complete! 1. waiting M=IMENIE Information Bar Help Setting ...

User Guide
Page 4
... window 12 5.1.3 Video play buttons ...12 5.1.4 Audio buttons...13 5.2 Setting ...13 5.3 Client Setting ...14 5.3.1 Mode...14 5.3.2 View Size ...14 5.3.3 Protocol...15 5.3.4 Video Buffer ...15 5.4 Image Setup ...15 5.4.1 Brightness...16 5.4.2 Contrast ...16 5.4.3 Saturation ...16 5.4.4 Hue ...16 5.4.5 Default ...16 Chapter 6 Setting-Basic...17 6.1 System...17 6.1.1 Information...17 6.1.2 Date / Time ...18 6.1.3 Initialize...19 6.2 Camera...
... window 12 5.1.3 Video play buttons ...12 5.1.4 Audio buttons...13 5.2 Setting ...13 5.3 Client Setting ...14 5.3.1 Mode...14 5.3.2 View Size ...14 5.3.3 Protocol...15 5.3.4 Video Buffer ...15 5.4 Image Setup ...15 5.4.1 Brightness...16 5.4.2 Contrast ...16 5.4.3 Saturation ...16 5.4.4 Hue ...16 5.4.5 Default ...16 Chapter 6 Setting-Basic...17 6.1 System...17 6.1.1 Information...17 6.1.2 Date / Time ...18 6.1.3 Initialize...19 6.2 Camera...

User Guide
Page 9
..." and password "admin" in the login window as shown below. ) Note: The default User name "admin" and Password "admin" are Setting, Client Setting, and Image Setup. The web-based management page will display on your web URL to view the video without setting page, enter "http:///index2.htm" as your screen... address (the default value is 192.168.1.10) of your browser. ) Note: If you only want to Section 5.2 Setting, Section 5.3 Client Setting and Section 5.4 Image Setup. 4
..." and password "admin" in the login window as shown below. ) Note: The default User name "admin" and Password "admin" are Setting, Client Setting, and Image Setup. The web-based management page will display on your web URL to view the video without setting page, enter "http:///index2.htm" as your screen... address (the default value is 192.168.1.10) of your browser. ) Note: If you only want to Section 5.2 Setting, Section 5.3 Client Setting and Section 5.4 Image Setup. 4
