
Quick Installation Guide
Page 1
... address: 192.168.0.10/255.255.255.0 ¾ Password: the TL-PS310U does not come with USB port Hardware Installation 1. Connect the TL-PS310U to the TL-PS310U. When the Link LED lights up, the TL-PS310U is correctly connected to the TL-PS310U. 3. Turn off the USB device's power. 2. Connect your USB device to the network. Before you start, you should prepare the...
... address: 192.168.0.10/255.255.255.0 ¾ Password: the TL-PS310U does not come with USB port Hardware Installation 1. Connect the TL-PS310U to the TL-PS310U. When the Link LED lights up, the TL-PS310U is correctly connected to the TL-PS310U. 3. Turn off the USB device's power. 2. Connect your USB device to the network. Before you start, you should prepare the...

Quick Installation Guide
Page 5
The windows will tell you want to the USB port of the TL-PS310U. The MFP and Storage Server will auto-detect the USB device connecting to connect and click Connect Device Because the "Disconnect Printer when Idle" option is enabled by default, the server will detect the printer and install its driver automatically 5 Connecting to an USB Printer Select the USB printer you this. Just click OK You can disable the "Disconnect Printer when Idle" in the Option menu.
The windows will tell you want to the USB port of the TL-PS310U. The MFP and Storage Server will auto-detect the USB device connecting to connect and click Connect Device Because the "Disconnect Printer when Idle" option is enabled by default, the server will detect the printer and install its driver automatically 5 Connecting to an USB Printer Select the USB printer you this. Just click OK You can disable the "Disconnect Printer when Idle" in the Option menu.
Quick Installation Guide
Page 7
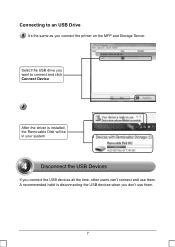
Connecting to connect and click Connect Device After the driver is disconnecting the USB devices when you connect the printer on the MFP and Storage Server. A recommended habit is installed, the Removable Disk will be in your system If you connect the USB devices all the time, other users can't connect and use them . Select the USB drive you want to an USB Drive It's the same as you don't use them . 7
Connecting to connect and click Connect Device After the driver is disconnecting the USB devices when you connect the printer on the MFP and Storage Server. A recommended habit is installed, the Removable Disk will be in your system If you connect the USB devices all the time, other users can't connect and use them . Select the USB drive you want to an USB Drive It's the same as you don't use them . 7

Quick Installation Guide
Page 8
Disconnect manually Select the USB device and click "Disconnect Device" Disconnect when Idle On the top menu, click Options, the "Disconnect Storage Device When Idle" and "Disconnect Printer When Idle" are on the list 8
Disconnect manually Select the USB device and click "Disconnect Device" Disconnect when Idle On the top menu, click Options, the "Disconnect Storage Device When Idle" and "Disconnect Printer When Idle" are on the list 8
User Guide
Page 3
...1 2 THE SOFTWARE INSTALLATION 2 2.1 For Windows 2000/XP Users 2 2.1.1 Connecting to an USB Device 5 2.1.2 Connecting to an USB Printer or Multi-functional Printer 8 2.1.3 Connecting to an USB HUB 10 2.1.4 Disconnecting an USB Device 11 2.1.5 Request to Disconnect ...12 2.1.6 Setting the Polling Interval 16 2.1.7 Setting the MFP... and Storage Server by Setup Utility 16 2.2 For Windows Vista Users 18 2.2.1 Connecting to an USB Device 21 2.2.2 Connecting to an USB HUB 21 3 WEB MANAGEMENT INTERFACE 22 3.1 For Windows 2000/XP/Vista Users 22 3.2 WEB Page Description 22 ...
...1 2 THE SOFTWARE INSTALLATION 2 2.1 For Windows 2000/XP Users 2 2.1.1 Connecting to an USB Device 5 2.1.2 Connecting to an USB Printer or Multi-functional Printer 8 2.1.3 Connecting to an USB HUB 10 2.1.4 Disconnecting an USB Device 11 2.1.5 Request to Disconnect ...12 2.1.6 Setting the Polling Interval 16 2.1.7 Setting the MFP... and Storage Server by Setup Utility 16 2.2 For Windows Vista Users 18 2.2.1 Connecting to an USB Device 21 2.2.2 Connecting to an USB HUB 21 3 WEB MANAGEMENT INTERFACE 22 3.1 For Windows 2000/XP/Vista Users 22 3.2 WEB Page Description 22 ...
User Guide
Page 4
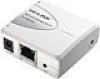
... and Storage Server y 1 USB2.0 port (High-speed) y Fast Ethernet network port: RJ-45 for 10Base-T or 100Base-TX y LINK LED to indicate network connection,100M LED to indicate 100M connection, USB LED to indicate USB status y One Setup CD for Windows 2000/XP/Vista, User's Guide y One power adapter y Built-in Reset Button...
... and Storage Server y 1 USB2.0 port (High-speed) y Fast Ethernet network port: RJ-45 for 10Base-T or 100Base-TX y LINK LED to indicate network connection,100M LED to indicate 100M connection, USB LED to indicate USB status y One Setup CD for Windows 2000/XP/Vista, User's Guide y One power adapter y Built-in Reset Button...
User Guide
Page 8
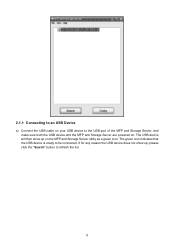
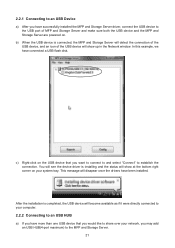
If for any reason the USB device does not show up , please click the "Search" button to refresh the list. 5 The USB device will then show up on the MFP and Storage Server utility as a green icon. 2.1.1 Connecting to an USB Device a) Connect the USB cable on your USB device to be connected. The green icon indicates that the USB device is ready to the USB port of the MFP and Storage Server, and make sure both the USB device and the MFP and Storage Server are powered on.
If for any reason the USB device does not show up , please click the "Search" button to refresh the list. 5 The USB device will then show up on the MFP and Storage Server utility as a green icon. 2.1.1 Connecting to an USB Device a) Connect the USB cable on your USB device to be connected. The green icon indicates that the USB device is ready to the USB port of the MFP and Storage Server, and make sure both the USB device and the MFP and Storage Server are powered on.

User Guide
Page 9
Also, please make sure the MFP and Storage Server and your USB device does not show up on the list, please try to disconnect and reconnect the USB device to connect and click on . Note: If your USB device are powered on the "Connect" button at the bottom. 6 b) Select the USB device that you will want to the USB port of the MFP and Storage Server.
Also, please make sure the MFP and Storage Server and your USB device does not show up on the list, please try to disconnect and reconnect the USB device to connect and click on . Note: If your USB device are powered on the "Connect" button at the bottom. 6 b) Select the USB device that you will want to the USB port of the MFP and Storage Server.

User Guide
Page 10
c) Once the USB device has been connected, the green icon( ) will turn orange( ) to your computer. 7 The USB device now becomes available on your computer, and you can use this USB device as if it was directly connected to indicate that the connection has been established.
c) Once the USB device has been connected, the green icon( ) will turn orange( ) to your computer. 7 The USB device now becomes available on your computer, and you can use this USB device as if it was directly connected to indicate that the connection has been established.
User Guide
Page 11
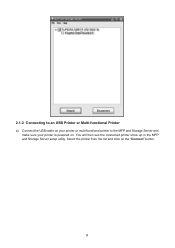
2.1.2 Connecting to an USB Printer or Multi-functional Printer a) Connect the USB cable on your printer or multi-functional printer to the MFP and Storage Server and make sure your printer is powered on the "Connect" button. 8 Select the printer from the list and click on . You will then see the connected printer show up in the MFP and Storage Server setup utility.
2.1.2 Connecting to an USB Printer or Multi-functional Printer a) Connect the USB cable on your printer or multi-functional printer to the MFP and Storage Server and make sure your printer is powered on the "Connect" button. 8 Select the printer from the list and click on . You will then see the connected printer show up in the MFP and Storage Server setup utility.
User Guide
Page 12
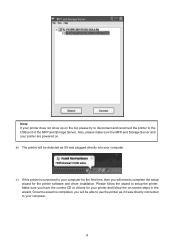
... computer. c) If this printer is completed, you will be detected as if it was directly connected to your printer and follow the wizard to the USB port of the MFP and Storage Server. Also, please make sure the MFP and Storage Server and your printer does not show up on the...
... computer. c) If this printer is completed, you will be detected as if it was directly connected to your printer and follow the wizard to the USB port of the MFP and Storage Server. Also, please make sure the MFP and Storage Server and your printer does not show up on the...
User Guide
Page 13
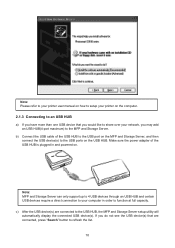
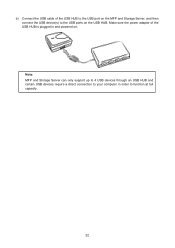
... and Storage Server can only support up to 4 USB devices through an USB HUB and certain USB devices require a direct connection to your network, you may add an USB HUB(4-port maximum) to the MFP and Storage Server. b) Connect the USB cable of the USB HUB is plugged in order to function at full ...the MFP and Storage Server setup utility will automatically display the connected USB device(s). Make sure the power adapter of the USB HUB to the USB port on the MFP and Storage Server, and then connect the USB device(s) to the USB ports on . Note: Please refer to your printer user manual on...
... and Storage Server can only support up to 4 USB devices through an USB HUB and certain USB devices require a direct connection to your network, you may add an USB HUB(4-port maximum) to the MFP and Storage Server. b) Connect the USB cable of the USB HUB is plugged in order to function at full ...the MFP and Storage Server setup utility will automatically display the connected USB device(s). Make sure the power adapter of the USB HUB to the USB port on the MFP and Storage Server, and then connect the USB device(s) to the USB ports on . Note: Please refer to your printer user manual on...
User Guide
Page 14
Note: If your computer, however, you may reconnect the USB device again once the icon becomes green( ). 11 The device will then no longer stay connected to the USB HUB. Also, please make sure the MFP and Storage Server and your USB HUB are powered on. 2.1.4 Disconnecting an USB Device a) To disconnect an USB device, simply click on the connected USB device on the list, please try to disconnect and reconnect the USB device to your USB device does not show up on the list of the MFP and Storage Server setup utility, and press the "Disconnect" button.
Note: If your computer, however, you may reconnect the USB device again once the icon becomes green( ). 11 The device will then no longer stay connected to the USB HUB. Also, please make sure the MFP and Storage Server and your USB HUB are powered on. 2.1.4 Disconnecting an USB Device a) To disconnect an USB device, simply click on the connected USB device on the list, please try to disconnect and reconnect the USB device to your USB device does not show up on the list of the MFP and Storage Server setup utility, and press the "Disconnect" button.

User Guide
Page 15
however, you may send a courteous message to disconnect the USB device; 2.1.5 Request to Disconnect a) If the USB device is being used by another computer on your network, a red icon( ) will not have the option to request that the other user disconnect/release the USB device. 12 You will be displayed in front of the USB device name.
however, you may send a courteous message to disconnect the USB device; 2.1.5 Request to Disconnect a) If the USB device is being used by another computer on your network, a red icon( ) will not have the option to request that the other user disconnect/release the USB device. 12 You will be displayed in front of the USB device name.

User Guide
Page 16
A message will then be sent to the user requesting that they disconnect from the USB device. 13 b) To send the courteous message, right-click on the USB device and select "Request Disconnect".
A message will then be sent to the user requesting that they disconnect from the USB device. 13 b) To send the courteous message, right-click on the USB device and select "Request Disconnect".
User Guide
Page 19
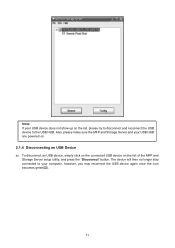
... the Polling Interval a) The polling interval will automatically update any changes made to find out the status of all connected MFP and Storage Server and USB devices. b) You may set a number, the utility will allow the new interval setting to take effect. Once you have set a number in the utility, click...
... the Polling Interval a) The polling interval will automatically update any changes made to find out the status of all connected MFP and Storage Server and USB devices. b) You may set a number, the utility will allow the new interval setting to take effect. Once you have set a number in the utility, click...
User Guide
Page 24
.... After the installation is installing and the status will become available as if it were directly connected to your computer. 2.2.2 Connecting to an USB HUB a) If you have been installed. In this example, we have successfully installed the MFP and Storage Server driver, connect the... USB device to the USB port of the USB device will disapear once the drivers have more than one USB device that you want to connect to and select "Connect" to establish the connection. c) Right-...
.... After the installation is installing and the status will become available as if it were directly connected to your computer. 2.2.2 Connecting to an USB HUB a) If you have been installed. In this example, we have successfully installed the MFP and Storage Server driver, connect the... USB device to the USB port of the USB device will disapear once the drivers have more than one USB device that you want to connect to and select "Connect" to establish the connection. c) Right-...
User Guide
Page 25
Note: MFP and Storage Server can only support up to 4 USB devices through an USB HUB and certain USB devices require a direct connection to your computer in and powered on the USB HUB. Make sure the power adapter of the USB HUB to the USB port on the MFP and Storage Server, and then connect the USB device(s) to function at full capacity. 22 b) Connect the USB cable of the USB HUB is plugged in order to the USB ports on .
Note: MFP and Storage Server can only support up to 4 USB devices through an USB HUB and certain USB devices require a direct connection to your computer in and powered on the USB HUB. Make sure the power adapter of the USB HUB to the USB port on the MFP and Storage Server, and then connect the USB device(s) to function at full capacity. 22 b) Connect the USB cable of the USB HUB is plugged in order to the USB ports on .
User Guide
Page 26
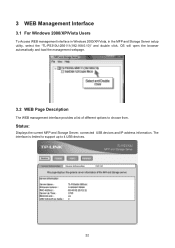
3 WEB Management Interface 3.1 For Windows 2000/XP/Vista Users To Access WEB management interface in Windows 2000/XP/Vista, in the MFP and Storage Server setup utility, select the "TL-PS310U-2B5111(192.168.0.10)" and double click, OS will open the browser automatically and load the management webpage. 3.2 WEB Page Description The WEB management interface provides a list of different options to 4 USB devices. 22 The interface is limited to support up to choose from. Status: Displays the current MFP and Storage Server, connected USB devices and IP address information.
3 WEB Management Interface 3.1 For Windows 2000/XP/Vista Users To Access WEB management interface in Windows 2000/XP/Vista, in the MFP and Storage Server setup utility, select the "TL-PS310U-2B5111(192.168.0.10)" and double click, OS will open the browser automatically and load the management webpage. 3.2 WEB Page Description The WEB management interface provides a list of different options to 4 USB devices. 22 The interface is limited to support up to choose from. Status: Displays the current MFP and Storage Server, connected USB devices and IP address information.
User Guide
Page 27
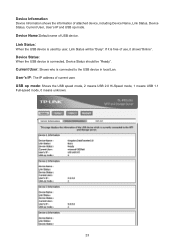
...". User's IP: The IP address of USB device. USB op mode: Shows the USB speed mode, 2 means USB 2.0 Hi-Speed mode, 1 means USB 1.1 Full-speed mode, 0 means unknown. 23 Link Status: When the USB device is free of attached device, including Device Name, Link Status, Device Status, Current User, User's IP and USB op mode. Device Status: When the...
...". User's IP: The IP address of USB device. USB op mode: Shows the USB speed mode, 2 means USB 2.0 Hi-Speed mode, 1 means USB 1.1 Full-speed mode, 0 means unknown. 23 Link Status: When the USB device is free of attached device, including Device Name, Link Status, Device Status, Current User, User's IP and USB op mode. Device Status: When the...


