Quick Installation Guide
Page 1
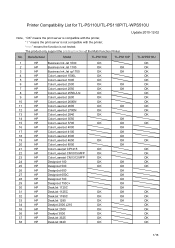
Printer Compatibility List for TL-PS110U/TL-PS110P/TL-WPS510U Update:2010-12-02 Note:"OK" means the print server is not compatible with the printer; The product only support the printing function of the Multi Function Printer. Manufacturer Model TL-PS110U TL-PS110P TL-WPS510U 1 HP Business Ink Jet 1000 OK OK 2 HP Business Ink Jet 1100 OK OK ... 2300 OK OK 36 HP Deskjet 3000 OK OK 37 HP DeskJet 3325 OK OK 38 HP DeskJet 3420 OK OK 1/16 " \ " means the print server is compatible with the printer; No. "--" means the function is not tested;
Printer Compatibility List for TL-PS110U/TL-PS110P/TL-WPS510U Update:2010-12-02 Note:"OK" means the print server is not compatible with the printer; The product only support the printing function of the Multi Function Printer. Manufacturer Model TL-PS110U TL-PS110P TL-WPS510U 1 HP Business Ink Jet 1000 OK OK 2 HP Business Ink Jet 1100 OK OK ... 2300 OK OK 36 HP Deskjet 3000 OK OK 37 HP DeskJet 3325 OK OK 38 HP DeskJet 3420 OK OK 1/16 " \ " means the print server is compatible with the printer; No. "--" means the function is not tested;
User Guide
Page 1
... UNIX INSTALLATION ...58 1 INTRODUCTION...4 PRODUCT OVERVIEW ...4 COMPONENTS AND FEATURES ...4 HARDWARE INSTALLATION...5 NETWORK ENVIRONMENT...6 WIRED NETWORK WITH PRINT SERVER 6 2. SOFTWARE INSTALLATION...9 INSTALLING THE PSADMIN AND PRINT SERVER'S DRIVER 9 USING PSADMIN...18 WIZARD ...19 MANUAL SETUP ...21 REFRESH...23 MULTIPLE PRINT QUEUES CONFIGURATION 24 UNINSTALLING THE PSADMIN ON WINDOWS PC 24 4. INTERNET PRINTER CONNECTION AND HP WEB...
... UNIX INSTALLATION ...58 1 INTRODUCTION...4 PRODUCT OVERVIEW ...4 COMPONENTS AND FEATURES ...4 HARDWARE INSTALLATION...5 NETWORK ENVIRONMENT...6 WIRED NETWORK WITH PRINT SERVER 6 2. SOFTWARE INSTALLATION...9 INSTALLING THE PSADMIN AND PRINT SERVER'S DRIVER 9 USING PSADMIN...18 WIZARD ...19 MANUAL SETUP ...21 REFRESH...23 MULTIPLE PRINT QUEUES CONFIGURATION 24 UNINSTALLING THE PSADMIN ON WINDOWS PC 24 4. INTERNET PRINTER CONNECTION AND HP WEB...
User Guide
Page 2
UPGRADING PRINT SERVER 63 OVERVIEW...63 UPGRADING THE PRINT SERVER FROM PSADMIN 63 UPGRADING THE PRINT SERVER FROM WINDOWS NT/2000/XP/2003 (THROUGH TCP/IP)........ 63 UPGRADING THE PRINT SERVER FROM UNIX (THROUGH TCP/IP 64 UPGRADING THE PRINT SERVER FROM BROWSER 64 9. 8. TROUBLESHOOTING ...66 GENERAL TROUBLESHOOTING OVERVIEW 66 POWER RELATED PROBLEMS...66 PRINT PORT RELATED PROBLEMS 66 WINDOWS 95/98...
UPGRADING PRINT SERVER 63 OVERVIEW...63 UPGRADING THE PRINT SERVER FROM PSADMIN 63 UPGRADING THE PRINT SERVER FROM WINDOWS NT/2000/XP/2003 (THROUGH TCP/IP)........ 63 UPGRADING THE PRINT SERVER FROM UNIX (THROUGH TCP/IP 64 UPGRADING THE PRINT SERVER FROM BROWSER 64 9. 8. TROUBLESHOOTING ...66 GENERAL TROUBLESHOOTING OVERVIEW 66 POWER RELATED PROBLEMS...66 PRINT PORT RELATED PROBLEMS 66 WINDOWS 95/98...
User Guide
Page 4
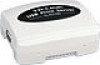
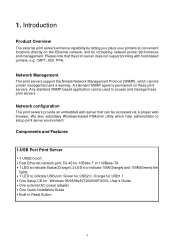
...One Quick Installation Guide ․Built-in Reset Button 4 Network configuration The print servers provide an embedded web server that the print server does not support printing with host-based printers, e.g. Components and Features 1-USB Port Print Server ․1 USB2.0 port ․Fast Ethernet network port: RJ-45 for ... or 100Base-TX ․1 LED to indicate Status(Orange), 2 LED's to indicate 10M(Orange) and 100M(Green) link lights ․1 LED to setup print server environment. CAPT, GDI, PPA. A standard SNMP agent is permanent on the Ethernet network, and by letting you place ...
...One Quick Installation Guide ․Built-in Reset Button 4 Network configuration The print servers provide an embedded web server that the print server does not support printing with host-based printers, e.g. Components and Features 1-USB Port Print Server ․1 USB2.0 port ․Fast Ethernet network port: RJ-45 for ... or 100Base-TX ․1 LED to indicate Status(Orange), 2 LED's to indicate 10M(Orange) and 100M(Green) link lights ․1 LED to setup print server environment. CAPT, GDI, PPA. A standard SNMP agent is permanent on the Ethernet network, and by letting you place ...

User Guide
Page 5
...all the LEDs have stopped flashing. If not, please contact your printer USB port works well. ․Connect the print server to the print server: 1. Turn the printer's power on the print server. 5. LAN Port has a valid network connection at 100Mbps. USB On (Green) On (Orange) Connect with USB2....0 printer Connect with USB1.1 printer Before you start, you are connecting to the network and printer, and plug in the print server. Follow these steps: ․Confirm that your local dealer for POST When power switched on, the Status indicator will flash five (Orange...
...all the LEDs have stopped flashing. If not, please contact your printer USB port works well. ․Connect the print server to the print server: 1. Turn the printer's power on the print server. 5. LAN Port has a valid network connection at 100Mbps. USB On (Green) On (Orange) Connect with USB2....0 printer Connect with USB1.1 printer Before you start, you are connecting to the network and printer, and plug in the print server. Follow these steps: ․Confirm that your local dealer for POST When power switched on, the Status indicator will flash five (Orange...

User Guide
Page 6
Network Environment Wired Network with Print Server: Printer Print Server HUB Computer Computer Computer 6 Wall-mount Information Note: We are not responsible for damages incurred by insecure wall-mounting hardware.
Network Environment Wired Network with Print Server: Printer Print Server HUB Computer Computer Computer 6 Wall-mount Information Note: We are not responsible for damages incurred by insecure wall-mounting hardware.
User Guide
Page 7
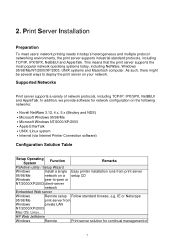
..., UNIX systems and Macintosh computer. IE or Netscape 95/98/Me print server from print server 95/98/Me network on your network. As such, there might be several ways to deploy the print server on a setup CD Windows peer-to-peer or NT/2000/XP/...2003 client-server network Embedded Web server Windows Remote setup Follow standard browse, e.g. Supported Networks Print server supports a variety of 7 HP Web JetAdmin Windows Remote Print server solution for network configuration on ...
..., UNIX systems and Macintosh computer. IE or Netscape 95/98/Me print server from print server 95/98/Me network on your network. As such, there might be several ways to deploy the print server on a setup CD Windows peer-to-peer or NT/2000/XP/...2003 client-server network Embedded Web server Windows Remote setup Follow standard browse, e.g. Supported Networks Print server supports a variety of 7 HP Web JetAdmin Windows Remote Print server solution for network configuration on ...

User Guide
Page 8
... Configuration solution Table has many installations way to document over Internet, replacing fax, mail Internet Printing Protocol- Firstly, we will discuss Embedded Web Server Installation with print server. 8 anywhere on your LAN print server, include alert and consumables Internet Printing Protocol Windows Printing via the Allows saving distribution of multiple printers- NT/2000/XP/2003 management of HQ...
... Configuration solution Table has many installations way to document over Internet, replacing fax, mail Internet Printing Protocol- Firstly, we will discuss Embedded Web Server Installation with print server. 8 anywhere on your LAN print server, include alert and consumables Internet Printing Protocol Windows Printing via the Allows saving distribution of multiple printers- NT/2000/XP/2003 management of HQ...

User Guide
Page 9
The program can assist you in configuring and managing your print server in NetWare environments. Installing the PSAdmin and Print Server's Driver 1. Insert the setup CD into your computer must have a proper IP address, e.g. 192.168.0.100 (the print server's default IP is a proprietary Windows-based management program that can be installed from the setup CD of print server. To enable network communication with print server, your CD-drive, and the following message appears: 9 3. Software Installation The PSAdmin is 192.168.0.10) 2.
The program can assist you in configuring and managing your print server in NetWare environments. Installing the PSAdmin and Print Server's Driver 1. Insert the setup CD into your computer must have a proper IP address, e.g. 192.168.0.100 (the print server's default IP is a proprietary Windows-based management program that can be installed from the setup CD of print server. To enable network communication with print server, your CD-drive, and the following message appears: 9 3. Software Installation The PSAdmin is 192.168.0.10) 2.
User Guide
Page 10
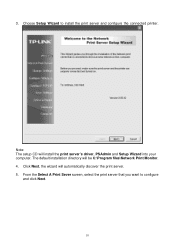
From the Select A Print Sever screen, select the print server that you want to install the print server and configure the connected printer. Choose Setup Wizard to configure and click Next. 10 The default installation directory will automatically discover the print server. 5. Click Next, the wizard will be C:\Program files\Network Print Monitor. 4. Note: The setup CD will install the print server's driver, PSAdmin and Setup Wizard into your computer. 3.
From the Select A Print Sever screen, select the print server that you want to install the print server and configure the connected printer. Choose Setup Wizard to configure and click Next. 10 The default installation directory will automatically discover the print server. 5. Click Next, the wizard will be C:\Program files\Network Print Monitor. 4. Note: The setup CD will install the print server's driver, PSAdmin and Setup Wizard into your computer. 3.
User Guide
Page 12
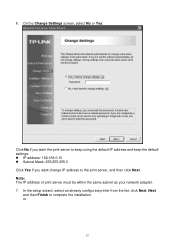
Note: The IP address of print server must be within the same subnet as your network adapter. 7. or 12 On the Change Settings screen, select No or Yes: Click No if you want the print server to keep using the default IP address and keep the default settings: z IP address: 192.168.0.10 z Subnet Mask: 255.255.255.0 Click Yes if you want change IP address to complete the installation. 6. In the setup wizard, select an already configured printer from the list, click Next, Next and then Finish to the print server, and then click Next.
Note: The IP address of print server must be within the same subnet as your network adapter. 7. or 12 On the Change Settings screen, select No or Yes: Click No if you want the print server to keep using the default IP address and keep the default settings: z IP address: 192.168.0.10 z Subnet Mask: 255.255.255.0 Click Yes if you want change IP address to complete the installation. 6. In the setup wizard, select an already configured printer from the list, click Next, Next and then Finish to the print server, and then click Next.

User Guide
Page 13
Select Add New Printer if the print server is connected to a printer that hasn't been installed before and does not appear in the list. 13
Select Add New Printer if the print server is connected to a printer that hasn't been installed before and does not appear in the list. 13

User Guide
Page 17
Right-click, select Properties -> Ports and verify that the print server's port appears. 17 16.
Right-click, select Properties -> Ports and verify that the print server's port appears. 17 16.

User Guide
Page 18
.... 18. Using PSAdmin After the software of the print server hardware used for identification purposes. Print server Name: The print server to install more print servers, start setup wizard from your Windows Start menu: start -> All Programs -> Network Print Server -> PSAdmin. Note: If you want to which ..., starts PSAdmin utility from your Windows Start menu: start -> All Programs -> Network Print Server -> PSWizard and repeat the installation procedure. Version: The firmware version of the print server. Status: To come up a Printer's status presently. 18 The screen will be ...
.... 18. Using PSAdmin After the software of the print server hardware used for identification purposes. Print server Name: The print server to install more print servers, start setup wizard from your Windows Start menu: start -> All Programs -> Network Print Server -> PSAdmin. Note: If you want to which ..., starts PSAdmin utility from your Windows Start menu: start -> All Programs -> Network Print Server -> PSWizard and repeat the installation procedure. Version: The firmware version of the print server. Status: To come up a Printer's status presently. 18 The screen will be ...

User Guide
Page 19
..., please skip to the following step. 3 In the IP Address option, type an IP address for your print server device to obtain IP-related settings automatically from DHCP server". TCP/IP Wizard 1. Wizard Wizard is a configuration program that can assist you would like a picture <...and select TCP/IP Wizard. 2 Select "Obtain an IP address from your network. This setting, by using Wizard. Setup a print server by default, is a DHCP server on your DHCP server. If you in setting up the necessary parameters for the print server. If there is disabled. This option allows the...
..., please skip to the following step. 3 In the IP Address option, type an IP address for your print server device to obtain IP-related settings automatically from DHCP server". TCP/IP Wizard 1. Wizard Wizard is a configuration program that can assist you would like a picture <...and select TCP/IP Wizard. 2 Select "Obtain an IP address from your network. This setting, by using Wizard. Setup a print server by default, is a DHCP server on your DHCP server. If you in setting up the necessary parameters for the print server. If there is disabled. This option allows the...

User Guide
Page 20
Type in a Print server. 5. Log into the print server. 7 Done NetWare Wizard 1. Type in a Print Queue Names. Note: Each print queue corresponds to each print port of the print server. 6. Click Wizard button just like a picture < picture. >.and select NetWare Wizard, as a Supervisor (Admin.) or equivalent...type the IP address of gateway. 6 When done, click OK button. Select the NetWare File Server to which the print server device will save the above settings into your NetWare file server as follow 3. Click OK. 7. 4 (Optional) In the Subnet Mask option, type the ...
Type in a Print server. 5. Log into the print server. 7 Done NetWare Wizard 1. Type in a Print Queue Names. Note: Each print queue corresponds to each print port of the print server. 6. Click Wizard button just like a picture < picture. >.and select NetWare Wizard, as a Supervisor (Admin.) or equivalent...type the IP address of gateway. 6 When done, click OK button. Select the NetWare File Server to which the print server device will save the above settings into your NetWare file server as follow 3. Click OK. 7. 4 (Optional) In the Subnet Mask option, type the ...

User Guide
Page 21
... serviced by using Manual Setup follow picture. 5. To setup the print server by the print server. 21 Run PCONSOLE in the Print server that created during PCONSOLE. 6. (Optional) In Bindery Settings, Select NetWare file server(s) that print server can do Bindery mode. 7. (Optional) In NDS Settings, Select NetWare file server(s), NetWare 4.x or later that you wish to configure. 4. Click OK...
... serviced by using Manual Setup follow picture. 5. To setup the print server by the print server. 21 Run PCONSOLE in the Print server that created during PCONSOLE. 6. (Optional) In Bindery Settings, Select NetWare file server(s) that print server can do Bindery mode. 7. (Optional) In NDS Settings, Select NetWare file server(s), NetWare 4.x or later that you wish to configure. 4. Click OK...

User Guide
Page 22
...allow you to manually specify the IP address of the print server. Obtain an IP address from a DHCP server: This option enables or disables the DHCP feature of the gateway to the print server, if DHCP option is enabled, the print server will be grayed out and are not available for editing.... 2.While the print server supports DHCP, we strongly recommend you manually specify a subnet mask to the print server, if DHCP option is optional. This ...
...allow you to manually specify the IP address of the print server. Obtain an IP address from a DHCP server: This option enables or disables the DHCP feature of the gateway to the print server, if DHCP option is enabled, the print server will be grayed out and are not available for editing.... 2.While the print server supports DHCP, we strongly recommend you manually specify a subnet mask to the print server, if DHCP option is optional. This ...

User Guide
Page 23
...Click Reset button just like a picture < >. 2. Select General Upgrade. Reset 1. Reset allows the user to reset the print server device in the same directory as follow picture 2. Make sure that the upgrade file is located in order to take effect. Click Upgrade ... button just like a picture < >. 2. Refresh searches the network for new settings to establish a new connection or for all attached print server(s). 23 In order to upgrade the print server device. Upgrade Upgrade allows the user to upgrade the unit please perform the steps as follows: 1.
...Click Reset button just like a picture < >. 2. Select General Upgrade. Reset 1. Reset allows the user to reset the print server device in the same directory as follow picture 2. Make sure that the upgrade file is located in order to take effect. Click Upgrade ... button just like a picture < >. 2. Refresh searches the network for new settings to establish a new connection or for all attached print server(s). 23 In order to upgrade the print server device. Upgrade Upgrade allows the user to upgrade the unit please perform the steps as follows: 1.
User Guide
Page 24
.... Double click the Add/Remove Programs icon. 24 Type in a Print server and a Print Queue Name (For more detailed information about Wizard, please refer to NetWare's Print server/Services manuals for detailed PCONSOLE commands. Select the Print server name you create in Step 6 into your Windows. 3. Reset the print server by Printer" option (For NetWare 4.x's PCONSOLE, please select "Printers...
.... Double click the Add/Remove Programs icon. 24 Type in a Print server and a Print Queue Name (For more detailed information about Wizard, please refer to NetWare's Print server/Services manuals for detailed PCONSOLE commands. Select the Print server name you create in Step 6 into your Windows. 3. Reset the print server by Printer" option (For NetWare 4.x's PCONSOLE, please select "Printers...


