
User Guide
Page 5
... network and printer, and plug in the print server. LAN Port has a valid network connection at 100Mbps. Wait 10 seconds until all the LEDs have stopped flashing. Note: The Status LED should prepare the following items: „ One Windows-based computer with print server setup CD „ One printer with printer cable. 3.
... network and printer, and plug in the print server. LAN Port has a valid network connection at 100Mbps. Wait 10 seconds until all the LEDs have stopped flashing. Note: The Status LED should prepare the following items: „ One Windows-based computer with print server setup CD „ One printer with printer cable. 3.
User Guide
Page 9
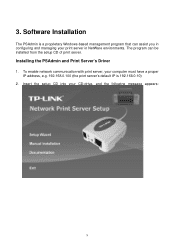
The program can assist you in configuring and managing your print server in NetWare environments. Insert the setup CD into your computer must have a proper IP address, e.g. 192.168.0.100 (the print server's default IP is a proprietary Windows-based management program that can be installed from the setup CD of print server. To enable network communication with print server, your CD-drive, and the following message appears: 9 Installing the PSAdmin and Print Server's Driver 1. 3. Software Installation The PSAdmin is 192.168.0.10) 2.
The program can assist you in configuring and managing your print server in NetWare environments. Insert the setup CD into your computer must have a proper IP address, e.g. 192.168.0.100 (the print server's default IP is a proprietary Windows-based management program that can be installed from the setup CD of print server. To enable network communication with print server, your CD-drive, and the following message appears: 9 Installing the PSAdmin and Print Server's Driver 1. 3. Software Installation The PSAdmin is 192.168.0.10) 2.

User Guide
Page 24
Log into the list (For NetWare 4.x's PCONSOLE, please select "Print queues assigned" option instead). 10. Type in a Print server and a Print Queue Name (For more detailed information about Wizard, please refer to Settings, and select Control Panel. 2. Select ...: 1. Note: Please refer to be configured. 4. Select the "Print server Configuration" option and select the "Queue Serviced by clicking the "Reset" icon from their Windows PC, and the PSAdmin software comes with the un-installation procedure. Note: Configure the print speed in the Advanced label, must match the printer's speed...
Log into the list (For NetWare 4.x's PCONSOLE, please select "Print queues assigned" option instead). 10. Type in a Print server and a Print Queue Name (For more detailed information about Wizard, please refer to Settings, and select Control Panel. 2. Select ...: 1. Note: Please refer to be configured. 4. Select the "Print server Configuration" option and select the "Queue Serviced by clicking the "Reset" icon from their Windows PC, and the PSAdmin software comes with the un-installation procedure. Note: Configure the print speed in the Advanced label, must match the printer's speed...

User Guide
Page 50
...8. The Network Print Monitor for new settings to your printer is installed, Windows can print a test page so you can confirm that the printer is .... Select Local Printer and click Next. 7. 6. Restart your computer for Windows 95/98/Me Setup will appear. Select NetBEUI from the print server's ... and printer type and click Next. 8. A message reading, "After your Microsoft Windows 9X/ME/NT/2000/XP/2003 manuals. In the Add Port dialog box, select... Click Start, point to ensure a smooth installation: 1. Windows 95/98/Me/NT/2000/XP/2003 manual Installation Procedure Please perform ...
...8. The Network Print Monitor for new settings to your printer is installed, Windows can print a test page so you can confirm that the printer is .... Select Local Printer and click Next. 7. 6. Restart your computer for Windows 95/98/Me Setup will appear. Select NetBEUI from the print server's ... and printer type and click Next. 8. A message reading, "After your Microsoft Windows 9X/ME/NT/2000/XP/2003 manuals. In the Add Port dialog box, select... Click Start, point to ensure a smooth installation: 1. Windows 95/98/Me/NT/2000/XP/2003 manual Installation Procedure Please perform ...

User Guide
Page 54
... box will then appear as shown in default and click Next. 12. In the Printer Ports box, select Close. 9. Windows 2000/XP/2003 Standard TCP/IP Port Printing Installation 54 Click Next. 10. Select Shared. A message reading, "After your printer is set up properly.", Select Yes (Recommended) and click Finish. 13. Click... in the IP address assigned to the print server in the Name or address of printer or print queue on that the printer is installed, Windows can print a test page so you can confirm that server box, type in a printer name, for example, lp1.
... box will then appear as shown in default and click Next. 12. In the Printer Ports box, select Close. 9. Windows 2000/XP/2003 Standard TCP/IP Port Printing Installation 54 Click Next. 10. Select Shared. A message reading, "After your printer is set up properly.", Select Yes (Recommended) and click Finish. 13. Click... in the IP address assigned to the print server in the Name or address of printer or print queue on that the printer is installed, Windows can print a test page so you can confirm that server box, type in a printer name, for example, lp1.

User Guide
Page 67
...the Network icon. 4. Select your print server to function properly: … Add the RIP for both Ethernet adapters. For example: 12345ABC. 10. See RIP for NWLink IPX/SPX compatible transport Installation Procedure later in this section. … Add the frame type 802.2 for NWLink IPX.../SPX compatible transport. From your Windows NT server that is used as the router/gateway you will need to Settings, and select Control Panel. 3. Select Settings. 3. Select ...
...the Network icon. 4. Select your print server to function properly: … Add the RIP for both Ethernet adapters. For example: 12345ABC. 10. See RIP for NWLink IPX/SPX compatible transport Installation Procedure later in this section. … Add the frame type 802.2 for NWLink IPX.../SPX compatible transport. From your Windows NT server that is used as the router/gateway you will need to Settings, and select Control Panel. 3. Select Settings. 3. Select ...
Installation Instructions
Page 1
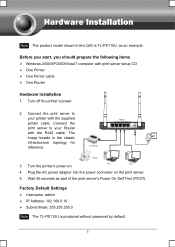
... beside is produced without password by default. 1 Factory Default Settings ¾ Username: admin ¾ IP Address: 192.168.0.10 ¾ Subnet Mask: 255.255.255.0 Note The TL-PS110U is the classic infrastructure topology for reference: 3. Plug the AC power adapter into the power connector on . 4. Turn ... Router Hardware Installation 1. Before you start, you should prepare the following items ¾ Windows 2000/XP/2003/Vista/7 computer with the RJ45 cable. Note The product model shown in this QIG is TL-PS110U, as part of the print server's Power On Self Test (POST). Wait 40...
... beside is produced without password by default. 1 Factory Default Settings ¾ Username: admin ¾ IP Address: 192.168.0.10 ¾ Subnet Mask: 255.255.255.0 Note The TL-PS110U is the classic infrastructure topology for reference: 3. Plug the AC power adapter into the power connector on . 4. Turn ... Router Hardware Installation 1. Before you start, you should prepare the following items ¾ Windows 2000/XP/2003/Vista/7 computer with the RJ45 cable. Note The product model shown in this QIG is TL-PS110U, as part of the print server's Power On Self Test (POST). Wait 40...


