
User Guide
Page 5
... ...2 2.3 Physical Interface ...3 2.4 Hardware Connection - Internet 4 Chapter 3 Installing Management Utility 6 Chapter 4 Using The Management Utility 10 4.1 Main ...10 4.1.1 Rename ...12 4.1.2 Enter Password 13 4.1.3 Add Device...14 4.1.4 Reset ...15 4.2 Privacy ...15 4.3 QoS ...16 4.4 Diagnostics...17 4.5 About ...19 Chapter 5 Advance Feature: How to Use the Push buttons 20 5.1 Pair( Secure with 128 bits-AES...
... ...2 2.3 Physical Interface ...3 2.4 Hardware Connection - Internet 4 Chapter 3 Installing Management Utility 6 Chapter 4 Using The Management Utility 10 4.1 Main ...10 4.1.1 Rename ...12 4.1.2 Enter Password 13 4.1.3 Add Device...14 4.1.4 Reset ...15 4.2 Privacy ...15 4.3 QoS ...16 4.4 Diagnostics...17 4.5 About ...19 Chapter 5 Advance Feature: How to Use the Push buttons 20 5.1 Pair( Secure with 128 bits-AES...
User Guide
Page 6
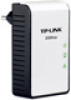
... the existing power lines installed in a home as a path to Internet access. A. Simply plug this Mini Powerline Adapter within minutes. TL-PA211 AV200 Mini Powerline Adapter Chapter 1 Introduction Congratulations on your Cable/xDSL broadband connection or existing Ethernet (LAN) network to any other electrical ..., voice, audio and video between devices. This Mini Powerline Adapter supports up to default setting via the Pair button. 2.Reset to 200Mbps data rate over the existing household power circuit. The adapter adds two useful functions. 1.Existing connection with a ...
... the existing power lines installed in a home as a path to Internet access. A. Simply plug this Mini Powerline Adapter within minutes. TL-PA211 AV200 Mini Powerline Adapter Chapter 1 Introduction Congratulations on your Cable/xDSL broadband connection or existing Ethernet (LAN) network to any other electrical ..., voice, audio and video between devices. This Mini Powerline Adapter supports up to default setting via the Pair button. 2.Reset to 200Mbps data rate over the existing household power circuit. The adapter adds two useful functions. 1.Existing connection with a ...

User Guide
Page 16
... downloaded for the device, please select appropriate Firmware and PIB files together. It is shown as below. PIB: Parameter Information Block. TL-PA211 AV200 Mini Powerline Adapter Local Device(s) on the screen then click "Connect" tab to the computer‟s LAN card. Once the ...Adapter found connected to manage the Powerline Ethernet Adapter. If you want to the factory defaults after resetting the PLC. 11 New firmware versions and PIB files are posted at www.tp-link.com and can upgrade the version of firmware for free. Note: The parameter information...
... downloaded for the device, please select appropriate Firmware and PIB files together. It is shown as below. PIB: Parameter Information Block. TL-PA211 AV200 Mini Powerline Adapter Local Device(s) on the screen then click "Connect" tab to the computer‟s LAN card. Once the ...Adapter found connected to manage the Powerline Ethernet Adapter. If you want to the factory defaults after resetting the PLC. 11 New firmware versions and PIB files are posted at www.tp-link.com and can upgrade the version of firmware for free. Note: The parameter information...
User Guide
Page 20
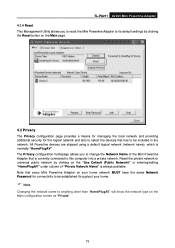
... the local network and providing additional security for connectivity to its default settings by clicking on the Main configuration screen as "Private". 15 TL-PA211 AV200 Mini Powerline Adapter 4.1.4 Reset This Management Utility allows you to change the Network Name of "Private Network Name" is always available. Note that every Mini Powerline Adapter...
... the local network and providing additional security for connectivity to its default settings by clicking on the Main configuration screen as "Private". 15 TL-PA211 AV200 Mini Powerline Adapter 4.1.4 Reset This Management Utility allows you to change the Network Name of "Private Network Name" is always available. Note that every Mini Powerline Adapter...
User Guide
Page 26
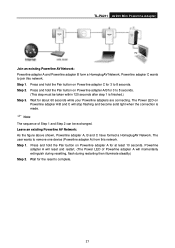
... an existing Powerline AV Network: As the figure above shown, Powerline adapter A, B and C have formed a HomeplugAV Network. Powerline adapter A will reset and restart. (The Power LED of Step 1 and Step 2 can be exchanged. Step 1. Press and hold the Pair button on Powerline adapter ... resetting, flash during restarting then illuminate steadily.) Step 2. The Power LED on Powerline adapter A/B for 3 to 8 seconds. Wait for about 60 seconds while your Powerline adapters are connecting. Press and hold the Pair button on Powerline adapter C for 3 to join this network. TL-PA211 ...
... an existing Powerline AV Network: As the figure above shown, Powerline adapter A, B and C have formed a HomeplugAV Network. Powerline adapter A will reset and restart. (The Power LED of Step 1 and Step 2 can be exchanged. Step 1. Press and hold the Pair button on Powerline adapter ... resetting, flash during restarting then illuminate steadily.) Step 2. The Power LED on Powerline adapter A/B for 3 to 8 seconds. Wait for about 60 seconds while your Powerline adapters are connecting. Press and hold the Pair button on Powerline adapter C for 3 to join this network. TL-PA211 ...

