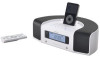
Owners Manual
Page 4
.... 4 Avoid placing it in any operations. < As the unit may become warm during operation, always leave sufficient space around the unit for choosing TEAC. Before Using the Unit 4 Remote Control Unit 5 Connections 6 Unit Functions 8 Display 10 Getting Started 10 Setting the Clock 12 Basic Operation 13 Listening to iPod 15 Operating iPod 16...
.... 4 Avoid placing it in any operations. < As the unit may become warm during operation, always leave sufficient space around the unit for choosing TEAC. Before Using the Unit 4 Remote Control Unit 5 Connections 6 Unit Functions 8 Display 10 Getting Started 10 Setting the Clock 12 Basic Operation 13 Listening to iPod 15 Operating iPod 16...

Owners Manual
Page 5
... different types of the unit. < Even if the remote control unit is operated within the effective range (5 m), remote control operation may operate incorrectly. Battery replacement If the distance required between the unit and the remote control unit. < If the remote control unit is not to be used . Remote Control Unit The provided remote control unit allows the unit to be operated from...
... different types of the unit. < Even if the remote control unit is operated within the effective range (5 m), remote control operation may operate incorrectly. Battery replacement If the distance required between the unit and the remote control unit. < If the remote control unit is not to be used . Remote Control Unit The provided remote control unit allows the unit to be operated from...

Owners Manual
Page 9
... menu. See page 14 for details. I DISPLAY In standby mode, use these buttons to tune in this button to check the timer on the remote control will also operate similarly. In iPod mode, use these buttons to select a preset station. P PHONES For private listening, insert the headphones plug into...dimming. K TUNING/TIME In TUNER mode, use these buttons to select the source you want to listen to adjust the volume level. O Remote sensor When operating the remote control unit, point it towards here. This button is also used for a part of a track. W MUTING Use this jack, and adjust the...
... menu. See page 14 for details. I DISPLAY In standby mode, use these buttons to tune in this button to check the timer on the remote control will also operate similarly. In iPod mode, use these buttons to select a preset station. P PHONES For private listening, insert the headphones plug into...dimming. K TUNING/TIME In TUNER mode, use these buttons to select the source you want to listen to adjust the volume level. O Remote sensor When operating the remote control unit, point it towards here. This button is also used for a part of a track. W MUTING Use this jack, and adjust the...
Owners Manual
Page 11
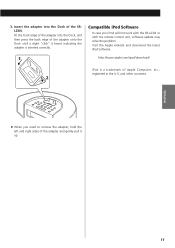
... remove the adapter, hold the left and right sides of the SRL230i. 3. Compatible iPod Software In case your iPod will not work with the SR-L230i or with the remote control unit, software update may solve the problem. Insert the adapter into the Dock, and then press the back edge of Apple Computer, Inc...
... remove the adapter, hold the left and right sides of the SRL230i. 3. Compatible iPod Software In case your iPod will not work with the SR-L230i or with the remote control unit, software update may solve the problem. Insert the adapter into the Dock, and then press the back edge of Apple Computer, Inc...

Owners Manual
Page 22
... button. < During timer playback and snoozing, all the function cannot work except the following buttons: ALARM 1, ALARM 2, SNOOZE, DISPLAY Standard Accessories Remote Control Unit (RC-1151W or RC-1151B) x 1 Battery for Remote Control Unit (AAA) x 2 Battery for Memory Backup (CR2032) x 1 AM loop antenna x 1 Dock adapter x 5 (adapter "60GB (color) + Photo 40/60GB" premounted) Stereo mini...
... button. < During timer playback and snoozing, all the function cannot work except the following buttons: ALARM 1, ALARM 2, SNOOZE, DISPLAY Standard Accessories Remote Control Unit (RC-1151W or RC-1151B) x 1 Battery for Remote Control Unit (AAA) x 2 Battery for Memory Backup (CR2032) x 1 AM loop antenna x 1 Dock adapter x 5 (adapter "60GB (color) + Photo 40/60GB" premounted) Stereo mini...
Owners Manual
Page 23
e Adjust the volume. e Pull out the headphone's plug from the Dock connector of the SR-L230i and the iPod, and insert the iPod again. e If the battery is near the unit, turn them , or turn it off. e If a strong light is ... you have problems with your dealer or TEAC service center. No sound from them off the HOLD switch of the unit. The sound is too close to remove any station, or signal is too weak. e The unit is noisy. Remote control doesn't work. e Clear obstacles between the remote control unit and the main unit. e Set...
e Adjust the volume. e Pull out the headphone's plug from the Dock connector of the SR-L230i and the iPod, and insert the iPod again. e If the battery is near the unit, turn them , or turn it off. e If a strong light is ... you have problems with your dealer or TEAC service center. No sound from them off the HOLD switch of the unit. The sound is too close to remove any station, or signal is too weak. e The unit is noisy. Remote control doesn't work. e Clear obstacles between the remote control unit and the main unit. e Set...
