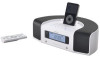

Owners Manual
Page 2
... (servicing) instructions in any way, such as power-supply cord or plug is used, use caution when moving the cart/apparatus combination to qualified service personnel. If the provided plug does not fit into the apparatus, the apparatus has been exposed to persons. A grounding type plug has two blades and a third grounding prong. The lightning flash with the manufacturer's instructions. 8) Do not install near...
... (servicing) instructions in any way, such as power-supply cord or plug is used, use caution when moving the cart/apparatus combination to qualified service personnel. If the provided plug does not fit into the apparatus, the apparatus has been exposed to persons. A grounding type plug has two blades and a third grounding prong. The lightning flash with the manufacturer's instructions. 8) Do not install near...

Owners Manual
Page 3
... TEAC CORPORATION for a Class B digital device, pursuant to Part 15 of the following measures: • Reorient or relocate the equipment and/or the receiving antenna. • Increase the separation between the equipment and receiver. • Connect the equipment into an outlet on the apparatus. < Do not install this equipment does cause harmful interference to radio or television reception...
... TEAC CORPORATION for a Class B digital device, pursuant to Part 15 of the following measures: • Reorient or relocate the equipment and/or the receiving antenna. • Increase the separation between the equipment and receiver. • Connect the equipment into an outlet on the apparatus. < Do not install this equipment does cause harmful interference to radio or television reception...
Owners Manual
Page 4
Before Using the Unit 4 Remote Control Unit 5 Connections 6 Unit Functions 8 Display 10 Getting Started 10 Setting the Clock 12 Basic Operation 13 Listening to iPod 15 Operating iPod 16 Listening to an External Source 17 Listening to the Radio 18 Preset Tuning 19 Timer 20 Specifications 22 Troubleshooting 23 Read this before attempting any doubt regarding this unit. If you for choosing TEAC. Also avoid locations subject to vibrations...
Before Using the Unit 4 Remote Control Unit 5 Connections 6 Unit Functions 8 Display 10 Getting Started 10 Setting the Clock 12 Basic Operation 13 Listening to iPod 15 Operating iPod 16 Listening to an External Source 17 Listening to the Radio 18 Preset Tuning 19 Timer 20 Specifications 22 Troubleshooting 23 Read this before attempting any doubt regarding this unit. If you for choosing TEAC. Also avoid locations subject to vibrations...

Owners Manual
Page 5
.... 5 Make sure that the batteries are used near other products which generate infrared rays, or if other products may operate incorrectly. Battery installation < Do not heat or disassemble batteries and never dispose of the same type. Battery replacement If the distance required between the unit and the remote control unit. < If the remote control unit is operated within the effective range (5 m), remote control operation may be used for a long time (more...
.... 5 Make sure that the batteries are used near other products which generate infrared rays, or if other products may operate incorrectly. Battery installation < Do not heat or disassemble batteries and never dispose of the same type. Battery replacement If the distance required between the unit and the remote control unit. < If the remote control unit is operated within the effective range (5 m), remote control operation may be used for a long time (more...

Owners Manual
Page 7
... them in a fire. Then connect the AC adapter's plug to insert the battery with it's positive + face facing outer side. Replace the lid. D Battery compartment The battery supplies a backup power to an AC outlet that supplies the correct voltage. 4. A FM antenna While in FM mode, tune in the direction which gives the best reception. Battery installation 1. Be sure to connect the adapter to the builtin clock and memory, when the unit...
... them in a fire. Then connect the AC adapter's plug to insert the battery with it's positive + face facing outer side. Replace the lid. D Battery compartment The battery supplies a backup power to an AC outlet that supplies the correct voltage. 4. A FM antenna While in FM mode, tune in the direction which gives the best reception. Battery installation 1. Be sure to connect the adapter to the builtin clock and memory, when the unit...

Owners Manual
Page 8
... an iPod mobile digital device into this button for more than 2 seconds to select stereo or monaural. 8 C ALARM 1, ALARM 2 Hold down these buttons are used to set sleep timer. E CLOCK ADJ Use this dock. F FM MODE In FM TUNER mode, use , insert an appropriate Dock adapter in the Dock (see page 10). Unit Functions B C D E FG A A R Q PON M L K J I H STANDBAY/ON Q FUNCTION R C ALARM MENU FM/AM G 1 2 PRESET/SCROLL SELECT FM MODE U F S V N H K N MEMORY/ CLOCK ADJ T SLEEP DISPLAY BASS TREBLE MUTING I Y B W X A Speakers (Stereo) B SLEEP Use this button to turn...
... an iPod mobile digital device into this button for more than 2 seconds to select stereo or monaural. 8 C ALARM 1, ALARM 2 Hold down these buttons are used to set sleep timer. E CLOCK ADJ Use this dock. F FM MODE In FM TUNER mode, use , insert an appropriate Dock adapter in the Dock (see page 10). Unit Functions B C D E FG A A R Q PON M L K J I H STANDBAY/ON Q FUNCTION R C ALARM MENU FM/AM G 1 2 PRESET/SCROLL SELECT FM MODE U F S V N H K N MEMORY/ CLOCK ADJ T SLEEP DISPLAY BASS TREBLE MUTING I Y B W X A Speakers (Stereo) B SLEEP Use this button to turn...

Owners Manual
Page 9
... connect a portable audio player to this button to start or pause playback of iPod. S PRESET/SCROLL (‡/°) In TUNER mode, use these buttons to select a preset station. This button is reached, use this button to display the current time. In iPod mode, use these buttons to skip tracks. Y BASS Use this button to select FM or AM. ENGLISH G FM/AM In TUNER mode, press this button to enter bass level adjustment mode. R FUNCTION Use these buttons to turn the unit off time. L SNOOZE/DIMMER...
... connect a portable audio player to this button to start or pause playback of iPod. S PRESET/SCROLL (‡/°) In TUNER mode, use these buttons to select a preset station. This button is reached, use this button to display the current time. In iPod mode, use these buttons to skip tracks. Y BASS Use this button to select FM or AM. ENGLISH G FM/AM In TUNER mode, press this button to enter bass level adjustment mode. R FUNCTION Use these buttons to turn the unit off time. L SNOOZE/DIMMER...
Owners Manual
Page 10
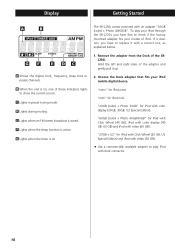
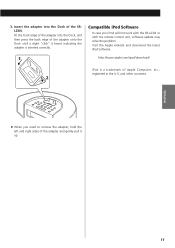
... the timer is on . GF E DC A Shows the digital clock, frequency, sleep time or preset channels. 1. B When the unit is on , one , as explained below. F Lights when the sleep function is tuned. Remove the adapter from the Dock of iPod. C Lights in preset tuning mode. If it does not, you have to play iPod with a correct one of these indicators lights to check if the factory mounted adapter fits your model...
... the timer is on . GF E DC A Shows the digital clock, frequency, sleep time or preset channels. 1. B When the unit is on , one , as explained below. F Lights when the sleep function is tuned. Remove the adapter from the Dock of iPod. C Lights in preset tuning mode. If it does not, you have to play iPod with a correct one of these indicators lights to check if the factory mounted adapter fits your model...
Owners Manual
Page 11
... up. and other countries. 2 < When you need to remove the adapter, hold the left and right sides of the SRL230i. ENGLISH 11 Compatible iPod Software In case your iPod will not work with the SR-L230i or with the remote control unit, software update may solve the problem. 3. Visit the Apple website and download the latest iPod Software. 1 http://www.apple.com/ipod/download/ iPod is inserted correctly.
... up. and other countries. 2 < When you need to remove the adapter, hold the left and right sides of the SRL230i. ENGLISH 11 Compatible iPod Software In case your iPod will not work with the SR-L230i or with the remote control unit, software update may solve the problem. 3. Visit the Apple website and download the latest iPod Software. 1 http://www.apple.com/ipod/download/ iPod is inserted correctly.

Owners Manual
Page 12
... HR" blinks on the display. If you want to change the hour mode, press the . Setting the Clock 4 Press the skip button (.//) to set the current minute. 2 Press the CLOCK ADJ button again. The clock starts. < When no button is "TUNER". 1 Press the CLOCK ADJ button to display the clock. 6 Press the skip button (.//) to set the current hour. / CLOCK ADJ 5 Press the CLOCK ADJ button. The "hour" value blinks. 12 or / button. 7 Press the CLOCK ADJ button.
... HR" blinks on the display. If you want to change the hour mode, press the . Setting the Clock 4 Press the skip button (.//) to set the current minute. 2 Press the CLOCK ADJ button again. The clock starts. < When no button is "TUNER". 1 Press the CLOCK ADJ button to display the clock. 6 Press the skip button (.//) to set the current hour. / CLOCK ADJ 5 Press the CLOCK ADJ button. The "hour" value blinks. 12 or / button. 7 Press the CLOCK ADJ button.
Owners Manual
Page 13
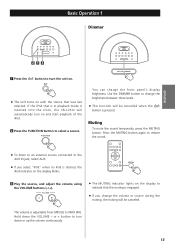
... volume continuously. 13 Use the DIMMER button to change the brightness between three levels. < This function will automatically turn down the VOLUME - Press the MUTING button again to restore the sound. < To listen to an external source connected to the AUX IN jack, select AUX. MUTING < If you select "iPod" when no iPod is docked, the iPod indicator on the display blinks. 3 Play the source, and adjust the volume using the VOLUME buttons (-/+). < The MUTING indicator lights on the display...
... volume continuously. 13 Use the DIMMER button to change the brightness between three levels. < This function will automatically turn down the VOLUME - Press the MUTING button again to restore the sound. < To listen to an external source connected to the AUX IN jack, select AUX. MUTING < If you select "iPod" when no iPod is docked, the iPod indicator on the display blinks. 3 Play the source, and adjust the volume using the VOLUME buttons (-/+). < The MUTING indicator lights on the display...

Owners Manual
Page 14
... headphones plug into Standby mode. TO AVOID DAMAGING YOUR HEARING - And then press the VOLUME buttons (-/+) to "+5". The unit will automatically turn off and then into the PHONES jack, and adjust the volume. Sleep timer Each press of the SLEEP button changes the time indication by 10 minutes. Each press of the SLEEP button permits setting an interval (from 90 down to check remaining time, press the SLEEP button once. < If you have plugged...
... headphones plug into Standby mode. TO AVOID DAMAGING YOUR HEARING - And then press the VOLUME buttons (-/+) to "+5". The unit will automatically turn off and then into the PHONES jack, and adjust the volume. Sleep timer Each press of the SLEEP button changes the time indication by 10 minutes. Each press of the SLEEP button permits setting an interval (from 90 down to check remaining time, press the SLEEP button once. < If you have plugged...
Owners Manual
Page 15
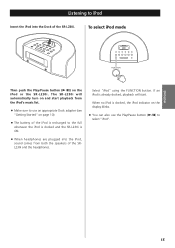
... the iPod, sound comes from the iPod's music list. < Make sure to use the Play/Pause button (y/J) to iPod Insert the iPod into the Dock of the SRL230i and the headphones. If an iPod is docked, the iPod indicator on the display blinks. < You can also use an appropriate Dock adapter (see "Getting Started" on the iPod or the SR-L230i. ENGLISH 15 Select "iPod" using the FUNCTION button. Listening to select "iPod". When no iPod is already docked, playback will automatically turn...
... the iPod, sound comes from the iPod's music list. < Make sure to use the Play/Pause button (y/J) to iPod Insert the iPod into the Dock of the SRL230i and the headphones. If an iPod is docked, the iPod indicator on the display blinks. < You can also use an appropriate Dock adapter (see "Getting Started" on the iPod or the SR-L230i. ENGLISH 15 Select "iPod" using the FUNCTION button. Listening to select "iPod". When no iPod is already docked, playback will automatically turn...
Owners Manual
Page 16
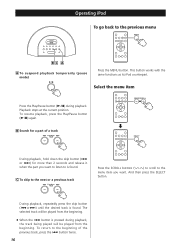
... stops at the current position. And then press the SELECT button. Select the menu item Press the Play/Pause button (G/J) during playback, the track being played will be played from the beginning. < When the . Operating iPod To go back to the beginning of a track SELECT During playback, hold down the skip button (. This button works with the same functions as its iPod counterpart. PRESET...
... stops at the current position. And then press the SELECT button. Select the menu item Press the Play/Pause button (G/J) during playback, the track being played will be played from the beginning. < When the . Operating iPod To go back to the beginning of a track SELECT During playback, hold down the skip button (. This button works with the same functions as its iPod counterpart. PRESET...
Owners Manual
Page 17
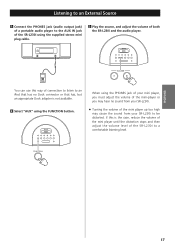
... the SR-L230i to an iPod that has no sound from your SR-L230i. < Turning the volume of the mini player up too high may cause the sound from your SR-L230i to the AUX IN jack of the SR-L230i using the FUNCTION button. If this way of both the SR-L230i and the audio player. ENGLISH 17 You can use this is not available. 2 Select "AUX" using the supplied stereo mini plug cable. 3 Play the source, and adjust the volume of connection...
... the SR-L230i to an iPod that has no sound from your SR-L230i. < Turning the volume of the mini player up too high may cause the sound from your SR-L230i to the AUX IN jack of the SR-L230i using the FUNCTION button. If this way of both the SR-L230i and the audio player. ENGLISH 17 You can use this is not available. 2 Select "AUX" using the supplied stereo mini plug cable. 3 Play the source, and adjust the volume of connection...

Owners Manual
Page 18
... stereo reception, select this mode. Stereo FM stereo broadcasts are received in stereo and the "STEREO" indicator lights in , the tuning process will now be tuned automatically (manual selection) When the skip button (.or/) is found. DISPLAY 2 Select FM or AM using the FUNCTION button. Press the skip button repeatedly until you get stations clearly. 3 Select the station you want to listen to is pressed momentarily the frequency changes by a fixed...
... stereo reception, select this mode. Stereo FM stereo broadcasts are received in stereo and the "STEREO" indicator lights in , the tuning process will now be tuned automatically (manual selection) When the skip button (.or/) is found. DISPLAY 2 Select FM or AM using the FUNCTION button. Press the skip button repeatedly until you get stations clearly. 3 Select the station you want to listen to is pressed momentarily the frequency changes by a fixed...

Owners Manual
Page 20
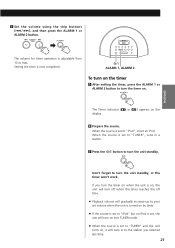
... ALARM 1 or ALARM 2 button for about 8 seconds, the timer setting mode will be set the hour, and then press the ALARM 1 or ALARM 2 button. 5 Press the skip buttons (. The clock and the Timer indicator ( or ) blinks on time is pressed for more than 2 seconds to set . or /) to display "ON". Now the off time value blink. < The unit can be cancelled. 2 Press the skip buttons (. "iPod" or "TUNER" blinks. 6 Select a source (iPod or TUNER) using...
... ALARM 1 or ALARM 2 button for about 8 seconds, the timer setting mode will be set the hour, and then press the ALARM 1 or ALARM 2 button. 5 Press the skip buttons (. The clock and the Timer indicator ( or ) blinks on time is pressed for more than 2 seconds to set . or /) to display "ON". Now the off time value blink. < The unit can be cancelled. 2 Press the skip buttons (. "iPod" or "TUNER" blinks. 6 Select a source (iPod or TUNER) using...
Owners Manual
Page 21
Setting the timer is adjustable from 10 to max. 7 Set the volume using the skip buttons (.//), and then press the ALARM 1 or ALARM 2 button. ALARM 1, ALARM 2 To turn on the timer 1 After setting the timer, press the ALARM 1 or ALARM 2 button to "iPod", insert an iPod. When the source is set , the unit will tune in a station. 3 Press the button to turn on into TUNER mode. < When the source is set to turn the timer on , it will turn the unit...
Setting the timer is adjustable from 10 to max. 7 Set the volume using the skip buttons (.//), and then press the ALARM 1 or ALARM 2 button. ALARM 1, ALARM 2 To turn on the timer 1 After setting the timer, press the ALARM 1 or ALARM 2 button to "iPod", insert an iPod. When the source is set , the unit will tune in a station. 3 Press the button to turn on into TUNER mode. < When the source is set to turn the timer on , it will turn the unit...

Owners Manual
Page 22
...) x 1 Battery for Remote Control Unit (AAA) x 2 Battery for 5 minutes then turn on . FM: 87.5 MHz to 108.0 MHz AM: 530 kHz to 1,710 kHz The Timer indicator ( or ) disappears from production models. 22 Press the ALARM 1 or ALARM 2 button again to turn it off for Memory Backup (CR2032) x 1 AM loop antenna x 1 Dock adapter x 5 (adapter "60GB (color) + Photo 40/60GB" premounted) Stereo mini plug cable x 1 AC Adapter x 1 Owner's Manual x 1 Warranty Card x 1 < Design and specifications are...
...) x 1 Battery for Remote Control Unit (AAA) x 2 Battery for 5 minutes then turn on . FM: 87.5 MHz to 108.0 MHz AM: 530 kHz to 1,710 kHz The Timer indicator ( or ) disappears from production models. 22 Press the ALARM 1 or ALARM 2 button again to turn it off for Memory Backup (CR2032) x 1 AM loop antenna x 1 Dock adapter x 5 (adapter "60GB (color) + Photo 40/60GB" premounted) Stereo mini plug cable x 1 AC Adapter x 1 Owner's Manual x 1 Warranty Card x 1 < Design and specifications are...
Owners Manual
Page 23
... FM or the AM antenna until you can solve the problem yourself before using. 23 No sound from the PHONES jack. e Check the dock adapter (see page 11). e Set off . Maintenance If the surface of the unit to the AC power supply. Remote control doesn't work. e Software update may damage the surface of the unit. Will not play. ENGLISH Troubleshooting If you have problems with your dealer or TEAC service center.
... FM or the AM antenna until you can solve the problem yourself before using. 23 No sound from the PHONES jack. e Check the dock adapter (see page 11). e Set off . Maintenance If the surface of the unit to the AC power supply. Remote control doesn't work. e Software update may damage the surface of the unit. Will not play. ENGLISH Troubleshooting If you have problems with your dealer or TEAC service center.


