NP-H750 Owner's Manual
Page 6
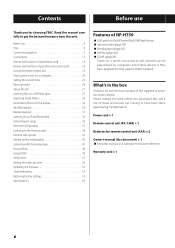
...) × 1 Batteries for choosing TEAC. Warranty card × 1 6 Please contact the store where you for remote control unit (AAA) × 2 Owner's manual (this document) × 1 ppKeep this unit. Before use Thank you purchased this unit if any of NP-H750 ppUSB port for iPod/iPhone/iPad/USB...with the media player 47 Using AirPlay 48 Using DLNA 49 Sleep Timer 50 Setting the wake-up timer 50 Updating the firmware 52 Troubleshooting 57 Restoring factory settings 59 Specifications 60 Features of these accessories are missing or have applications that support DLNA installed...
...) × 1 Batteries for choosing TEAC. Warranty card × 1 6 Please contact the store where you for remote control unit (AAA) × 2 Owner's manual (this document) × 1 ppKeep this unit. Before use Thank you purchased this unit if any of NP-H750 ppUSB port for iPod/iPhone/iPad/USB...with the media player 47 Using AirPlay 48 Using DLNA 49 Sleep Timer 50 Setting the wake-up timer 50 Updating the firmware 52 Troubleshooting 57 Restoring factory settings 59 Specifications 60 Features of these accessories are missing or have applications that support DLNA installed...
NP-H750 Owner's Manual
Page 52
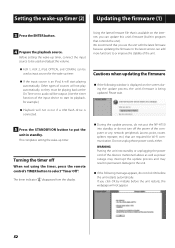
..., either. Cautions when updating the firmware ppIf the following message appears, do not turn off When not using the timer, press the remote control's TIMER button to be used as power outage may interrupt the update process and may result in permanent damage to put the NP-H750 into standby or unplugging the...
..., either. Cautions when updating the firmware ppIf the following message appears, do not turn off When not using the timer, press the remote control's TIMER button to be used as power outage may interrupt the update process and may result in permanent damage to put the NP-H750 into standby or unplugging the...
NP-H750 Owner's Manual
Page 53
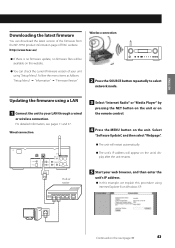
ENGLISH Downloading the latest firmware You can check the current firmware version of TEAC website. http://www.teac.eu/ ppIf there is no firmware update, no firmware files will restart automatically. For detailed information, see pages 11 and 37. ppIn this example, we explain this procedure using ... "Setup Menu". ppThe unit will be available on the website. ppYou can download the latest version of the firmware from the NP-H750 product information page of your unit using a LAN 1 Connect the unit to select network mode. Select "Software Update", and then select ...
ENGLISH Downloading the latest firmware You can check the current firmware version of TEAC website. http://www.teac.eu/ ppIf there is no firmware update, no firmware files will restart automatically. For detailed information, see pages 11 and 37. ppIn this example, we explain this procedure using ... "Setup Menu". ppThe unit will be available on the website. ppYou can download the latest version of the firmware from the NP-H750 product information page of your unit using a LAN 1 Connect the unit to select network mode. Select "Software Update", and then select ...

NP-H750 Owner's Manual
Page 54
When the firmware update is also displayed on . If the following message will restart automatically. 9 Disconnect the power cord from the outlet, connect it again, and then press the STANDBY/ ON button to turn the unit on the unit. Updating the firmware (2) 6 Click Browse..., and then select the desired firmware file (.fw). 8 Click "OK" to Step 5 . Check the file and its name. 54 c When the update starts, the following message appears, click "OK", and then return to start the firmware update. ppThe update status is completed, the unit will appear. 7 Click "Upload".
When the firmware update is also displayed on . If the following message will restart automatically. 9 Disconnect the power cord from the outlet, connect it again, and then press the STANDBY/ ON button to turn the unit on the unit. Updating the firmware (2) 6 Click Browse..., and then select the desired firmware file (.fw). 8 Click "OK" to Step 5 . Check the file and its name. 54 c When the update starts, the following message appears, click "OK", and then return to start the firmware update. ppThe update status is completed, the unit will appear. 7 Click "Upload".

NP-H750 Owner's Manual
Page 55
ENGLISH Updating the firmware via the Internet 1 Press the SOURCE button repeatedly to select network mode. 4 Select "Software Update" from "Setup Menu" by pressing the MENU button. Continued on the display. "Software Update" appears on the next page e 55 Setup Menu ›Software Update 3 Open "Setup Menu" by turning the MULTI JOG knob, and then press the ENTER button or / button. or 2 Select "Internet Radio" by pressing the NET button.
ENGLISH Updating the firmware via the Internet 1 Press the SOURCE button repeatedly to select network mode. 4 Select "Software Update" from "Setup Menu" by pressing the MENU button. Continued on the display. "Software Update" appears on the next page e 55 Setup Menu ›Software Update 3 Open "Setup Menu" by turning the MULTI JOG knob, and then press the ENTER button or / button. or 2 Select "Internet Radio" by pressing the NET button.

NP-H750 Owner's Manual
Page 56
... 56 ON button to turn the unit on . or 4 Disconnect the power cord from TEAC website, save it on the unit's display. Setup Menu ›Software Update ppYou can check the current firmware version of the firmware file from the outlet, connect it again, and then press the STANDBY/ ON button to...to show the following on a USB flash drive, and insert the USB flash drive into the USB port in "Updating the firm- Installation of the firmware file starts automatically. or ware via the Internet" on page 55 to select "USB", and then press the ENTER button or the / button. ...
... 56 ON button to turn the unit on . or 4 Disconnect the power cord from TEAC website, save it on the unit's display. Setup Menu ›Software Update ppYou can check the current firmware version of the firmware file from the outlet, connect it again, and then press the STANDBY/ ON button to...to show the following on a USB flash drive, and insert the USB flash drive into the USB port in "Updating the firm- Installation of the firmware file starts automatically. or ware via the Internet" on page 55 to select "USB", and then press the ENTER button or the / button. ...