
Owners Manual
Page 6
...unit carefully. If you for future reference. 6 Use a clean, dry cloth. < Keep this might result in a safe place for choosing TEAC. If a foreign object should match the voltage as this manual in damage to clean the unit with chemical solvents as printed on the plug, ... 6 Batteries 7 Connections 8 Unit Functions 10 Display 12 Getting Started 13 Setting the Clock 14 Basic Operation 15 Listening to iPod 16 Listening to an External Source 19 Listening to the Radio 20 Preset Tuning 21 Timer 22 Sleep Timer 24 Specifications 24 Troubleshooting 25 Read this before...
...unit carefully. If you for future reference. 6 Use a clean, dry cloth. < Keep this might result in a safe place for choosing TEAC. If a foreign object should match the voltage as this manual in damage to clean the unit with chemical solvents as printed on the plug, ... 6 Batteries 7 Connections 8 Unit Functions 10 Display 12 Getting Started 13 Setting the Clock 14 Basic Operation 15 Listening to iPod 16 Listening to an External Source 19 Listening to the Radio 20 Preset Tuning 21 Timer 22 Sleep Timer 24 Specifications 24 Troubleshooting 25 Read this before...
Owners Manual
Page 22
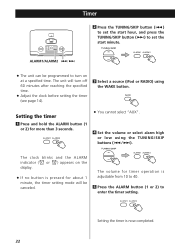
...about 1 minute, the timer setting mode will turn off 60 minutes after reaching the specified time. < Adjust the clock before setting the timer (see page 14). 3 Select a source (iPod or RADIO) using the TUNING/SKIP buttons (.//). Timer 2 Press the TUNING/SKIP button (.) to set the start hour, ...and press the TUNING/SKIP button (/) to enter the timer setting. The clock blinks and the ALARM indicator ( or ) appears on at...
...about 1 minute, the timer setting mode will turn off 60 minutes after reaching the specified time. < Adjust the clock before setting the timer (see page 14). 3 Select a source (iPod or RADIO) using the TUNING/SKIP buttons (.//). Timer 2 Press the TUNING/SKIP button (.) to set the start hour, ...and press the TUNING/SKIP button (/) to enter the timer setting. The clock blinks and the ALARM indicator ( or ) appears on at...


