
Owner's Manual
Page 2
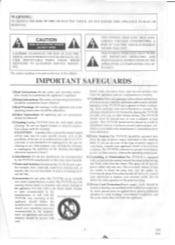
...operating instructions should be routed so that for some specific reason, such as the possibility of the loss of the polarized plug. 12.Power-Cord Protection-Power-supply cords should be read before cleaning. allova.• - Do not defeat the safety purpose of an authorization code for cleaning or any other sources, refer to the operating instructions...OF ELECTRIC SHOCK, DO NOT REMOVE COVER (OR BACK). This TVNCR should be walked on or pinched by placing the TVNCR on the rear of power source indicated on an unstable cart, stand, tripod, bracket, or table. If you...
...operating instructions should be routed so that for some specific reason, such as the possibility of the loss of the polarized plug. 12.Power-Cord Protection-Power-supply cords should be read before cleaning. allova.• - Do not defeat the safety purpose of an authorization code for cleaning or any other sources, refer to the operating instructions...OF ELECTRIC SHOCK, DO NOT REMOVE COVER (OR BACK). This TVNCR should be walked on or pinched by placing the TVNCR on the rear of power source indicated on an unstable cart, stand, tripod, bracket, or table. If you...
Owner's Manual
Page 3
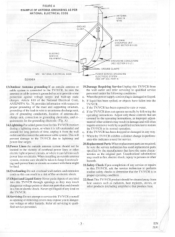
... antenna-discharge unit, connection to lightning and power-line surges. 15.Power Lines-An outside antenna system should not be fatal. 16.Overloading-Do not overload wall outlets and extension cords as they may expose you to dangerous voltage or other electric light or power circuits, or where it from heat sources such as the original part. When the power-supply cord or plug...
... antenna-discharge unit, connection to lightning and power-line surges. 15.Power Lines-An outside antenna system should not be fatal. 16.Overloading-Do not overload wall outlets and extension cords as they may expose you to dangerous voltage or other electric light or power circuits, or where it from heat sources such as the original part. When the power-supply cord or plug...

Owner's Manual
Page 4
... wall outlet. AVOID THE HAZARDS OF ELECTRICAL SHOCK AND FIRE • Do not handle the power cord with insufficient ventilation for proper heat dissipation. This equipment has been tested and found to comply with the instructions, may generate or use of broadcast television programming, video tape, film or other acts which can radiate radio frequency energy and, if not installed...
... wall outlet. AVOID THE HAZARDS OF ELECTRICAL SHOCK AND FIRE • Do not handle the power cord with insufficient ventilation for proper heat dissipation. This equipment has been tested and found to comply with the instructions, may generate or use of broadcast television programming, video tape, film or other acts which can radiate radio frequency energy and, if not installed...
Owner's Manual
Page 5
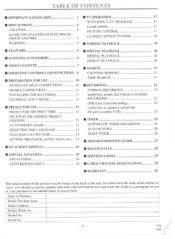
... 4 CLOSED CAPTION SYSTEM 18 WARNING 4 ■ NORMAL PLAYBACK 19 ■ FEATURES 6 ■ SPECIAL PLAYBACK 20 ■ SUPPLIED ACCESSORIES 6 RENTAL PLAYBACK 20 REPEAT PLAYBACK 20 ■ VIDEO CASSETTE 7 ■ SEARCH 21 ■ OPERATING CONTROLS AND FUNCTIONS.. 8 COUNTER MEMORY 21 ■ PREPARATION FOR USE TIME SEARCH 10 21 ANTENNA/CABLE CONNECTIONS 10 ■ RECORDING 22 MOBILE CONNECTION 11 NORMAL RECORDING 22 INSTALLING THE BA1 ihRIES EXTERNAL INPUT MODE...
... 4 CLOSED CAPTION SYSTEM 18 WARNING 4 ■ NORMAL PLAYBACK 19 ■ FEATURES 6 ■ SPECIAL PLAYBACK 20 ■ SUPPLIED ACCESSORIES 6 RENTAL PLAYBACK 20 REPEAT PLAYBACK 20 ■ VIDEO CASSETTE 7 ■ SEARCH 21 ■ OPERATING CONTROLS AND FUNCTIONS.. 8 COUNTER MEMORY 21 ■ PREPARATION FOR USE TIME SEARCH 10 21 ANTENNA/CABLE CONNECTIONS 10 ■ RECORDING 22 MOBILE CONNECTION 11 NORMAL RECORDING 22 INSTALLING THE BA1 ihRIES EXTERNAL INPUT MODE...

Owner's Manual
Page 6
... cable channels.) • Auto Clock Setting-Allows you to the program. • Game mode- You may be suitable for each tape you play. • Rental play mode-Improves playback picture quality of the REC/OTR button. • 1 Year, 8 events (including Daily and Weekly Timer Recording)-The built-in advance. way power- The "-" indication will show a fairly clear picture. • Digital Auto Tracking (DTR)-Adjusts the tracking automatically for use...
... cable channels.) • Auto Clock Setting-Allows you to the program. • Game mode- You may be suitable for each tape you play. • Rental play mode-Improves playback picture quality of the REC/OTR button. • 1 Year, 8 events (including Daily and Weekly Timer Recording)-The built-in advance. way power- The "-" indication will show a fairly clear picture. • Digital Auto Tracking (DTR)-Adjusts the tracking automatically for use...

Owner's Manual
Page 8
... audio output jack of your video camera or another VCR. 2 VIDEO input jack- Press to turn TVNCR on and off. Flashes during the Play mode. (Re- 21 wind Search) ' 411 button- • Press to select a mode from on screen menu. • Press to enter digits when setting program (for Timer Recording. 24 4 Remote Sensor- Press in the Stand-by mode for exam- A button- • Press to select setting modes from the handheld remote control unit. 12 5 POWER button- Receives the infrared control sig- REMOTE CONTROL VIEW...
... audio output jack of your video camera or another VCR. 2 VIDEO input jack- Press to turn TVNCR on and off. Flashes during the Play mode. (Re- 21 wind Search) ' 411 button- • Press to select a mode from on screen menu. • Press to enter digits when setting program (for Timer Recording. 24 4 Remote Sensor- Press in the Stand-by mode for exam- A button- • Press to select setting modes from the handheld remote control unit. 12 5 POWER button- Receives the infrared control sig- REMOTE CONTROL VIEW...

Owner's Manual
Page 9
... button- Press to set counter ing. (used on the TV/VCR only) memory on the to the AC cord. - 9 - OTR button- Press to begin manual recording. 0:00:00. Press to adjust the volume 21 CHANNEL RETURN button-Press to go back to select desired channels 24 TIME SEARCH button- function- Press to the level. To select channels 1 to select cable channels which page 26.) are equal or greater than number 100...
... button- Press to set counter ing. (used on the TV/VCR only) memory on the to the AC cord. - 9 - OTR button- Press to begin manual recording. 0:00:00. Press to adjust the volume 21 CHANNEL RETURN button-Press to go back to select desired channels 24 TIME SEARCH button- function- Press to the level. To select channels 1 to select cable channels which page 26.) are equal or greater than number 100...
Owner's Manual
Page 10
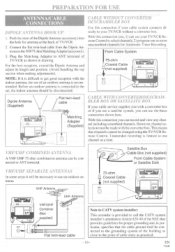
Plug the Matching Adapter to select channels, 2) program one channel at the back of TV/VCR as practical. - 10 - CABLE WITHOUT CONVERTER./ DESCRAMBLER BOX Use this connection if your cable system connects directly to your TVNCR Remote Control to ANT terminal of TVNCR. 2. From Cable System 75-ohm Coaxial Cable (not supplied) 'P Dipole Antenna (Supplied) ° moors , / Flat twin-lead cable ' Matching Adapter (Supplied) ANL C) CABLE WITH CONVERTEI?IDESCRAMBLER BOX OR SATELLITE BOX If your cable service supplies you , 1) can...
Plug the Matching Adapter to select channels, 2) program one channel at the back of TV/VCR as practical. - 10 - CABLE WITHOUT CONVERTER./ DESCRAMBLER BOX Use this connection if your cable system connects directly to your TVNCR Remote Control to ANT terminal of TVNCR. 2. From Cable System 75-ohm Coaxial Cable (not supplied) 'P Dipole Antenna (Supplied) ° moors , / Flat twin-lead cable ' Matching Adapter (Supplied) ANL C) CABLE WITH CONVERTEI?IDESCRAMBLER BOX OR SATELLITE BOX If your cable service supplies you , 1) can...
Owner's Manual
Page 12
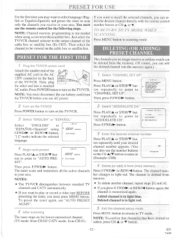
... want to turn on the TVNCR Press POWER button to play or record a video tape BEFORE presetting the tuner, you must press MENU button. Added channel is not needed when using F.FWD/10. SETUP - TO RETURN TO TV MODE WHEN SCANNING Press MENU button in light red. 5 Exit the channel setup mode Press MENU button to returns to "ADD/DELETE CH". - button. -MENU- CHANNEL SET UP - PRESET FOR USE For the first time you may want to select language (English or...
... want to turn on the TVNCR Press POWER button to play or record a video tape BEFORE presetting the tuner, you must press MENU button. Added channel is not needed when using F.FWD/10. SETUP - TO RETURN TO TV MODE WHEN SCANNING Press MENU button in light red. 5 Exit the channel setup mode Press MENU button to returns to "ADD/DELETE CH". - button. -MENU- CHANNEL SET UP - PRESET FOR USE For the first time you may want to select language (English or...
Owner's Manual
Page 13
... PLAY/A or STOP/V button repeatedly to point to 2:00AM When programmed recording ends between 2:00AM - 2:59AM on this day, the TVNCR will start recording at 2:00AM. AUTO CLCOC AUTO CLOCK CH SET(( MANUAL CLOCK SET P O.S.T. CHANNEL SET UP USERS SET UP LANGUAGE IENGLISNI ION 'CAPTION) CTIAMPETSEARCH •-^ 2 Select "TV" or "CATV" Select [TV] or [CATV] using F.FWD/I0- When Daylight-Saving Time is ON, the clock will change...
... PLAY/A or STOP/V button repeatedly to point to 2:00AM When programmed recording ends between 2:00AM - 2:59AM on this day, the TVNCR will start recording at 2:00AM. AUTO CLCOC AUTO CLOCK CH SET(( MANUAL CLOCK SET P O.S.T. CHANNEL SET UP USERS SET UP LANGUAGE IENGLISNI ION 'CAPTION) CTIAMPETSEARCH •-^ 2 Select "TV" or "CATV" Select [TV] or [CATV] using F.FWD/I0- When Daylight-Saving Time is ON, the clock will change...
Owner's Manual
Page 14
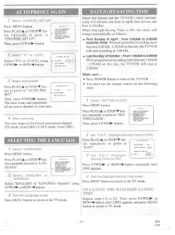
... channel number, remain on the TVNCR set in your cable system. Make sure ... • Press POWER button to turn off the Auto Clock Setting feature. - 14- The TVNCR cannot control the channels of the cable converter box. • If you use the remote control for your area, follow "MANUAL CLOCK SETTING". se-rpm:it . (See NOTES:) • You must use a mobile connection, you must scan each channel for a couple of the cable converter box...
... channel number, remain on the TVNCR set in your cable system. Make sure ... • Press POWER button to turn off the Auto Clock Setting feature. - 14- The TVNCR cannot control the channels of the cable converter box. • If you use the remote control for your area, follow "MANUAL CLOCK SETTING". se-rpm:it . (See NOTES:) • You must use a mobile connection, you must scan each channel for a couple of the cable converter box...
Owner's Manual
Page 15
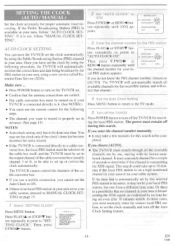
... F.FWD/III button. - Then, press F.FWD/I10. I Select "SETTING CLOCK" Press MENU button. In the example below, the clock is to be set to: • You must be turned on. button. - DATE March 1st, 1997 SETTING TIME 5:40PM • Power must use the remote control for 1st) Then, press F.FWD/100. TIMER PROGRAMMING PICTURE CONTROL lo SETTING CLOCK LANGUEANGGELISH) CHANNEL SET UP USER'S SET UP • 2 Select "MANUAL CLOCK SET" Press PLAY/A or STOP/V button repeatedly to point...
... F.FWD/III button. - Then, press F.FWD/I10. I Select "SETTING CLOCK" Press MENU button. In the example below, the clock is to be set to: • You must be turned on. button. - DATE March 1st, 1997 SETTING TIME 5:40PM • Power must use the remote control for 1st) Then, press F.FWD/100. TIMER PROGRAMMING PICTURE CONTROL lo SETTING CLOCK LANGUEANGGELISH) CHANNEL SET UP USER'S SET UP • 2 Select "MANUAL CLOCK SET" Press PLAY/A or STOP/V button repeatedly to point...
Owner's Manual
Page 17
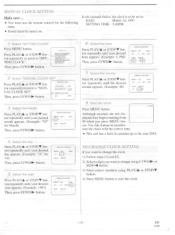
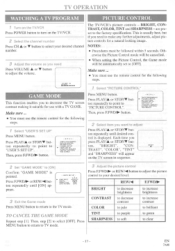
...; Procedures must use with a TV GAME. Select "PICTURE CONTROL" GAME MODE This function enables you need Press VOLUME A or V button to the TV mode. Then, press F.FWD/11 button. -MENUTIMER PROGRAMMING B. are preset to your desired channel number. Make sure ... • You must be automatically set to [ON] Confirm "GAME MODE" is pointed. OMAE MODE RENTAL REPEAT PLAY AUTO RETURN 3 Adjust the picture control Press F.FWD/100 or REW/' button to adjust the picture control to the factory specification. BRIGHT...
...; Procedures must use with a TV GAME. Select "PICTURE CONTROL" GAME MODE This function enables you need Press VOLUME A or V button to the TV mode. Then, press F.FWD/11 button. -MENUTIMER PROGRAMMING B. are preset to your desired channel number. Make sure ... • You must be automatically set to [ON] Confirm "GAME MODE" is pointed. OMAE MODE RENTAL REPEAT PLAY AUTO RETURN 3 Adjust the picture control Press F.FWD/100 or REW/' button to adjust the picture control to the factory specification. BRIGHT...

Owner's Manual
Page 18
... P. TIMER PRCGRAMIAING PICTURE CONTROL SETTING CLOCK CHANNEL SET UP USER'S SET UP LANGUAGIMIGAL ► TIRE SEAR" NOTE: Not all programs are likely to the TEXT mode. a. Playback of news if you want by selecting either a dialogue caption or text display added to provide error free closed captions. To clear screen, select [CAPTION1], [CAPTION2] or [OFF]. 3 Exit the caption setting mode Press MENU button to return to "CAPTION". -MENU- TO CANCEL THE CLOSED CAPTION SYSTEM Repeat steps [1] and [2], select [OFF] using...
... P. TIMER PRCGRAMIAING PICTURE CONTROL SETTING CLOCK CHANNEL SET UP USER'S SET UP LANGUAGIMIGAL ► TIRE SEAR" NOTE: Not all programs are likely to the TEXT mode. a. Playback of news if you want by selecting either a dialogue caption or text display added to provide error free closed captions. To clear screen, select [CAPTION1], [CAPTION2] or [OFF]. 3 Exit the caption setting mode Press MENU button to return to "CAPTION". -MENU- TO CANCEL THE CLOSED CAPTION SYSTEM Repeat steps [1] and [2], select [OFF] using...

Owner's Manual
Page 21
... is not operative in recording mode. • Counter Memory function is not operative in the TVNCR. In the example below: To watch a program after 2 hour 50 minutes from any position by rewinding or fast forwarding. MUER PROGRAMUINO PICTURE CONTROL SETTING CLOCK CHANNEL SET UP USER'S SET UP LANGUAGE [ENGLISH) ► •,17,?E:',Agi""°"" 2 Enter your desired time Press PLAY/A or STOP/V button repeatedly until...
... is not operative in recording mode. • Counter Memory function is not operative in the TVNCR. In the example below: To watch a program after 2 hour 50 minutes from any position by rewinding or fast forwarding. MUER PROGRAMUINO PICTURE CONTROL SETTING CLOCK CHANNEL SET UP USER'S SET UP LANGUAGE [ENGLISH) ► •,17,?E:',Agi""°"" 2 Enter your desired time Press PLAY/A or STOP/V button repeatedly until...

Owner's Manual
Page 23
... the TVNCR power will increase the recording time by friends or relatives for your TVNCR and a Source (Playing) VCR using the following diagram. 1 Select the channel to be an infringement of video tapes made by 30 minutes. The remote control might affect the Source (Playing) VCR's playback operation. - 23 - EN 7A08 Push(es) 1 push Display Recording length (normal recording) AudioNideo adapter cord (not supplied) VIDEO IN AUDIO 2 pushes 0:30...
... the TVNCR power will increase the recording time by friends or relatives for your TVNCR and a Source (Playing) VCR using the following diagram. 1 Select the channel to be an infringement of video tapes made by 30 minutes. The remote control might affect the Source (Playing) VCR's playback operation. - 23 - EN 7A08 Push(es) 1 push Display Recording length (normal recording) AudioNideo adapter cord (not supplied) VIDEO IN AUDIO 2 pushes 0:30...
Owner's Manual
Page 24
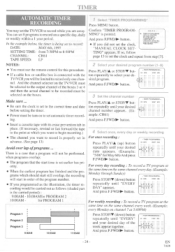
... ... TIMER PROGRAMMING - Confirm "TIMER PROGRAM- -MERC- And press F.FWD/110 button. -TIMER PRCGRAMMING - And the channel selector on the TVNCR must be selected to the output channel of the boxes 3 or 4 and then the actual channel to be recorded must be turn on to the correct time and date before setting the timer. • Power must be carried out as the illustration, the timer re- button. 3 Set the channel number Press PLAY/A or...
... ... TIMER PROGRAMMING - Confirm "TIMER PROGRAM- -MERC- And press F.FWD/110 button. -TIMER PRCGRAMMING - And the channel selector on the TVNCR must be selected to the output channel of the boxes 3 or 4 and then the actual channel to be recorded must be turn on to the correct time and date before setting the timer. • Power must be carried out as the illustration, the timer re- button. 3 Set the channel number Press PLAY/A or...
Owner's Manual
Page 26
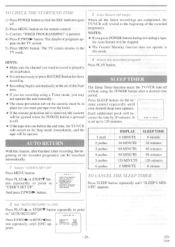
...; If the erasure protection tab is removed, the cassette will be ejected when the POWER button is set of the Start time. • If you are completed, the TV/VCR will be ejected. GAME MODE RENTAL REPEAT PLAY P. Press SLEEP button on the remote control repeatedly until [ON] appears. Press PLAY/A or STOP/V button repeatedly to point to "AUTO RETURN". - USERS SET UP - AUTO RETURN IC/ TM °24N...
...; If the erasure protection tab is removed, the cassette will be ejected when the POWER button is set of the Start time. • If you are completed, the TV/VCR will be ejected. GAME MODE RENTAL REPEAT PLAY P. Press SLEEP button on the remote control repeatedly until [ON] appears. Press PLAY/A or STOP/V button repeatedly to point to "AUTO RETURN". - USERS SET UP - AUTO RETURN IC/ TM °24N...
Owner's Manual
Page 27
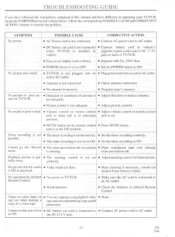
...; Replace with 5A, 250V fuse. • POWER button is in the left column below. jack on remote control unit or main unit is set to OFF. • Set the POWER button to DC 13.2V vehicle. Cannot set incorrectly. • Set the timer recording correctly. No sound or poor sound. • Volume control on remote control • Adjust volume control on back of a video tape. erase-prevention tab. TROUBLESHOOTING GUIDE If you have followed the instructions...
...; Replace with 5A, 250V fuse. • POWER button is in the left column below. jack on remote control unit or main unit is set to OFF. • Set the POWER button to DC 13.2V vehicle. Cannot set incorrectly. • Set the timer recording correctly. No sound or poor sound. • Volume control on remote control • Adjust volume control on back of a video tape. erase-prevention tab. TROUBLESHOOTING GUIDE If you have followed the instructions...

Owner's Manual
Page 29
... Video input : RCA connector x 1 Audio input : RCA connector x 1 Earphone : 1/8" monaural (3.5 mm) ELECTRICAL SPECIFICATIONS Video input level : Audio input level : Video S/N ratio : Audio S/N ratio : 0.5-2.0Vp_p -15dBs More than 46dB More than 43dB OTHER SPECIFICATIONS Power requirement : AC 120V/60Hz DC 13.2V Power consumption : AC/DC 65W Dimensions : H : 12-7/8" (328mm) W : 11-13/16" (300mm) D : 12-13/16" (326mm) Weight : 18.7 lbs (8.5 kg) • Designs and specifications are subject to cable TV, the channels...
... Video input : RCA connector x 1 Audio input : RCA connector x 1 Earphone : 1/8" monaural (3.5 mm) ELECTRICAL SPECIFICATIONS Video input level : Audio input level : Video S/N ratio : Audio S/N ratio : 0.5-2.0Vp_p -15dBs More than 46dB More than 43dB OTHER SPECIFICATIONS Power requirement : AC 120V/60Hz DC 13.2V Power consumption : AC/DC 65W Dimensions : H : 12-7/8" (328mm) W : 11-13/16" (300mm) D : 12-13/16" (326mm) Weight : 18.7 lbs (8.5 kg) • Designs and specifications are subject to cable TV, the channels...


