

Owner's Manual
Page 2
... use instructions should never be retained for some specific reason, such as they may fall, causing serious injury to someone, and serious damage to replace your electrician to the appliance. If the plug should not be placed in a built-in the operating instructions should use liquid cleaners or aerosol cleaners. REFER SERVICING TO QUALIFIED SERVICE PERSONNEL. Use only with a cart, stand, tripod, bracket...
... use instructions should never be retained for some specific reason, such as they may fall, causing serious injury to someone, and serious damage to replace your electrician to the appliance. If the plug should not be placed in a built-in the operating instructions should use liquid cleaners or aerosol cleaners. REFER SERVICING TO QUALIFIED SERVICE PERSONNEL. Use only with a cart, stand, tripod, bracket...

Owner's Manual
Page 3
... Requiring Service-Unplug this can fall into such power lines or circuits. When the power-supply cord or plug is damaged or frayed. Adjust only those controls that produce heat. -351 If the TVNCR does not operate normally by a qualified technician to restore the TVNCR to its normal operation. This will often require extensive work by following conditions: a. FIGURE A EXAMPLE OF ANTENNA...
... Requiring Service-Unplug this can fall into such power lines or circuits. When the power-supply cord or plug is damaged or frayed. Adjust only those controls that produce heat. -351 If the TVNCR does not operate normally by a qualified technician to restore the TVNCR to its normal operation. This will often require extensive work by following conditions: a. FIGURE A EXAMPLE OF ANTENNA...
Owner's Manual
Page 4
... is played in mind when selecting a place for its installation: • Shield it from direct sunlight and keep it away from an AC wall outlet. Changes or modifications to an authorized service center for servicing. • Do not put your unit, keep the following measures: 1) Reorient or relocate the receiving antenna. 2) Increase the separation between the equipment and receiver. 3) Connect...
... is played in mind when selecting a place for its installation: • Shield it from direct sunlight and keep it away from an AC wall outlet. Changes or modifications to an authorized service center for servicing. • Do not put your unit, keep the following measures: 1) Reorient or relocate the receiving antenna. 2) Increase the separation between the equipment and receiver. 3) Connect...
Owner's Manual
Page 5
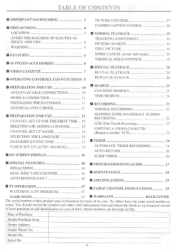
... AUTOMATIC TIMER RECORDING 24 AUTO RETURN 26 ■ ON SCREEN DISPLAY 16 SLEEP TIMER 26 ■ SPECIAL FEATURES DEGAUSSING REAL TIME TAPE COUNTER 16 ■ TROUBLESHOOTING GUIDE 27 16 16 ■ MAINTENANCE 28 AUTO REWIND-EJECT 16 ■ SPECIFICATIONS 29 ■ TV OPERATION 17 ■ CABLE CHANNEL DESIGNATIONS 29 WATCHING A TV PROGRAM 17 GAME MODE 17 ■ WARRANTY BACK COVER The serial number of this product may be found on file.
... AUTOMATIC TIMER RECORDING 24 AUTO RETURN 26 ■ ON SCREEN DISPLAY 16 SLEEP TIMER 26 ■ SPECIAL FEATURES DEGAUSSING REAL TIME TAPE COUNTER 16 ■ TROUBLESHOOTING GUIDE 27 16 16 ■ MAINTENANCE 28 AUTO REWIND-EJECT 16 ■ SPECIFICATIONS 29 ■ TV OPERATION 17 ■ CABLE CHANNEL DESIGNATIONS 29 WATCHING A TV PROGRAM 17 GAME MODE 17 ■ WARRANTY BACK COVER The serial number of this product may be found on file.

Owner's Manual
Page 6
... and Weekly Timer Recording)-The built-in advance. If you need different types of the recorded program(s) can view a video program at a high speed or super high speed in either a dialogue caption or text display added-to repeat a tape indefinitely without using the supplied car-battery cord. You may be controlled with this unit, please be aware that the code number given may need to replace these...
... and Weekly Timer Recording)-The built-in advance. If you need different types of the recorded program(s) can view a video program at a high speed or super high speed in either a dialogue caption or text display added-to repeat a tape indefinitely without using the supplied car-battery cord. You may be controlled with this unit, please be aware that the code number given may need to replace these...

Owner's Manual
Page 8
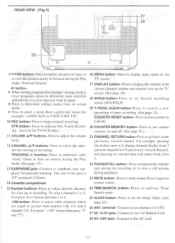
... or timer program). 20 7 REW button- See each description for exam- A button- • Press to select setting modes from on screen menu. • Press to enter digits when setting program (for details. • We do not recommend the use a universal remote control with a universal remote control. Connect to select a mode from the handheld remote control unit. 11 5 POWER button- nals from a particular menu (for exam- wind Search) AI button- • Press to video output jack of your video camera or another VCR. 25 2 VIDEO input jack- OPERATING CONTROLS...
... or timer program). 20 7 REW button- See each description for exam- A button- • Press to select setting modes from on screen menu. • Press to enter digits when setting program (for details. • We do not recommend the use a universal remote control with a universal remote control. Connect to select a mode from the handheld remote control unit. 11 5 POWER button- nals from a particular menu (for exam- wind Search) AI button- • Press to video output jack of your video camera or another VCR. 25 2 VIDEO input jack- OPERATING CONTROLS...
Owner's Manual
Page 9
... Play TV screen. Connect to 9. +100 button- The size of timer recording (See page 25). To select channels 1 to 9, first press the 0 button and then 1 to the Car Battery Cord. 28 AC 120V jack- example: LANGUAGE.or USER'S SET UP) COUNTER RESET button- function- OTR button- TRACKING +/- REAR VIEW - [Fig.3] • \• 27 28 F010) 26 0 0 O O 9 F.FWD button- Connect to activate Time Search mode. 25 SLEEP button- button- Press to 14 Cassette compartment resume sound. 15 Number buttons...
... Play TV screen. Connect to 9. +100 button- The size of timer recording (See page 25). To select channels 1 to 9, first press the 0 button and then 1 to the Car Battery Cord. 28 AC 120V jack- example: LANGUAGE.or USER'S SET UP) COUNTER RESET button- function- OTR button- TRACKING +/- REAR VIEW - [Fig.3] • \• 27 28 F010) 26 0 0 O O 9 F.FWD button- Connect to activate Time Search mode. 25 SLEEP button- button- Press to 14 Cassette compartment resume sound. 15 Number buttons...

Owner's Manual
Page 10
... BOX Use this connection you can use your TVNCR Remote Control to ANT terminal. Unattended recording is connected to the set, the indoor antenna should be connected to select channels, 2) program one channel at the back of cable entry as close to the point of TVNCR. 2. VHF/UHF COMBINED ANTENNA A VHF UHF 75 ohm combination antenna can use an outdoor antenna. [Fig.5] VHF Antenna , len VHF/UHF Combiner (Not supplied) UHF Antenna O Flat twin...
... BOX Use this connection you can use your TVNCR Remote Control to ANT terminal. Unattended recording is connected to the set, the indoor antenna should be connected to select channels, 2) program one channel at the back of cable entry as close to the point of TVNCR. 2. VHF/UHF COMBINED ANTENNA A VHF UHF 75 ohm combination antenna can use an outdoor antenna. [Fig.5] VHF Antenna , len VHF/UHF Combiner (Not supplied) UHF Antenna O Flat twin...

Owner's Manual
Page 12
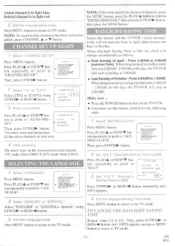
..., plug the other end into the memory again.) 1 Select "CHANNEL SET UP" ...1960tIONamsesio Press MENU button. button. 4 Begin auto preset Press PLAY/A or STOP/V button to point to light red. The tuner scans and memorizes all memorized channels if there is not needed when using F.FWD/I0- "[ 1" marks indicate the selected language. - Press the POWER button to turn on the TVNCR. PREPA3- .,E For the first time you may want to select language (English or...
..., plug the other end into the memory again.) 1 Select "CHANNEL SET UP" ...1960tIONamsesio Press MENU button. button. 4 Begin auto preset Press PLAY/A or STOP/V button to point to light red. The tuner scans and memorizes all memorized channels if there is not needed when using F.FWD/I0- "[ 1" marks indicate the selected language. - Press the POWER button to turn on the TVNCR. PREPA3- .,E For the first time you may want to select language (English or...
Owner's Manual
Page 13
... must use the remote control for some reason the menu is in light blue. D.S.T. 47(- or REW/All button. - Press PLAY/A or STOP/V button repeatedly to point to "SETTING CLOCK". The tuner scans and memorizes all the active channels in October. Press PLAY/A or STOP/V button repeatedly to point to "CHANNEL SET UP". IR AUTO PRESET ADO, DELETE CH Then, press F.FWD/110- TIMER PROGRAMMING PICTURE CONTROL SETTING CLOCK CHANNEL SE7 UP ► USERS SET...
... must use the remote control for some reason the menu is in light blue. D.S.T. 47(- or REW/All button. - Press PLAY/A or STOP/V button repeatedly to point to "SETTING CLOCK". The tuner scans and memorizes all the active channels in October. Press PLAY/A or STOP/V button repeatedly to point to "CHANNEL SET UP". IR AUTO PRESET ADO, DELETE CH Then, press F.FWD/110- TIMER PROGRAMMING PICTURE CONTROL SETTING CLOCK CHANNEL SE7 UP ► USERS SET...
Owner's Manual
Page 14
... "AUTO CLOCK CH". - Then, press F.FWD//0- TIMER PROGRAMMING PICTURE OCNTROL m SETTING CLOCK CHANNEL SET UP USER'S SET UP LANGUAG(EOIEMNGUSHI CTHAPETSOENARCH If the time that the antenna connections are correct. • The cable converter box must be turned on if your area. SETTING C_CCK P. Press PLAY/A or STOP/V button repeatedly to point to "SETTING CLOCK". Press POWER button to 10 minutes if the local PBS station is no time being broadcast by using...
... "AUTO CLOCK CH". - Then, press F.FWD//0- TIMER PROGRAMMING PICTURE OCNTROL m SETTING CLOCK CHANNEL SET UP USER'S SET UP LANGUAG(EOIEMNGUSHI CTHAPETSOENARCH If the time that the antenna connections are correct. • The cable converter box must be turned on if your area. SETTING C_CCK P. Press PLAY/A or STOP/V button repeatedly to point to "SETTING CLOCK". Press POWER button to 10 minutes if the local PBS station is no time being broadcast by using...
Owner's Manual
Page 15
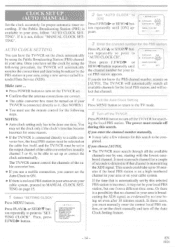
...- MANUAL CLCCK SET - MANUAL CLOCK SET - CLOCK SET - or REW/-411 button. 3) Enter correct numbers using F.FWD/110- MANUAL CLOCK SETTING Make sure ... SETTING CLOCK CHANNEL SETUP USERS SET UP LANGUAGE [ENGLISH] CAPTION TIME SEARCH 2 Select "MANUAL CLOCK SET" Press PLAY/A or STOP/V button repeatedly to synchronize the clock with the correct time. button. - 1/ANuAL CLOCK SET - SEYRRO CLOCK - button. - button. - MONTH DAY YEAR 03 / 01 SUN 1996 HOUR NDTE 0$ 1.404:11,1 8 Start the clock 5:40 pm Press MENU button. Use...
...- MANUAL CLCCK SET - MANUAL CLOCK SET - CLOCK SET - or REW/-411 button. 3) Enter correct numbers using F.FWD/110- MANUAL CLOCK SETTING Make sure ... SETTING CLOCK CHANNEL SETUP USERS SET UP LANGUAGE [ENGLISH] CAPTION TIME SEARCH 2 Select "MANUAL CLOCK SET" Press PLAY/A or STOP/V button repeatedly to synchronize the clock with the correct time. button. - 1/ANuAL CLOCK SET - SEYRRO CLOCK - button. - button. - MONTH DAY YEAR 03 / 01 SUN 1996 HOUR NDTE 0$ 1.404:11,1 8 Start the clock 5:40 pm Press MENU button. Use...

Owner's Manual
Page 17
... The TV/VCR's picture controls - are preset to brilliant TO CANCEL THE GAME MODE Repeat step [1]. or REWPAII button to adjust the picture control to your desired channel number. 3 Adjust the volume as you need to make any further adjustments, adjust picture controls for use with a TV GAME. USERS SET UP rANCCIGICIEPral" TIME SEA CH Press MENU button. TIMER PROGRAMMING * PICTURE CONTROL DETERS CLOCK CHANNEL SET UP USER'S SET UP LANGUAGE( (ENGUSH) CAPIVON (074)1 TIME SEARCH 2 Select item you press PLAY/A or STOP/V button, "BRIGHT", "CONTRAST", "COLOR", "TINT...
... The TV/VCR's picture controls - are preset to brilliant TO CANCEL THE GAME MODE Repeat step [1]. or REWPAII button to adjust the picture control to your desired channel number. 3 Adjust the volume as you need to make any further adjustments, adjust picture controls for use with a TV GAME. USERS SET UP rANCCIGICIEPral" TIME SEA CH Press MENU button. TIMER PROGRAMMING * PICTURE CONTROL DETERS CLOCK CHANNEL SET UP USER'S SET UP LANGUAGE( (ENGUSH) CAPIVON (074)1 TIME SEARCH 2 Select item you press PLAY/A or STOP/V button, "BRIGHT", "CONTRAST", "COLOR", "TINT...

Owner's Manual
Page 18
... the caption setting mode Press MENU button to return to provide error free closed captions. with closed captions from high quality antenna, cable and VCR signals. TEXT mode:You may watch screen text information if you want by choosing the text mode. 1/2:You may watch dramas, movies and news etc. Press PLAY/A or STOP/V button repeatedly to point to result in caption errors or no captions at all programs are likely to "CAPTION". -MENU- TIMER PROGRAMMING PICTURE CONTROL SETTING CLOCK CHANNEL SET UP USER'S SET...
... the caption setting mode Press MENU button to return to provide error free closed captions. with closed captions from high quality antenna, cable and VCR signals. TEXT mode:You may watch screen text information if you want by choosing the text mode. 1/2:You may watch dramas, movies and news etc. Press PLAY/A or STOP/V button repeatedly to point to result in caption errors or no captions at all programs are likely to "CAPTION". -MENU- TIMER PROGRAMMING PICTURE CONTROL SETTING CLOCK CHANNEL SET UP USER'S SET...

Owner's Manual
Page 21
...;AE CONTROL SETTING CLOCK CHANNEL KT UP USERS SET UP LANGUAGE IENGUSK: ► CAPTON TUJE SEAMCM 2 Enter your desired time Press PLAY/A or STOP/V button repeatedly until "COUNT" appears. OR Before the timer search mode goes in this mode. The tape will move to the beginning point at your desired time appears. (Example: "2:50" for the following steps. • Power must use the remote control for...
...;AE CONTROL SETTING CLOCK CHANNEL KT UP USERS SET UP LANGUAGE IENGUSK: ► CAPTON TUJE SEAMCM 2 Enter your desired time Press PLAY/A or STOP/V button repeatedly until "COUNT" appears. OR Before the timer search mode goes in this mode. The tape will move to the beginning point at your desired time appears. (Example: "2:50" for the following steps. • Power must use the remote control for...

Owner's Manual
Page 23
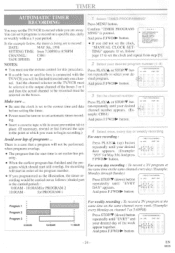
... TVNCR to be recorded Press the number buttons on the remote control or the CHANNEL V or A button. [The TV/VCR] [Fig.9] 2 Begin OTR O174(2:30) Press REC/OTR button on the TVNCR. EN 8B26 Connect your TV/VCR and a Source (Playing) VCR using the following diagram. 1 Select the channel to select the desired recording speed (SP, LP or SLP). 4) Press CHANNEL A or V button on the TVNCR repeatedly so that...
... TVNCR to be recorded Press the number buttons on the remote control or the CHANNEL V or A button. [The TV/VCR] [Fig.9] 2 Begin OTR O174(2:30) Press REC/OTR button on the TVNCR. EN 8B26 Connect your TV/VCR and a Source (Playing) VCR using the following diagram. 1 Select the channel to select the desired recording speed (SP, LP or SLP). 4) Press CHANNEL A or V button on the TVNCR repeatedly so that...
Owner's Manual
Page 24
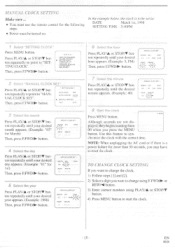
... point at the same time on the same channel every week (Example: every Monday on the boxes. If so, follow page IS to set to record: DATE: MAY 5th, 1998 SETTING TIME: from step 131. 2 Select your desired program number (1-8) Press PLAY/A or STOP/V button repeatedly to be recorded must use the remote control for PROGRAM 1 Select "TIMER PROGRAMMING" Press MENU button. button. 3 Set the channel number Press PLAY/A or STOP/V button repeatedly until "EVRY t X DAY...
... point at the same time on the same channel every week (Example: every Monday on the boxes. If so, follow page IS to set to record: DATE: MAY 5th, 1998 SETTING TIME: from step 131. 2 Select your desired program number (1-8) Press PLAY/A or STOP/V button repeatedly to be recorded must use the remote control for PROGRAM 1 Select "TIMER PROGRAMMING" Press MENU button. button. 3 Set the channel number Press PLAY/A or STOP/V button repeatedly until "EVRY t X DAY...
Owner's Manual
Page 26
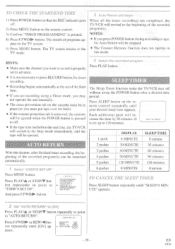
... a desired time period. GAME MODE 'OFF RENTAL REPEAT PLAY 1- Press SLEEP button on the TV screen. 5) Press MENU button. And press F.FWD/II button. 2 Set "AUTO RETURN" to [ON] Press PLAY/A or STOP/V button repeatedly to point to press RECORD button for timer recording. USER'S SET UP - When all the timer recordings are recording using the POWER button after finished timer recording, the beginning of the recorded program(s). The Sleep Timer function make the TVNCR turn off...
... a desired time period. GAME MODE 'OFF RENTAL REPEAT PLAY 1- Press SLEEP button on the TV screen. 5) Press MENU button. And press F.FWD/II button. 2 Set "AUTO RETURN" to [ON] Press PLAY/A or STOP/V button repeatedly to point to press RECORD button for timer recording. USER'S SET UP - When all the timer recordings are recording using the POWER button after finished timer recording, the beginning of the recorded program(s). The Sleep Timer function make the TVNCR turn off...
Owner's Manual
Page 27
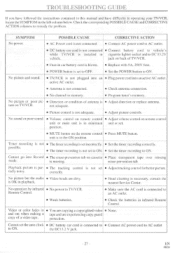
... copying a copyrighted video • None. possible. • The timer recording is set incorrectly. • Set the timer recording correctly. TROUBLESHOOTING GUIDE If you have followed the instructions contained in this manual and have difficulty in operating your TV/VCR, locate the SYMPTOM in car battery cord is blown. • Replace with 5A, 250V fuse. • POWER button is not set • Adjust tracking control for better picture. jack on cassette...
... copying a copyrighted video • None. possible. • The timer recording is set incorrectly. • Set the timer recording correctly. TROUBLESHOOTING GUIDE If you have followed the instructions contained in this manual and have difficulty in operating your TV/VCR, locate the SYMPTOM in car battery cord is blown. • Replace with 5A, 250V fuse. • POWER button is not set • Adjust tracking control for better picture. jack on cassette...

Owner's Manual
Page 29
... band : W+1-W+84 Terminals Antenna input : VHF/UHF 75 ohms unbalanced Video input : RCA connector x 1 Audio input : RCA connector x 1 Earphone : 1/8" monaural (3.5 mm) ELECTRICAL SPECIFICATIONS Video input level : Audio input level : Video S/N ratio : Audio S/N ratio : 0.5-2.0Vp.p -15dBs More than 46dB More than 43dB OTHER SPECIFICATIONS Power requirement : AC 120V/60Hz DC 13.2V Power consumption : AC/DC 65W Dimensions : H : 12-7/8" (328mm) W : 11-13/16" (300mm) D : 12-13/16" (326mm) Weight : 18.7 lbs (8.5 kg...
... band : W+1-W+84 Terminals Antenna input : VHF/UHF 75 ohms unbalanced Video input : RCA connector x 1 Audio input : RCA connector x 1 Earphone : 1/8" monaural (3.5 mm) ELECTRICAL SPECIFICATIONS Video input level : Audio input level : Video S/N ratio : Audio S/N ratio : 0.5-2.0Vp.p -15dBs More than 46dB More than 43dB OTHER SPECIFICATIONS Power requirement : AC 120V/60Hz DC 13.2V Power consumption : AC/DC 65W Dimensions : H : 12-7/8" (328mm) W : 11-13/16" (300mm) D : 12-13/16" (326mm) Weight : 18.7 lbs (8.5 kg...


