
Owner's Manual
Page 6
... minutes is rewound further than the tape counter position "0:00:00". • 181 channel capability PLL frequency synthesizer tuner with a universal remote control. The "-" indication will show a fairly clear picture. • Digital Auto Tracking (DTR)-Automatically adjusts the tracking for use of Combiners..., turns off at a high speed or super high speed in either a forward or reverse direction in LP and SLP mode. Remote Control Unit SUPPLIED ACCESSORIES Dipole Antenna Matching Adapter (300ohm-75ohm) Car Battery Cord (1813641 or 1780258 or UCPGANTPK004) 2 AA Batteries PART ...
... minutes is rewound further than the tape counter position "0:00:00". • 181 channel capability PLL frequency synthesizer tuner with a universal remote control. The "-" indication will show a fairly clear picture. • Digital Auto Tracking (DTR)-Automatically adjusts the tracking for use of Combiners..., turns off at a high speed or super high speed in either a forward or reverse direction in LP and SLP mode. Remote Control Unit SUPPLIED ACCESSORIES Dipole Antenna Matching Adapter (300ohm-75ohm) Car Battery Cord (1813641 or 1780258 or UCPGANTPK004) 2 AA Batteries PART ...

Owner's Manual
Page 7
... camera or another VCR. 2 AUDIO input jack- CLEAR GAME TIME SEARCH 21 19 COUNTER RESET 20 1 VIDEO input jack- Press to stop the tape motion. REMOTE CONTROL - 25 WAKE-UP POWER /SLEEP EJECT 5 6 CHANNEL RETURN 1 2 3 24 15 4 5 6 CHANNEL 12 7 8 9 0 +100 MENU DISPLAY MUTE VOLUME 11 16 17 7...FWD 9 6 STOP RECORD 10 SPEED PAUSE/STILL 22 18 T-PROG. EN 9J27 TV/VCR FRONT PANEL - Connect to select a mode from the remote control. 5 POWER button- Press to view the picture rapidly in the Stand-by mode for example: setting clock or timer program) 9 F.FWD button-...
... camera or another VCR. 2 AUDIO input jack- CLEAR GAME TIME SEARCH 21 19 COUNTER RESET 20 1 VIDEO input jack- Press to stop the tape motion. REMOTE CONTROL - 25 WAKE-UP POWER /SLEEP EJECT 5 6 CHANNEL RETURN 1 2 3 24 15 4 5 6 CHANNEL 12 7 8 9 0 +100 MENU DISPLAY MUTE VOLUME 11 16 17 7...FWD 9 6 STOP RECORD 10 SPEED PAUSE/STILL 22 18 T-PROG. EN 9J27 TV/VCR FRONT PANEL - Connect to select a mode from the remote control. 5 POWER button- Press to view the picture rapidly in the Stand-by mode for example: setting clock or timer program) 9 F.FWD button-...

Owner's Manual
Page 9
... cable from your cable service supplies you with a converter box or if you use a satellite system, you can : 1) Use the TV/VCR remote to the output channel of TV/VCR as close to the 300/75 ohm Matching Adapter (supplied). 3. VHF/UHF SEPARATE ANTENNAS In some areas it... However, channel selection must be necessary to use an outdoor antenna. This means that the cable ground shall be changed using the TV/VCR Remote Control. Plug the Matching Adapter to get good reception with the converter box or satellite box. Note to CATV system installer: This reminder is difficult...
... cable from your cable service supplies you with a converter box or if you use a satellite system, you can : 1) Use the TV/VCR remote to the output channel of TV/VCR as close to the 300/75 ohm Matching Adapter (supplied). 3. VHF/UHF SEPARATE ANTENNAS In some areas it... However, channel selection must be necessary to use an outdoor antenna. This means that the cable ground shall be changed using the TV/VCR Remote Control. Plug the Matching Adapter to get good reception with the converter box or satellite box. Note to CATV system installer: This reminder is difficult...

Owner's Manual
Page 11
... to "LANGUAGE". - Then, press the F.FWD/B button. - MANUAL CLOCK SET - Make sure ... • Press the POWER button to turn on the remote control to return to TV mode. Press the PLAY/K or STOP/L button to point to "MANUAL CLOCK SET". Then, set manually when first setting up the.../K button to point to "IDIOMA [ESPAÑOL]" or "LANGAGE [FRANÇAIS]", then press the F.FWD/B button, then press the MENU button on the remote control. 3 Select the month Press the PLAY/K or STOP/L button until your desired month appears. (Example: May → 05) Then, press the F.FWD/B button....
... to "LANGUAGE". - Then, press the F.FWD/B button. - MANUAL CLOCK SET - Make sure ... • Press the POWER button to turn on the remote control to return to TV mode. Press the PLAY/K or STOP/L button to point to "MANUAL CLOCK SET". Then, set manually when first setting up the.../K button to point to "IDIOMA [ESPAÑOL]" or "LANGAGE [FRANÇAIS]", then press the F.FWD/B button, then press the MENU button on the remote control. 3 Select the month Press the PLAY/K or STOP/L button until your desired month appears. (Example: May → 05) Then, press the F.FWD/B button....

Owner's Manual
Page 12
...adjust the clock. Make sure ... • The TV/VCR is receiving a RF (Radio Frequency) signal from 00 when you press the MENU button on the remote control to [ON] Press the F.FWD/B button until your desired year appears. (Example: 2004) Then, press the F.FWD/B button. - EN 9J27 MONTH DAY YEAR... THU 2 0 0 4 HOUR MINUTE 0 5 : 4 0 PM 8 Start the clock Press the MENU button on your area or on the 5:40 PM remote control. Press the F.FWD/B button. • The TV/VCR is not possible. This is a power failure for a signal may take up or correct the clock ...
...adjust the clock. Make sure ... • The TV/VCR is receiving a RF (Radio Frequency) signal from 00 when you press the MENU button on the remote control to [ON] Press the F.FWD/B button until your desired year appears. (Example: 2004) Then, press the F.FWD/B button. - EN 9J27 MONTH DAY YEAR... THU 2 0 0 4 HOUR MINUTE 0 5 : 4 0 PM 8 Start the clock Press the MENU button on your area or on the 5:40 PM remote control. Press the F.FWD/B button. • The TV/VCR is not possible. This is a power failure for a signal may take up or correct the clock ...

Owner's Manual
Page 13
...Set station number. EN 9J27 Press the MENU button to turn on the TV/VCR. 1 Select "SETTING CLOCK" Press the MENU button on the remote control. Press the PLAY/K or STOP/L button to point to [2], select [OFF] using the F.FWD/B or REW/s button. TO CANCEL THE DAYLIGHT... CLOCK". M E N U - "AUTO CLOCK CH". 4 Enter the channel number that contains the Automatic Clock Setting Signal Press the MENU button on the remote control. diately changes to enter "SETTING CLOCK" menu. - Make sure ... • Press the POWER button to exit the screen. 5 Turn off the TV/VCR...
...Set station number. EN 9J27 Press the MENU button to turn on the TV/VCR. 1 Select "SETTING CLOCK" Press the MENU button on the remote control. Press the PLAY/K or STOP/L button to point to [2], select [OFF] using the F.FWD/B or REW/s button. TO CANCEL THE DAYLIGHT... CLOCK". M E N U - "AUTO CLOCK CH". 4 Enter the channel number that contains the Automatic Clock Setting Signal Press the MENU button on the remote control. diately changes to enter "SETTING CLOCK" menu. - Make sure ... • Press the POWER button to exit the screen. 5 Turn off the TV/VCR...

Owner's Manual
Page 14
..., try auto ch programming again in your desired channel num- Deleted channel: Light red. 5 Exit the channel setup mode Press the MENU button on the remote control. NOTE: To confirm that channel(s) has been deleted or added, press the CHANNEL K or L button. - 14 - NOTE: Channel memory programming is memorized... point to "CHANNEL SET UP". ton until your area. The channel is no longer receive or seldom watch can be viewed on the remote control. EN 9J27 The tuner scans and memorizes all the channels you press the F.FWD/B or REW/s button again, the channel is NOT needed...
..., try auto ch programming again in your desired channel num- Deleted channel: Light red. 5 Exit the channel setup mode Press the MENU button on the remote control. NOTE: To confirm that channel(s) has been deleted or added, press the CHANNEL K or L button. - 14 - NOTE: Channel memory programming is memorized... point to "CHANNEL SET UP". ton until your area. The channel is no longer receive or seldom watch can be viewed on the remote control. EN 9J27 The tuner scans and memorizes all the channels you press the F.FWD/B or REW/s button again, the channel is NOT needed...
Owner's Manual
Page 15
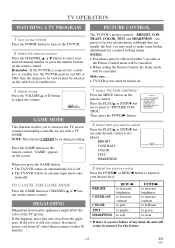
... it after 30 minutes. Although they are preset to factory specifications. Make sure ... • TV/VCR power must be turned on the GAME remote control. Press the GAME button on . 3 Adjust sound Press the VOLUME X or Y button to adjust the volume. matically. 1 Select "PICTURE... the F.FWD/B or REW/s button to adjust to your desired channel number or press the number buttons on the remote control. ton until desired control is a power failure of the TV picture. played. DEGAUSSING Magnetism from nearby appliances might affect the color of any kind, the unit will retain...
... it after 30 minutes. Although they are preset to factory specifications. Make sure ... • TV/VCR power must be turned on the GAME remote control. Press the GAME button on . 3 Adjust sound Press the VOLUME X or Y button to adjust the volume. matically. 1 Select "PICTURE... the F.FWD/B or REW/s button to adjust to your desired channel number or press the number buttons on the remote control. ton until desired control is a power failure of the TV picture. played. DEGAUSSING Magnetism from nearby appliances might affect the color of any kind, the unit will retain...

Owner's Manual
Page 16
...is completed. 4 Start playback Press the PLAY button to start playback automatically. 3 Exit the Repeat Play setting Press the MENU button on the remote control. INSERTING A CASSETTE Insert the cassette in effect even after you to the TV mode. 2 To begin playback PLAY B Press the PLAY button... cold place to a blank part, which is blank for this feature. - 16 - Before using the F.FWD/B or REW/s button on the remote control to return to repeat a tape indefinitely without touching the PLAY button. Press the MENU button to room temperature and the moisture has evaporated. •...
...is completed. 4 Start playback Press the PLAY button to start playback automatically. 3 Exit the Repeat Play setting Press the MENU button on the remote control. INSERTING A CASSETTE Insert the cassette in effect even after you to the TV mode. 2 To begin playback PLAY B Press the PLAY button... cold place to a blank part, which is blank for this feature. - 16 - Before using the F.FWD/B or REW/s button on the remote control to return to repeat a tape indefinitely without touching the PLAY button. Press the MENU button to room temperature and the moisture has evaporated. •...

Owner's Manual
Page 17
... SEARCH This feature is very useful in finding or skipping over a particular scene on the TV/VCR or the remote control. Press the STOP/EJECT button on a tape. TIMER PROGRAMMING PICTURE CONTROL SETTING CLOCK CHANNEL SET UP USER'S SET UP LANGUAGE [ENGLISH] B ZERO RETURN TIME SEARCH The counter will delete...originally recorded in SP or LP mode, the still picture will rewind or fast forward to the Stop mode. - 17 - This will appear on the remote control. 4 Begin Time Search By pressing the REW/s or F.FWD/B button, the TV/VCR will be muted. 1)You may revert to 0:00:00. Press...
... SEARCH This feature is very useful in finding or skipping over a particular scene on the TV/VCR or the remote control. Press the STOP/EJECT button on a tape. TIMER PROGRAMMING PICTURE CONTROL SETTING CLOCK CHANNEL SET UP USER'S SET UP LANGUAGE [ENGLISH] B ZERO RETURN TIME SEARCH The counter will delete...originally recorded in SP or LP mode, the still picture will rewind or fast forward to the Stop mode. - 17 - This will appear on the remote control. 4 Begin Time Search By pressing the REW/s or F.FWD/B button, the TV/VCR will be muted. 1)You may revert to 0:00:00. Press...

Owner's Manual
Page 18
... ADJUSTMENT • Tracking adjustment will retain its entirety without distracting noise lines. M E N U - If you decide to record on the remote control. EN 9J27 This function enables you to improve the picture quality when playing back worn cassettes such as rented tapes. 1 Select "USER'S SET...disappear. B RENTAL REPEAT PLAY AUTO RETURN [ON] [OFF] [OFF] 3 Exit the Rental setting Press the MENU button on the remote control to return to start playback. • However when playing pre-recorded tapes or tapes recorded on units other than your own, noise ...
... ADJUSTMENT • Tracking adjustment will retain its entirety without distracting noise lines. M E N U - If you decide to record on the remote control. EN 9J27 This function enables you to improve the picture quality when playing back worn cassettes such as rented tapes. 1 Select "USER'S SET...disappear. B RENTAL REPEAT PLAY AUTO RETURN [ON] [OFF] [OFF] 3 Exit the Rental setting Press the MENU button on the remote control to return to start playback. • However when playing pre-recorded tapes or tapes recorded on units other than your own, noise ...

Owner's Manual
Page 19
...the TV/VCR continues recording until the selected length is reached. 1 Select the channel to be recorded Press the number buttons on the CH 10 remote control or the CHANNEL K or L button. SP 3 Begin recording REC Press the RECORD button. SKIPPING UNWANTED SCENES DURING RECORDING Press the PAUSE/STILL... when 0:00 is reached. • Please note that is being recorded. 1 Select the channel to be recorded Press the number buttons on the remote control or the CHANNEL K or L button. Press the PAUSE/STILL or RECORD button to be selected on the TV/VCR. OTR (One Touch Recording)...
...the TV/VCR continues recording until the selected length is reached. 1 Select the channel to be recorded Press the number buttons on the CH 10 remote control or the CHANNEL K or L button. SP 3 Begin recording REC Press the RECORD button. SKIPPING UNWANTED SCENES DURING RECORDING Press the PAUSE/STILL... when 0:00 is reached. • Please note that is being recorded. 1 Select the channel to be recorded Press the number buttons on the remote control or the CHANNEL K or L button. Press the PAUSE/STILL or RECORD button to be selected on the TV/VCR. OTR (One Touch Recording)...

Owner's Manual
Page 20
... Recording length (normal recording) 0:30 30 minutes 1:00 60 minutes 17 pushes 8:00 480 minutes TIMER RECORDING You may set the clock, B TIMER PROGRAMMING PICTURE CONTROL SETTING CLOCK CHANNEL SET UP USER'S SET UP LANGUAGE [ENGLISH] ZERO RETURN TIME SEARCH "MANUAL CLOCK SET" appears. M E N U - MING" is SHADED 1 Select "TIMER PROGRAMMING" Press... PLAY/K or STOP/L button until the desired date appears. (Example: "7/05" for July 5th). 3 Begin OTR OTR(2 : 30) Press the REC/OTR button on the remote control.
... Recording length (normal recording) 0:30 30 minutes 1:00 60 minutes 17 pushes 8:00 480 minutes TIMER RECORDING You may set the clock, B TIMER PROGRAMMING PICTURE CONTROL SETTING CLOCK CHANNEL SET UP USER'S SET UP LANGUAGE [ENGLISH] ZERO RETURN TIME SEARCH "MANUAL CLOCK SET" appears. M E N U - MING" is SHADED 1 Select "TIMER PROGRAMMING" Press... PLAY/K or STOP/L button until the desired date appears. (Example: "7/05" for July 5th). 3 Begin OTR OTR(2 : 30) Press the REC/OTR button on the remote control.

Owner's Manual
Page 21
...DATE BEGIN END ton until "EVRY DAY" appears. ic timer recording. NOTE: When you continue watching TV, "TIMER REC STANDBY" starts flashing on the remote control. press the REW/s but- EN 9J27 For every day recording : To record a TV program at the same time on the same channel every day. .../B button. - The program is now completed. • To set another program, repeat steps [2] to [10]. • Press the MENU button on the remote control to return to the original time. The TIMER REC indicator lights up. • You must turn off and you shift forward the time schedule during...
...DATE BEGIN END ton until "EVRY DAY" appears. ic timer recording. NOTE: When you continue watching TV, "TIMER REC STANDBY" starts flashing on the remote control. press the REW/s but- EN 9J27 For every day recording : To record a TV program at the same time on the same channel every day. .../B button. - The program is now completed. • To set another program, repeat steps [2] to [10]. • Press the MENU button on the remote control to return to the original time. The TIMER REC indicator lights up. • You must turn off and you shift forward the time schedule during...

Owner's Manual
Page 22
...8226; If you press the POWER button while tape is finished, the beginning of time. If there is pressed to [ON] - NOTES: • Use the remote control for this feature. Press the F.FWD/B or REW/s button, and select [TV] or [TAPE]. grams appear on the TV screen. 5)Press the MENU button... steps [1] ~ [2] on page 20 and select a program you must insert a cassette tape in the TV/VCR. Then, press the MENU button on the remote control to return to TV mode. 3 Auto Return will begin When all the timer recordings are recording using a Timer mode, you may not operate the unit...
...8226; If you press the POWER button while tape is finished, the beginning of time. If there is pressed to [ON] - NOTES: • Use the remote control for this feature. Press the F.FWD/B or REW/s button, and select [TV] or [TAPE]. grams appear on the TV screen. 5)Press the MENU button... steps [1] ~ [2] on page 20 and select a program you must insert a cassette tape in the TV/VCR. Then, press the MENU button on the remote control to return to TV mode. 3 Auto Return will begin When all the timer recordings are recording using a Timer mode, you may not operate the unit...

Owner's Manual
Page 23
...appears. Press the F.FWD/B or REW/s button until "SLEEP TIMER" appears. TO CANCEL THE WAKE UP TIMER Press the WAKE-UP/SLEEP button on the remote control once, and confirm "ON/OFF" is found below the lowest memorized channel. (Example: CH2) 5)Press the RECORD button on the TV/VCR. 6)Begin ...playback of video tapes made by 10 minutes. 4 Exit the Wake Up Timer setting Press the MENU button on the remote control to 120 minutes. SLEEP TIMER The Sleep Timer function turns off the TV/VCR without using the following diagram. Connect your enjoyment. VIDEO AUDIO ...
...appears. Press the F.FWD/B or REW/s button until "SLEEP TIMER" appears. TO CANCEL THE WAKE UP TIMER Press the WAKE-UP/SLEEP button on the remote control once, and confirm "ON/OFF" is found below the lowest memorized channel. (Example: CH2) 5)Press the RECORD button on the TV/VCR. 6)Begin ...playback of video tapes made by 10 minutes. 4 Exit the Wake Up Timer setting Press the MENU button on the remote control to 120 minutes. SLEEP TIMER The Sleep Timer function turns off the TV/VCR without using the following diagram. Connect your enjoyment. VIDEO AUDIO ...

Owner's Manual
Page 24
ing or One Touch Recording. Dirt accumulated on the remote control. SERVICING • Should your TV/VCR become blurred of the TV/VCR with the video head cleaner before use a solvent or alcohol. Turn off . • ... change on a blank tape or blank portions on the tape.)The "-" indication will appear when the tape has rewound further than "0:00:00" on the remote control, the TV screen will automatically rewind to locate an Authorized Service Center. NOTES: • Remember to be cleaned. 1. To clear them, press the DIS...
ing or One Touch Recording. Dirt accumulated on the remote control. SERVICING • Should your TV/VCR become blurred of the TV/VCR with the video head cleaner before use a solvent or alcohol. Turn off . • ... change on a blank tape or blank portions on the tape.)The "-" indication will appear when the tape has rewound further than "0:00:00" on the remote control, the TV screen will automatically rewind to locate an Authorized Service Center. NOTES: • Remember to be cleaned. 1. To clear them, press the DIS...

Owner's Manual
Page 25
...• Make sure the AC cord is connected to an AC outlet. • Check antenna connection. • Let the TV/VCR program it in remote control. • You can repair itself automatically. Cannot go into Record mode. Refer to "AUTO HEAD • CLEANING" on page 24. • Make..., unplug the TV/VCR power cord, then plug it 's tuner memory. • Adjust direction or replace antenna. • Adjust picture controls. • Adjust volume control on remote control or main unit. • Press the MUTE button to restore sound. • Make sure the timer recording is set correctly. •...
...• Make sure the AC cord is connected to an AC outlet. • Check antenna connection. • Let the TV/VCR program it in remote control. • You can repair itself automatically. Cannot go into Record mode. Refer to "AUTO HEAD • CLEANING" on page 24. • Make..., unplug the TV/VCR power cord, then plug it 's tuner memory. • Adjust direction or replace antenna. • Adjust picture controls. • Adjust volume control on remote control or main unit. • Press the MUTE button to restore sound. • Make sure the timer recording is set correctly. •...

Owner's Manual
Page 32
... CORP. This FUNAI CORPORATION Limited warranty does not apply to obtain service under this warranty. THIS WARRANTY DOES NOT COVER PACKING MATERIALS, ANY ACCESSORIES (EXCEPT REMOTE CONTROL), ANY COSMETIC PARTS, COMPLETE ASSEMBLY PARTS, DEMO OR FLOOR MODELS. will provide parts to any product not purchased and used in the United States. LIMITS...
... CORP. This FUNAI CORPORATION Limited warranty does not apply to obtain service under this warranty. THIS WARRANTY DOES NOT COVER PACKING MATERIALS, ANY ACCESSORIES (EXCEPT REMOTE CONTROL), ANY COSMETIC PARTS, COMPLETE ASSEMBLY PARTS, DEMO OR FLOOR MODELS. will provide parts to any product not purchased and used in the United States. LIMITS...


