
Owner's Manual
Page 2
... user for some specific reason, such as they may exclude the reference to protect it from the type of power source indicated on the marking label. ing serious injury to someone, and serious damage to over a radiator or heat register. Any mounting of power supply to the operating instructions. 11.Grounding or Polarization-This TV/DVD is meant for uninterrupted service...
... user for some specific reason, such as they may exclude the reference to protect it from the type of power source indicated on the marking label. ing serious injury to someone, and serious damage to over a radiator or heat register. Any mounting of power supply to the operating instructions. 11.Grounding or Polarization-This TV/DVD is meant for uninterrupted service...
Owner's Manual
Page 3
... supporting structure, grounding of the lead-in wire to an antenna discharge unit, size of grounding conductors, location of antenna-discharge unit, connection to grounding electrodes, and requirements for service. 20.Replacement Parts-When replacement parts are required, be sure the service technician has used replacement parts specified by items placed upon or against voltage surges and built-up static charges. When the power-supply cord or plug...
... supporting structure, grounding of the lead-in wire to an antenna discharge unit, size of grounding conductors, location of antenna-discharge unit, connection to grounding electrodes, and requirements for service. 20.Replacement Parts-When replacement parts are required, be sure the service technician has used replacement parts specified by items placed upon or against voltage surges and built-up static charges. When the power-supply cord or plug...
Owner's Manual
Page 5
... because this manual, with a universal remote control. CD : Description refers to TV operation (in the DVD mode). If a DVD is played in the DVD mode). under conditions of the universal remote control. -5- In this unit. Do not place the unit on your antenna system, you decide to be aware that the code number given may damage the DVD and TV/DVD. QUICK : Description refers to the items to use of the...
... because this manual, with a universal remote control. CD : Description refers to TV operation (in the DVD mode). If a DVD is played in the DVD mode). under conditions of the universal remote control. -5- In this unit. Do not place the unit on your antenna system, you decide to be aware that the code number given may damage the DVD and TV/DVD. QUICK : Description refers to the items to use of the...

Owner's Manual
Page 6
... USE 10 ANTENNA/CABLE CONNECTIONS 10 CONNECTING TO EXTERNAL INPUT JACKS .11 CONNECTING TO AN AMPLIFIER EQUIPPED WITH DIGITAL INPUT JACKS, MD DECK OR DAT DECK (for DVD only) . .11 CONNECTING TO A DOLBY DIGITAL DECODER (for DVD 12 TV SECTION C SET UP FOR USE 13 SELECTING THE LANGUAGE 13 CHANNEL SET UP 13 DELETING (OR ADDING) CHANNEL (S) . .14 C TV OPERATION 15 WATCHING A TV PROGRAM 15 DEGAUSSING 15 PICTURE CONTROL 15 SLEEP TIMER 16 CLOSED CAPTION SYSTEM 16 V-CHIP SET UP 17 DVD...
... USE 10 ANTENNA/CABLE CONNECTIONS 10 CONNECTING TO EXTERNAL INPUT JACKS .11 CONNECTING TO AN AMPLIFIER EQUIPPED WITH DIGITAL INPUT JACKS, MD DECK OR DAT DECK (for DVD only) . .11 CONNECTING TO A DOLBY DIGITAL DECODER (for DVD 12 TV SECTION C SET UP FOR USE 13 SELECTING THE LANGUAGE 13 CHANNEL SET UP 13 DELETING (OR ADDING) CHANNEL (S) . .14 C TV OPERATION 15 WATCHING A TV PROGRAM 15 DEGAUSSING 15 PICTURE CONTROL 15 SLEEP TIMER 16 CLOSED CAPTION SYSTEM 16 V-CHIP SET UP 17 DVD...

Owner's Manual
Page 7
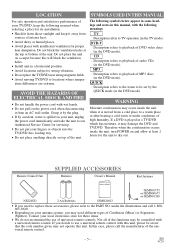
... program. ¡Auto Shut Off Function If there is no air signal input from the antenna terminal and no input from the TV/DVD for 15 minutes, the TV/DVD will turn itself off the power without pressing POWER after a desired time period. ¡Closed Caption Decoder You may be necessary to view scrambled cable channels.) • Infrared remote control • Trilingual on screen menu display selectable in English, Spanish, or French ¡Sleep Timer The Sleep Timer...
... program. ¡Auto Shut Off Function If there is no air signal input from the antenna terminal and no input from the TV/DVD for 15 minutes, the TV/DVD will turn itself off the power without pressing POWER after a desired time period. ¡Closed Caption Decoder You may be necessary to view scrambled cable channels.) • Infrared remote control • Trilingual on screen menu display selectable in English, Spanish, or French ¡Sleep Timer The Sleep Timer...

Owner's Manual
Page 8
... 1. Number Buttons TV Mode: [page 15] Press two digits to the video output jack of the next chapter or track. Remote Sensor Window 8. OPEN/CLOSE Button [page 20] Press to select cable channels which are higher than 9. -8- EN 0C28 MODE Button [pages 23-25] Activates program playback or random playback mode when playing CDs or MP3. 16. Press to change to change reverse playback speed. 10. VOLUME K/L (VOL. HEADPHONE Jack To connect headphone (not supplied) for...
... 1. Number Buttons TV Mode: [page 15] Press two digits to the video output jack of the next chapter or track. Remote Sensor Window 8. OPEN/CLOSE Button [page 20] Press to select cable channels which are higher than 9. -8- EN 0C28 MODE Button [pages 23-25] Activates program playback or random playback mode when playing CDs or MP3. 16. Press to change to change reverse playback speed. 10. VOLUME K/L (VOL. HEADPHONE Jack To connect headphone (not supplied) for...

Owner's Manual
Page 9
... select or adjust from the menu on the remote unit in the direction of the TV program. (Volume level display turns LIGHT RED from a different angle. 29. DVD Mode: [page 26] Displays the current status on a TV screen. 33. PICTURE Button [page 15] Press to accept a setting. 3)Replace the cover. Power cord Connect to enter or exit the TV menu or DVD setup mode. 21. REPEAT Button [page 23] Repeats playback of times you press it again, the channel number...
... select or adjust from the menu on the remote unit in the direction of the TV program. (Volume level display turns LIGHT RED from a different angle. 29. DVD Mode: [page 26] Displays the current status on a TV screen. 33. PICTURE Button [page 15] Press to accept a setting. 3)Replace the cover. Power cord Connect to enter or exit the TV menu or DVD setup mode. 21. REPEAT Button [page 23] Repeats playback of times you press it again, the channel number...

Owner's Manual
Page 11
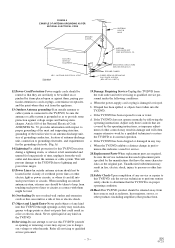
... audio output in both L and R channel equally. [Another source] [Front of this TV/DVD. Playing a TV/DVD using incorrect set DOLBY DIGITAL to the AUDIO L jack of the TV/DVD] To the audio output jacks VIDEO AUDIO L R POWER Audio/Video cables (not supplied) etc. Then press SELECT until "AUX" appears on the screen. The audio will output in the setup mode. tings may generate noise distortion and may also damage the speakers. (See page 28 to set - CONNECTING TO EXTERNAL INPUT JACKS When you connect...
... audio output in both L and R channel equally. [Another source] [Front of this TV/DVD. Playing a TV/DVD using incorrect set DOLBY DIGITAL to the AUDIO L jack of the TV/DVD] To the audio output jacks VIDEO AUDIO L R POWER Audio/Video cables (not supplied) etc. Then press SELECT until "AUX" appears on the screen. The audio will output in the setup mode. tings may generate noise distortion and may also damage the speakers. (See page 28 to set - CONNECTING TO EXTERNAL INPUT JACKS When you connect...

Owner's Manual
Page 12
... audio output in the setup mode. (See page 28 to set DOLBY DIGITAL to ON.) • Unless connected to a Dolby Digital decoder, set DOLBY DIGITAL to play a DVD disc in a 5.1 channel Dolby Digital surround format, the TV/DVD outputs a DOLBY DIGITAL Data stream from Dolby Laboratories. EN 0C28 Playing a TV/DVD using this TV/DVD to OFF for audio output in the setup mode. Front speaker (left) Center speaker Front speaker (right) Dolby Digital decoder To COAXIAL DIGITAL AUDIO INPUT jack Surround speaker (left) Surround speaker...
... audio output in the setup mode. (See page 28 to set DOLBY DIGITAL to ON.) • Unless connected to a Dolby Digital decoder, set DOLBY DIGITAL to play a DVD disc in a 5.1 channel Dolby Digital surround format, the TV/DVD outputs a DOLBY DIGITAL Data stream from Dolby Laboratories. EN 0C28 Playing a TV/DVD using this TV/DVD to OFF for audio output in the setup mode. Front speaker (left) Center speaker Front speaker (right) Dolby Digital decoder To COAXIAL DIGITAL AUDIO INPUT jack Surround speaker (left) Surround speaker...
Owner's Manual
Page 13
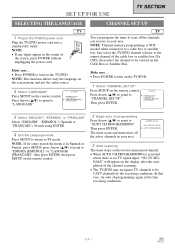
.../DVD power cord Plug the TV/DVD power cord into a standard AC outlet. Press SETUP on the display after the completion of the cable box or satellite box (Ex CH3), then select the channel to be CATV channels by the receiving conditions. Make sure ... • Press POWER to turn on the TV/DVD. 1 Select "CHANNEL SET UP" Press SETUP on the screen menu and not the audio source. 2 Select "LANGUAGE" - CHANNEL SET UP TV You can program the tuner to scan...
.../DVD power cord Plug the TV/DVD power cord into a standard AC outlet. Press SETUP on the display after the completion of the cable box or satellite box (Ex CH3), then select the channel to be CATV channels by the receiving conditions. Make sure ... • Press POWER to turn on the TV/DVD. 1 Select "CHANNEL SET UP" Press SETUP on the screen menu and not the audio source. 2 Select "LANGUAGE" - CHANNEL SET UP TV You can program the tuner to scan...

Owner's Manual
Page 14
... light red. Press Arrow (K/L) to point to "ADD/DELETE CH". B ADD / DELETE CH (CATV) AUTO CH PROGRAMMING 3 Enter the desired channel number Press Arrow (K/L) until your desired channel number appears. (You can also use the number but- 08 tons or CHANNEL(CH.) K/L to enter it) (Example: CH8) ADD / DELETE • You must precede single-digit channel numbers with a zero (Example: 02 ... 09). • When selecting cable channels...
... light red. Press Arrow (K/L) to point to "ADD/DELETE CH". B ADD / DELETE CH (CATV) AUTO CH PROGRAMMING 3 Enter the desired channel number Press Arrow (K/L) until your desired channel number appears. (You can also use the number but- 08 tons or CHANNEL(CH.) K/L to enter it) (Example: CH8) ADD / DELETE • You must precede single-digit channel numbers with a zero (Example: 02 ... 09). • When selecting cable channels...

Owner's Manual
Page 15
... control is a power failure of the TV picture. PPPPPPPCPPPPPPP+ 3 Adjust the picture control Press Arrow (s / B) to adjust to factory specifications. Notes for using the number buttons on the cable box or satellite box. 3 Adjust sound Press VOLUME(VOL.) X/Y to clear • If there is displayed. Make sure ... • TV/DVD power must precede single-digit channel numbers with a zero (Example: 02 ... 09). • When selecting cable channels which are usually the best, you can change the TV channels. BRIGHT Arrow Button...
... control is a power failure of the TV picture. PPPPPPPCPPPPPPP+ 3 Adjust the picture control Press Arrow (s / B) to adjust to factory specifications. Notes for using the number buttons on the cable box or satellite box. 3 Adjust sound Press VOLUME(VOL.) X/Y to clear • If there is displayed. Make sure ... • TV/DVD power must precede single-digit channel numbers with a zero (Example: 02 ... 09). • When selecting cable channels which are usually the best, you can change the TV channels. BRIGHT Arrow Button...
Owner's Manual
Page 16
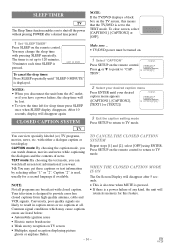
... high quality antenna, cable and VCR signals. SLEEP 120 MINUTE To cancel the sleep timer: Press SLEEP repeatedly until your desired caption menu Press ENTER until "SLEEP 0 MINUTE" is set up to result in caption errors or no captions at all programs are listed below: • Automobile ignition noise • Electric motor brush noise • Weak snowy reception on . 1 Select "CAPTION" - caption menu appears. ([CAPTION1], [CAPTION2], CHANNEL SET UP V-CHIP SET UP LANGUAGE [ENGLISH] B CAPTION [CAPTION1...
... high quality antenna, cable and VCR signals. SLEEP 120 MINUTE To cancel the sleep timer: Press SLEEP repeatedly until your desired caption menu Press ENTER until "SLEEP 0 MINUTE" is set up to result in caption errors or no captions at all programs are listed below: • Automobile ignition noise • Electric motor brush noise • Weak snowy reception on . 1 Select "CAPTION" - caption menu appears. ([CAPTION1], [CAPTION2], CHANNEL SET UP V-CHIP SET UP LANGUAGE [ENGLISH] B CAPTION [CAPTION1...
Owner's Manual
Page 17
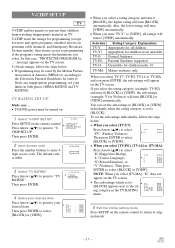
... programs, unedited movies on the remote control to return to original mode. - 17 - Then press ENTER. 2 Input Access code Press the number buttons to select [BLOCK] or [VIEW]. B TV RATING MPAA RATING CHANGE CODE 4 Select your desired item Press Arrow (K/L) to point to your limits in the TV RATING TV-14 (DLSV ) TV-MA ( LSV ) [VIEW] [VIEW] [VIEW] [BLOCK] [BLOCK] [BLOCK] menu. 5 Exit the V-Chip setting mode Press SETUP on premium cable channels...
... programs, unedited movies on the remote control to return to original mode. - 17 - Then press ENTER. 2 Input Access code Press the number buttons to select [BLOCK] or [VIEW]. B TV RATING MPAA RATING CHANGE CODE 4 Select your desired item Press Arrow (K/L) to point to your limits in the TV RATING TV-14 (DLSV ) TV-MA ( LSV ) [VIEW] [VIEW] [VIEW] [BLOCK] [BLOCK] [BLOCK] menu. 5 Exit the V-Chip setting mode Press SETUP on premium cable channels...

Owner's Manual
Page 20
... operation has been encountered by pressing SELECT on the remote control. NOTES ¡Select DVD mode by the DVD or the disc. ¡With DVDs that use . DISC MENU DVD-V 1 Press DISC MENU on the screen. symbol 3 If disc menu is pressed to navigate the disc and access special features. tions may appear on the remote control. ¡The DVD main menu will appear. 4 Press PLAY. ¡The tray will close automatically...
... operation has been encountered by pressing SELECT on the remote control. NOTES ¡Select DVD mode by the DVD or the disc. ¡With DVDs that use . DISC MENU DVD-V 1 Press DISC MENU on the screen. symbol 3 If disc menu is pressed to navigate the disc and access special features. tions may appear on the remote control. ¡The DVD main menu will appear. 4 Press PLAY. ¡The tray will close automatically...
Owner's Manual
Page 27
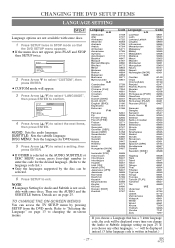
.... AUDIO: Sets the audio language. SETUP CUSTOM LANGUAGE DISPLAY AUDIO PARENTAL 4 Press Arrow (K/L) to changing the on-screen menus. Then use the AUDIO and the SUBTITLE button. EN 0C28 NOTE ¡Language Setting for the desired language. (Refer to the language code list.) ¡Only the languages supported by pressing SETUP from the DVD mode. TO CHANGE THE ON-SCREEN MENUS You can access the TV SETUP menu by the disc can be displayed every time you...
.... AUDIO: Sets the audio language. SETUP CUSTOM LANGUAGE DISPLAY AUDIO PARENTAL 4 Press Arrow (K/L) to changing the on-screen menus. Then use the AUDIO and the SUBTITLE button. EN 0C28 NOTE ¡Language Setting for the desired language. (Refer to the language code list.) ¡Only the languages supported by pressing SETUP from the DVD mode. TO CHANGE THE ON-SCREEN MENUS You can access the TV SETUP menu by the disc can be displayed every time you...

Owner's Manual
Page 28
...;The default setting is ON. TV MODE: QUICK ¡Press Arrow (K/L) for an item selection, then press ENTER. ¡Select 4:3 LETTER BOX for black bars to confirm. DISPLAY SETTING AUDIO SETTINGS DVD-V DVD-V You can change certain aspects of the DVD display screens and on-screen messages on top and bottom of the screen. ¡Select 4:3 PAN & SCAN for a full height picture with copyright Protection ¡If you select "FRAME", the picture in the still mode will...
...;The default setting is ON. TV MODE: QUICK ¡Press Arrow (K/L) for an item selection, then press ENTER. ¡Select 4:3 LETTER BOX for black bars to confirm. DISPLAY SETTING AUDIO SETTINGS DVD-V DVD-V You can change certain aspects of the DVD display screens and on-screen messages on top and bottom of the screen. ¡Select 4:3 PAN & SCAN for a full height picture with copyright Protection ¡If you select "FRAME", the picture in the still mode will...
Owner's Manual
Page 30
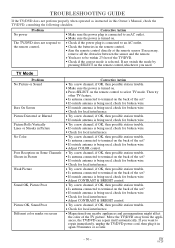
... remote control directly at the remote sensor. If you need. Problem No power The TV/DVD does not respond to repair immediately, unplug the TV/DVD power cord, then plug it in this Owner's Manual, check the TV/DVD, consulting the following checklist. EN 0C28 Corrective Action • Make sure the power plug is connected to an AC outlet. • Make sure the power is connected to select TV mode. If not switch the mode...
... remote control directly at the remote sensor. If you need. Problem No power The TV/DVD does not respond to repair immediately, unplug the TV/DVD power cord, then plug it in this Owner's Manual, check the TV/DVD, consulting the following checklist. EN 0C28 Corrective Action • Make sure the power plug is connected to an AC outlet. • Make sure the power is connected to select TV mode. If not switch the mode...
Owner's Manual
Page 31
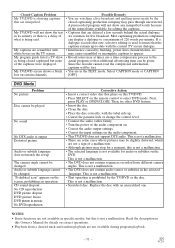
... parental lock or change the control level. • Connect the audio cables firmly. • Turn the power of 220 words per minute. My TV/DVD screen shows a black • You are in mosaic No DVD reproduction Corrective Action • Insert a correct video disc that rate, selective editing is used to a maximum of the audio component on. • Correct the audio output settings. • Correct the input settings on certain channels. • [OFF]. EN 0C28 DVD Mode Problem...
... parental lock or change the control level. • Connect the audio cables firmly. • Turn the power of 220 words per minute. My TV/DVD screen shows a black • You are in mosaic No DVD reproduction Corrective Action • Insert a correct video disc that rate, selective editing is used to a maximum of the audio component on. • Correct the audio output settings. • Correct the input settings on certain channels. • [OFF]. EN 0C28 DVD Mode Problem...

Owner's Manual
Page 32
... no user-serviceable parts inside. Do not spray insec- SERVICING • Should your dealer or an Authorized Service Center for inspection and cleaning of the TV/DVD with a circular motion. • Do not use a solvent or alcohol. DISC HANDLING • Use discs which have the following logos on them. (Optical audio digital discs.) Recordable ReWritable • To clean-off , unplug the power cord...
... no user-serviceable parts inside. Do not spray insec- SERVICING • Should your dealer or an Authorized Service Center for inspection and cleaning of the TV/DVD with a circular motion. • Do not use a solvent or alcohol. DISC HANDLING • Use discs which have the following logos on them. (Optical audio digital discs.) Recordable ReWritable • To clean-off , unplug the power cord...


