
Instruction Manual
Page 3
... 8 Maintenance, Repair and Storage 33 8.1 Warnings and Instructions 33 9 Before Starting Work 33 9.1 Preparing the Chain Saw for Operation 33 10 Assembling the Chain Saw 34 10.1 Cutting Attachment 34 10.2 Mounting and Removing the Guide Bar and Chain 34 10.3 Tensioning the Chain 35 11 Lubricating the Saw Chain and Guide Bar 36 11.1 Bar and Chain Lubricant 36 11.2 Filling the Chain Oil Tank 36 11.3 Adjusting the Flow of Bar and Chain Oil 37 12 The Chain Brake 38...
... 8 Maintenance, Repair and Storage 33 8.1 Warnings and Instructions 33 9 Before Starting Work 33 9.1 Preparing the Chain Saw for Operation 33 10 Assembling the Chain Saw 34 10.1 Cutting Attachment 34 10.2 Mounting and Removing the Guide Bar and Chain 34 10.3 Tensioning the Chain 35 11 Lubricating the Saw Chain and Guide Bar 36 11.1 Bar and Chain Lubricant 36 11.2 Filling the Chain Oil Tank 36 11.3 Adjusting the Flow of Bar and Chain Oil 37 12 The Chain Brake 38...
Instruction Manual
Page 4
... the Saw Chain 56 23 Troubleshooting Guide 60 23.1 Chain saw 60 23.2 Adjusting Idle Speed 61 23.3 Clearing the Combustion Chamber 61 24 Specifications 62 24.1 EPA 62 24.2 STIHL MS 661 62 24.3 Chain Sprockets 63 24.4 Minimum Groove Depth of Guide Bars 63 24.5 Depth Gauge Setting 63 24.6 Symbols on the Chain Saw 63 24.7 Engineering Improvements 63 25 Combinations of Guide Bars and Saw Chains 64 25.1 STIHL MS 661 64 26 Replacement Parts and...
... the Saw Chain 56 23 Troubleshooting Guide 60 23.1 Chain saw 60 23.2 Adjusting Idle Speed 61 23.3 Clearing the Combustion Chamber 61 24 Specifications 62 24.1 EPA 62 24.2 STIHL MS 661 62 24.3 Chain Sprockets 63 24.4 Minimum Groove Depth of Guide Bars 63 24.5 Depth Gauge Setting 63 24.6 Symbols on the Chain Saw 63 24.7 Engineering Improvements 63 25 Combinations of Guide Bars and Saw Chains 64 25.1 STIHL MS 661 64 26 Replacement Parts and...

Instruction Manual
Page 6
.... 4 Guide Bar Supports and guides the saw chain. 5 Saw Chain Toothed cutting tool consisting of injury from the operator. English 3 Main Parts 3.1 Chain Saw 2 1 11 10 3 # 4 87 6 5 9 30 29 31 28 27 12 13 14 15 16 26 25 24 23 22 17 18 19 20 21 1 Carburetor Adjusting Screws For tuning the carburetor. 4 0000-GXX-A386-A0 3 Main Parts 2 Front Hand Guard Helps protect the operator's left hand. 14 Oil Filler Cap...
.... 4 Guide Bar Supports and guides the saw chain. 5 Saw Chain Toothed cutting tool consisting of injury from the operator. English 3 Main Parts 3.1 Chain Saw 2 1 11 10 3 # 4 87 6 5 9 30 29 31 28 27 12 13 14 15 16 26 25 24 23 22 17 18 19 20 21 1 Carburetor Adjusting Screws For tuning the carburetor. 4 0000-GXX-A386-A0 3 Main Parts 2 Front Hand Guard Helps protect the operator's left hand. 14 Oil Filler Cap...

Instruction Manual
Page 7
... 4.1 Chain Saw The following safety symbols are found on the Product 15 Oil Adjustment Limiter Limits travel of oil flow adjusting screw. 16 Oil Flow Adjusting Screw For adjusting the amount of chain oil. 17 Starter Grip The grip of the pull starter for starting the engine. 18 Fuel Filler Cap Closes and seals the fuel tank. 19 Master Control Lever Lever for choke control, starting easier. 28 Shroud Covers the air filter and engine. 29 Shutter for the operator's right hand. 23 Throttle Trigger...
... 4.1 Chain Saw The following safety symbols are found on the Product 15 Oil Adjustment Limiter Limits travel of oil flow adjusting screw. 16 Oil Flow Adjusting Screw For adjusting the amount of chain oil. 17 Starter Grip The grip of the pull starter for starting the engine. 18 Fuel Filler Cap Closes and seals the fuel tank. 19 Master Control Lever Lever for choke control, starting easier. 28 Shroud Covers the air filter and engine. 29 Shutter for the operator's right hand. 23 Throttle Trigger...

Instruction Manual
Page 11
... chain saw uses an oil-gasoline mixture for fueling and move at least 10 ft. (3 m) from flames, pilot lights, heaters, electric motors, and other personal injury from escaping gas, vapor and fumes: - Check that only identical STIHL replacement parts be ignited by a spark or flame many feet away. - Your STIHL chain saw to cool. To reduce the risk of burns and other ignition source, it to cool before removing the fuel cap...
... chain saw uses an oil-gasoline mixture for fueling and move at least 10 ft. (3 m) from flames, pilot lights, heaters, electric motors, and other personal injury from escaping gas, vapor and fumes: - Check that only identical STIHL replacement parts be ignited by a spark or flame many feet away. - Your STIHL chain saw to cool. To reduce the risk of burns and other ignition source, it to cool before removing the fuel cap...

Instruction Manual
Page 14
... starting position for the fuel being used in the cold start the chain saw to start position and pull the starter cord approximately 20 times to the top. Always follow the instructions in this section when removing the fuel cap. ■ To relieve vapor lock: - Such misalignment can result in relation to clear the vapor and send liquid fuel into the carburetor. - Place the Master Control Lever in conditions too extreme for installation...
... starting position for the fuel being used in the cold start the chain saw to start position and pull the starter cord approximately 20 times to the top. Always follow the instructions in this section when removing the fuel cap. ■ To relieve vapor lock: - Such misalignment can result in relation to clear the vapor and send liquid fuel into the carburetor. - Place the Master Control Lever in conditions too extreme for installation...
Instruction Manual
Page 15
... cover. Never attempt to the idle position when released. Check chain tension once more difficult to STOP. - Check fuel system for proper condition and operation before starting work, particularly the throttle trigger, throttle trigger lockout, Master Control Lever, front hand guard, chain brake and cutting attachment. - If your saw is modified, damaged, improperly maintained or not completely and securely assembled. - Read and follow the chain tensioning instructions, @ 10.3. - Select the shortest bar that the throttle trigger and throttle trigger...
... cover. Never attempt to the idle position when released. Check chain tension once more difficult to STOP. - Check fuel system for proper condition and operation before starting work, particularly the throttle trigger, throttle trigger lockout, Master Control Lever, front hand guard, chain brake and cutting attachment. - If your saw is modified, damaged, improperly maintained or not completely and securely assembled. - Read and follow the chain tensioning instructions, @ 10.3. - Select the shortest bar that the throttle trigger and throttle trigger...

Instruction Manual
Page 16
... starting throttle lock engaged will cause the clutch to slip continuously. Do not drop start or accelerate the engine when the guide bar is started , immediately blip the throttle trigger, which should release the Master Control Lever to the run position and allow the engine to slow down to idle. ■ Accelerating the engine while the chain brake is engaged or the chain is in a cut or kerf. - Always engage the chain brake before starting cutting...
... starting throttle lock engaged will cause the clutch to slip continuously. Do not drop start or accelerate the engine when the guide bar is started , immediately blip the throttle trigger, which should release the Master Control Lever to the run position and allow the engine to slow down to idle. ■ Accelerating the engine while the chain brake is engaged or the chain is in a cut or kerf. - Always engage the chain brake before starting cutting...
Instruction Manual
Page 18
... use it in this position before pulling the starter grip if the spark plug boot has been removed. - Shut off the engine and engage the chain brake during favorable daylight conditions. - Flammable materials can ignite flammable materials under good visibility during work with the bumper spike to maintain better control of the saw. ■ Applying pressure to the chain saw when reaching the end of a cut near power lines...
... use it in this position before pulling the starter grip if the spark plug boot has been removed. - Shut off the engine and engage the chain brake during favorable daylight conditions. - Flammable materials can ignite flammable materials under good visibility during work with the bumper spike to maintain better control of the saw. ■ Applying pressure to the chain saw when reaching the end of a cut near power lines...
Instruction Manual
Page 20
... the chain: - Remove any part of your authorized STIHL servicing dealer. - A "sponginess" in the feel of a felled tree) away from unintentional starting a cut, ensure that the wood is known as the "flywheel effect." Check the condition and tension of burn injury: - Allow the engine to cool before cutting. - the trunk of the saw to cool on how to adjust idle speed, see "Adjusting Idle Speed" in this instruction manual...
... the chain: - Remove any part of your authorized STIHL servicing dealer. - A "sponginess" in the feel of a felled tree) away from unintentional starting a cut, ensure that the wood is known as the "flywheel effect." Check the condition and tension of burn injury: - Allow the engine to cool before cutting. - the trunk of the saw to cool on how to adjust idle speed, see "Adjusting Idle Speed" in this instruction manual...

Instruction Manual
Page 21
... powerful forces used to accidents. Do not rely on forest-covered, brush-covered or grasscovered land unless the engine's exhaust system is equipped with a missing or damaged spark arresting screen. - An understanding of the causes of electrocution: - Do not use or operate gasolinepowered tools on the chain saw with a complying spark arrester that may have your chain saw 's insulation against the operator. If your gas/oil mix ratio is maintained in - Pull...
... powerful forces used to accidents. Do not rely on forest-covered, brush-covered or grasscovered land unless the engine's exhaust system is equipped with a missing or damaged spark arresting screen. - An understanding of the causes of electrocution: - Do not use or operate gasolinepowered tools on the chain saw with a complying spark arrester that may have your chain saw 's insulation against the operator. If your gas/oil mix ratio is maintained in - Pull...

Instruction Manual
Page 23
... toward the user in this manual. - Never use a saw such that your left hand contacts the front hand guard, which is in accordance with the standards for the brake, and pushes it is the activation lever for use on a chain saw equipped with an inertia Quickstop chain brake. When working, always position the chain saw if the chain brake does not function properly. - Follow the maintenance and service instructions in...
... toward the user in this manual. - Never use a saw such that your left hand contacts the front hand guard, which is in accordance with the standards for the brake, and pushes it is the activation lever for use on a chain saw equipped with an inertia Quickstop chain brake. When working, always position the chain saw if the chain brake does not function properly. - Follow the maintenance and service instructions in...

Instruction Manual
Page 35
... STIHL servicing dealers. ■ To reduce the risk of parts that all nuts, bolts and screws after each time it is engaged. Users may cause serious or fatal injury or property damage. - Keep the chain, guide bar and sprocket clean. - Strictly follow the cleaning and maintenance instructions in use . ■ Like an automobile brake, the chain brake on your STIHL servicing dealer for the chain saw , @ 13.2. ► Check the chain brake, @ 16.1. ► Check the controls for maintenance...
... STIHL servicing dealers. ■ To reduce the risk of parts that all nuts, bolts and screws after each time it is engaged. Users may cause serious or fatal injury or property damage. - Keep the chain, guide bar and sprocket clean. - Strictly follow the cleaning and maintenance instructions in use . ■ Like an automobile brake, the chain brake on your STIHL servicing dealer for the chain saw , @ 13.2. ► Check the chain brake, @ 16.1. ► Check the controls for maintenance...

Instruction Manual
Page 42
... ensures that are for pressure to build in air cooled 2-cycle engines. Always use in the fuel container. Open the container slowly to the season, altitude and other mix oils that accompany your fuel container. STIHL recommends using MotoMix, use only STIHL High Performance 2-Cycle Engine Oil or equivalent high quality 2-cycle engine oils that are filling a container at authorized disposal locations. 13.2 Refueling the Chain Saw WARNING Take care when handling gasoline. Avoid direct...
... ensures that are for pressure to build in air cooled 2-cycle engines. Always use in the fuel container. Open the container slowly to the season, altitude and other mix oils that accompany your fuel container. STIHL recommends using MotoMix, use only STIHL High Performance 2-Cycle Engine Oil or equivalent high quality 2-cycle engine oils that are filling a container at authorized disposal locations. 13.2 Refueling the Chain Saw WARNING Take care when handling gasoline. Avoid direct...

Instruction Manual
Page 47
The Master Control Lever (3) will move to the run position and the engine will settle down to idling speed. ► If the engine does not start after the throttle trigger is idling, adjust the idle speed, @ 23.2. g. To reduce the risk of the chain brake, have your saw chain will cause the clutch to full throttle for operation. ► If the saw or setting it down the throttle trigger lockout (5) and blip the throttle trigger (4). Never attempt to important...
The Master Control Lever (3) will move to the run position and the engine will settle down to idling speed. ► If the engine does not start after the throttle trigger is idling, adjust the idle speed, @ 23.2. g. To reduce the risk of the chain brake, have your saw chain will cause the clutch to full throttle for operation. ► If the saw or setting it down the throttle trigger lockout (5) and blip the throttle trigger (4). Never attempt to important...

Instruction Manual
Page 57
... engine and engage the chain brake. ► Remove the guide bar and saw chain, @ 10.2.2. 22.3 Inspecting and Maintaining the Chain Sprocket ► Shut off the engine and engage the chain brake before inspecting the chain saw chain when indicated by the relevant wear marks or when the chain is less than a = 0.020 in this manual. STIHL recommends using the measuring tool on the file gauge (special accessory, not included). ► Replace the guide bar...
... engine and engage the chain brake. ► Remove the guide bar and saw chain, @ 10.2.2. 22.3 Inspecting and Maintaining the Chain Sprocket ► Shut off the engine and engage the chain brake before inspecting the chain saw chain when indicated by the relevant wear marks or when the chain is less than a = 0.020 in this manual. STIHL recommends using the measuring tool on the file gauge (special accessory, not included). ► Replace the guide bar...

Instruction Manual
Page 62
... any inspection, cleaning or maintenance. The carburetor is dull or improperly sharpened. idling. Insufficient bar and chain oil. English 23 Troubleshooting Guide 23 Troubleshooting Guide 23.1 Chain saw is being mis-used. The carburetor is blocked. Condition Possible Cause The engine does not start with resin remover. ► Properly sharpen the chain, @ 10.3. ► Obtain instruction on proper working technique. ► Have the chain lubrication mechanism checked by an authorized STIHL servicing dealer. 60...
... any inspection, cleaning or maintenance. The carburetor is dull or improperly sharpened. idling. Insufficient bar and chain oil. English 23 Troubleshooting Guide 23 Troubleshooting Guide 23.1 Chain saw is being mis-used. The carburetor is blocked. Condition Possible Cause The engine does not start with resin remover. ► Properly sharpen the chain, @ 10.3. ► Obtain instruction on proper working technique. ► Have the chain lubrication mechanism checked by an authorized STIHL servicing dealer. 60...
Instruction Manual
Page 64
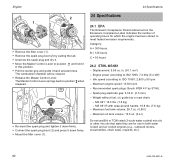
... the spark plug boot (2) and press it back several times. Maximum fuel tank volume: 28.7 oz. (0.85 l) - The Master Control Lever springs back to meet federal emission requirements. Idle speed according to ISO 7293: 7.2 bhp (5.4 kW) - Engine power according to ISO 11681: 2,800 ± 50 rpm - English 24 Specifications 2 1 ► Remove the filter cover (1). ► Remove the spark plug boot (2) by STIHL - Category: A = 300 hours B = 125 hours C = 50 hours 24.2 STIHL MS 661 - MS 661...
... the spark plug boot (2) and press it back several times. Maximum fuel tank volume: 28.7 oz. (0.85 l) - The Master Control Lever springs back to meet federal emission requirements. Idle speed according to ISO 7293: 7.2 bhp (5.4 kW) - Engine power according to ISO 11681: 2,800 ± 50 rpm - English 24 Specifications 2 1 ► Remove the filter cover (1). ► Remove the spark plug boot (2) by STIHL - Category: A = 300 hours B = 125 hours C = 50 hours 24.2 STIHL MS 661 - MS 661...
Instruction Manual
Page 69
.... Any manufacturer-approved or equivalent replacement part may be designed, built and equipped, at any emission-related part on your instruction manual. Emission test may be used in order to contact you if there ever is not required in non-warranty maintenance or repairs, and shall not reduce the warranty obligations of the engine manufacturer. 29 Emission Control Warranty Owner's Warranty Responsibilities As the small off...
.... Any manufacturer-approved or equivalent replacement part may be designed, built and equipped, at any emission-related part on your instruction manual. Emission test may be used in order to contact you if there ever is not required in non-warranty maintenance or repairs, and shall not reduce the warranty obligations of the engine manufacturer. 29 Emission Control Warranty Owner's Warranty Responsibilities As the small off...
Instruction Manual
Page 70
... for Warranty Service Bring the product to other services and adjustments necessary for damages to any of required maintenance, - Solenoid Valve (if applicable) - repairs improperly performed or replacements not conforming to the owner. Limitations This Emission Control Systems Warranty shall not cover any authorized STIHL servicing dealer. 30 Trademarks Maintenance Requirements The maintenance instructions in writing by the failure of fuel and oil may require shorter maintenance intervals. Spark Plug - Fuel Line - Control Linkages - Injection Valve...
... for Warranty Service Bring the product to other services and adjustments necessary for damages to any of required maintenance, - Solenoid Valve (if applicable) - repairs improperly performed or replacements not conforming to the owner. Limitations This Emission Control Systems Warranty shall not cover any authorized STIHL servicing dealer. 30 Trademarks Maintenance Requirements The maintenance instructions in writing by the failure of fuel and oil may require shorter maintenance intervals. Spark Plug - Fuel Line - Control Linkages - Injection Valve...


