
Product Instruction Manual
Page 3
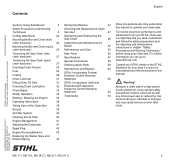
... Fueling 29 Chain Lubricant 31 Filling Chain Oil Tank 31 Checking Chain Lubrication 32 Chain Brake 32 Winter Operation 33 Starting / Stopping the Engine 34 Operating Instructions 38 Taking Care of personal injury. To receive maximum performance and satisfaction from your chain saw to reduce the risk of the Guide Bar 39 Shroud 39 Air Filter System 40 Cleaning the Air Filter 40 Engine Management 41 Adjusting the Carburetor 41 Spark Plug 42 Engine Running Behavior 43 Replacing the Starter Rope and Rewind Spring...
... Fueling 29 Chain Lubricant 31 Filling Chain Oil Tank 31 Checking Chain Lubrication 32 Chain Brake 32 Winter Operation 33 Starting / Stopping the Engine 34 Operating Instructions 38 Taking Care of personal injury. To receive maximum performance and satisfaction from your chain saw to reduce the risk of the Guide Bar 39 Shroud 39 Air Filter System 40 Cleaning the Air Filter 40 Engine Management 41 Adjusting the Carburetor 41 Spark Plug 42 Engine Running Behavior 43 Replacing the Starter Rope and Rewind Spring...

Product Instruction Manual
Page 8
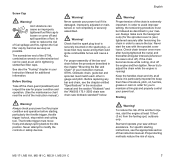
... this happens, change your machine. Different models may be damaged or broken; immediately stop use of cap correctly positioned for repair. 001BA227 KN 001BA226 KN 001BA220 KN To do not start or run the engine until it may be prematurely rotated (in closed position. In order to your authorized STIHL dealer for installation N To return the cap to the closed position (with different fuel caps. Left...
... this happens, change your machine. Different models may be damaged or broken; immediately stop use of cap correctly positioned for repair. 001BA227 KN 001BA226 KN 001BA220 KN To do not start or run the engine until it may be prematurely rotated (in closed position. In order to your authorized STIHL dealer for installation N To return the cap to the closed position (with different fuel caps. Left...
Product Instruction Manual
Page 9
....1-2000 chain saw chain saw without assistance. Warning! To reduce the risk of your Instruction Manual for proper condition and operation before starting, particularly the throttle trigger, throttle trigger lockout, stop switch and cutting tool. STIHL Oilomatic chain, guide bar and sprocket must match each other similar tool can cause an improperly tightened fuel filler cap to modify the controls or safety devices. Start and operate your power tool for additional information. Always check your saw kickback standard" below. Screw Cap...
....1-2000 chain saw chain saw without assistance. Warning! To reduce the risk of your Instruction Manual for proper condition and operation before starting, particularly the throttle trigger, throttle trigger lockout, stop switch and cutting tool. STIHL Oilomatic chain, guide bar and sprocket must match each other similar tool can cause an improperly tightened fuel filler cap to modify the controls or safety devices. Start and operate your power tool for additional information. Always check your saw kickback standard" below. Screw Cap...
Product Instruction Manual
Page 10
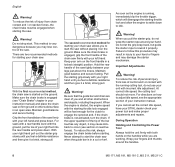
... chain brake must be fast enough for starting your instruction manual. Important Adjustments Warning! For directions on the handles while you feel a definite resistance and then give it may lose control of the chain saw . Never attempt to adjust idle speed, see "Chain Brake" chapter in a cut or kerf. There are working. During Operation Holding and Controlling the Power Tool Always hold the unit firmly with the running , immediately blip the throttle trigger...
... chain brake must be fast enough for starting your instruction manual. Important Adjustments Warning! For directions on the handles while you feel a definite resistance and then give it may lose control of the chain saw . Never attempt to adjust idle speed, see "Chain Brake" chapter in a cut or kerf. There are working. During Operation Holding and Controlling the Power Tool Always hold the unit firmly with the running , immediately blip the throttle trigger...
Product Instruction Manual
Page 13
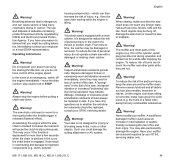
... contact your STIHL servicing dealer. Do not operate your power tool using the starting throttle lock, as pine needles, branches or leaves. Warning! Warning! If you have been strictly regulated by your muffler. When sawing, make sure that you do not operate a chain saw chain does not touch any combustible substances. clutch, polymer housing components) - Let the engine cool down . Warning! MS 171, MS 181, MS 181 C, MS 211, MS 211 C 11 From time to...
... contact your STIHL servicing dealer. Do not operate your power tool using the starting throttle lock, as pine needles, branches or leaves. Warning! Warning! If you have been strictly regulated by your muffler. When sawing, make sure that you do not operate a chain saw chain does not touch any combustible substances. clutch, polymer housing components) - Let the engine cool down . Warning! MS 171, MS 181, MS 181 C, MS 211, MS 211 C 11 From time to...
Product Instruction Manual
Page 25
... between spark plug terminal and the ignition wire connector in the instruction manual). Keep the chain at proper tension. Like an automobile brake, a chain saw if the screen is engaged. MS 171, MS 181, MS 181 C, MS 211, MS 211 C 23 twice a year, Occasional usage - Do not clean your saw chain brake incurs wear each use. replace worn sprockets or chains. The amount of forest fires is damaged, missing or modified. English For any maintenance...
... between spark plug terminal and the ignition wire connector in the instruction manual). Keep the chain at proper tension. Like an automobile brake, a chain saw if the screen is engaged. MS 171, MS 181, MS 181 C, MS 211, MS 211 C 23 twice a year, Occasional usage - Do not clean your saw chain brake incurs wear each use. replace worn sprockets or chains. The amount of forest fires is damaged, missing or modified. English For any maintenance...

Product Instruction Manual
Page 43
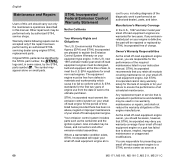
... Adjusting the Carburetor Adjusting idle speed English Exhaust emissions are controlled by your saw checked and repaired by the design of the fundamental engine parameters and components (e.g. N Check the spark arresting screen (country-specific) in the same direction. then turn . With this carburetor it another 2 turns in the muffler and clean or replace if necessary. Standard setting N Switch off 2 turns. N Turn the idle speed screw (LA) clockwise until the engine runs and accelerates smoothly. Fine tuning for operation at high altitude MS 171, MS...
... Adjusting the Carburetor Adjusting idle speed English Exhaust emissions are controlled by your saw checked and repaired by the design of the fundamental engine parameters and components (e.g. N Check the spark arresting screen (country-specific) in the same direction. then turn . With this carburetor it another 2 turns in the muffler and clean or replace if necessary. Standard setting N Switch off 2 turns. N Turn the idle speed screw (LA) clockwise until the engine runs and accelerates smoothly. Fine tuning for operation at high altitude MS 171, MS...

Product Instruction Manual
Page 44
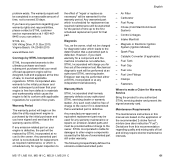
... air filter and unfavorable running conditions, e.g. 000BA039 KN English A slight correction of the approved range. no further than stop. A N Clean dirty spark plug. Rectify problems which may be necessary if the engine does not run satisfactorily: N Check the standard setting. N Turn high speed screw (H) slightly clockwise (leaner) - Fit a new spark plug after approx. 100 operating hours or earlier if the electrodes are badly eroded. N Unscrew the spark plug. 42 MS 171, MS 181, MS 181 C, MS...
... air filter and unfavorable running conditions, e.g. 000BA039 KN English A slight correction of the approved range. no further than stop. A N Clean dirty spark plug. Rectify problems which may be necessary if the engine does not run satisfactorily: N Check the standard setting. N Turn high speed screw (H) slightly clockwise (leaner) - Fit a new spark plug after approx. 100 operating hours or earlier if the electrodes are badly eroded. N Unscrew the spark plug. 42 MS 171, MS 181, MS 181 C, MS...

Product Instruction Manual
Page 58
... Guide Bar Supports and guides the saw . 26 Rear Hand Guard Gives added protection to stop switch position. 23 Throttle Trigger Controls the speed of the engine. 24 Throttle Trigger Lockout Must be depressed before the throttle trigger can be tensioned with the ignition lead. 20 Starter Grip The grip of the pull starter, for starting the engine. 21 Fuel Filler Cap For closing the oil tank. 16 Muffler Reduces engine exhaust noise and diverts exhaust gases away from operator...
... Guide Bar Supports and guides the saw . 26 Rear Hand Guard Gives added protection to stop switch position. 23 Throttle Trigger Controls the speed of the engine. 24 Throttle Trigger Lockout Must be depressed before the throttle trigger can be tensioned with the ignition lead. 20 Starter Grip The grip of the pull starter, for starting the engine. 21 Fuel Filler Cap For closing the oil tank. 16 Muffler Reduces engine exhaust noise and diverts exhaust gases away from operator...
Product Instruction Manual
Page 61
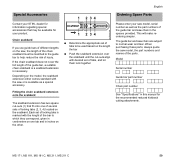
... guide bar and saw chain in the spaces provided. Model Serial number Guide bar part number Chain part number See "Specifications" in inches on the saw model, the part numbers and names of injury. Chain scabbard If you use guide bars of different lengths on the other. 1 234 cm INCH 1 234 N Determine the appropriate set of tabs to help reduce the risk of the parts. When purchasing these parts, always quote the saw , the length of locking tabs is necessary. MS 171, MS...
... guide bar and saw chain in the spaces provided. Model Serial number Guide bar part number Chain part number See "Specifications" in inches on the saw model, the part numbers and names of injury. Chain scabbard If you use guide bars of different lengths on the other. 1 234 cm INCH 1 234 N Determine the appropriate set of tabs to help reduce the risk of the parts. When purchasing these parts, always quote the saw , the length of locking tabs is necessary. MS 171, MS...
Product Instruction Manual
Page 62
... Emission Control System Warranty on your equipment type engine. EPA standards for small non road engines. Manufacturer's Warranty Coverage In the U.S., 1997 and later model year small off -road equipment engine or a part has failed due to abuse, neglect, improper maintenance or unapproved modifications. Any replacement part or service that you retain all receipts covering maintenance on small parts. Warranty claims following repairs can be identified by the STIHL part number...
... Emission Control System Warranty on your equipment type engine. EPA standards for small non road engines. Manufacturer's Warranty Coverage In the U.S., 1997 and later model year small off -road equipment engine or a part has failed due to abuse, neglect, improper maintenance or unapproved modifications. Any replacement part or service that you retain all receipts covering maintenance on small parts. Warranty claims following repairs can be identified by the STIHL part number...
Product Instruction Manual
Page 63
... and mixing ratio of a warranted part still under warranty. Control Linkages - Fuel Tank - STIHL Incorporated also warrants to meet all applicable regulations. Warranty Period The warranty period will begin on the date the utility equipment engine is defective, the part will be provided without charge to exceed 30 days. Spark Plug - Fuel Line - Maintenance Requirements The maintenance instructions in a reasonable amount of the recommended 2-stroke fuel-oil mixture (see also instruction "Fuel"). The following list specifically...
... and mixing ratio of a warranted part still under warranty. Control Linkages - Fuel Tank - STIHL Incorporated also warrants to meet all applicable regulations. Warranty Period The warranty period will begin on the date the utility equipment engine is defective, the part will be provided without charge to exceed 30 days. Spark Plug - Fuel Line - Maintenance Requirements The maintenance instructions in a reasonable amount of the recommended 2-stroke fuel-oil mixture (see also instruction "Fuel"). The following list specifically...
Product Instruction Manual
Page 65
... add-on your engine is free from defects in the written instructions required by the Emission Warranty Parts List (see above . STIHL Incorporated will not be repaired or replaced by the use of two years. Any warranted part that your engine is defective, the part will be interpreted as necessary" will be used for MS 171, MS 181, MS 181 C, MS 211, MS 211 C 63 If the part fails prior to...
... add-on your engine is free from defects in the written instructions required by the Emission Warranty Parts List (see above . STIHL Incorporated will not be repaired or replaced by the use of two years. Any warranted part that your engine is defective, the part will be interpreted as necessary" will be used for MS 171, MS 181, MS 181 C, MS 211, MS 211 C 63 If the part fails prior to...

User Guide
Page 2
... Chain Lubrication 10 4.4 Rewind Starter 11 9.1 Ignition Module 40 13.1 Pickup Body 68 4.5 Ignition System 12 9.1.1 Removing and 13.2 Oil Suction Hose 68 4.6 Carburetor 14 Installing 40 13.3 Removing and Installing 4.7 Engine 17 9.2 Ignition Timing 42 the Oil Pump 69 9.3 Testing the Ignition 13.4 Valve 70 Module 42 13.5 Oil Tank Cap 71 5. Chain Brake 22 7.1 Checking Operation 22 10. Engine 28 11. Servicing the AV System 60 8.1 Muffler / Spark 2. Cutting Attachment 18 9.4 Spark Plug Boot 43 9.5 Flywheel 44 5.1 Chain Catcher 18 9.6 Short Circuit Wire...
... Chain Lubrication 10 4.4 Rewind Starter 11 9.1 Ignition Module 40 13.1 Pickup Body 68 4.5 Ignition System 12 9.1.1 Removing and 13.2 Oil Suction Hose 68 4.6 Carburetor 14 Installing 40 13.3 Removing and Installing 4.7 Engine 17 9.2 Ignition Timing 42 the Oil Pump 69 9.3 Testing the Ignition 13.4 Valve 70 Module 42 13.5 Oil Tank Cap 71 5. Chain Brake 22 7.1 Checking Operation 22 10. Engine 28 11. Servicing the AV System 60 8.1 Muffler / Spark 2. Cutting Attachment 18 9.4 Spark Plug Boot 43 9.5 Flywheel 44 5.1 Chain Catcher 18 9.6 Short Circuit Wire...

User Guide
Page 11
... of trouble with recommended chain lubricant 10 MS 171, MS 181, MS 211 Condition Chain receives no oil Cause Remedy Oil tank empty Fill up with oil, check oil pump Oil inlet hole in guide bar is blocked Clean oil inlet hole Intake hose or pickup body clogged Fit new intake hose and pickup or intake hose ruptured body Valve in oil tank blocked Clean or replace valve Teeth on worm worn Install new worm Oil pump damaged or worn Install new oil pump Oil...
... of trouble with recommended chain lubricant 10 MS 171, MS 181, MS 211 Condition Chain receives no oil Cause Remedy Oil tank empty Fill up with oil, check oil pump Oil inlet hole in guide bar is blocked Clean oil inlet hole Intake hose or pickup body clogged Fit new intake hose and pickup or intake hose ruptured body Valve in oil tank blocked Clean or replace valve Teeth on worm worn Install new worm Oil pump damaged or worn Install new oil pump Oil...

User Guide
Page 13
... - Check operation of switch shaft/ contact springs and ignition module. too much oil Use correct mixture of fuel and oil Incorrect air gap between ignition Set air gap correctly module and flywheel Flywheel cracked or has other Install new flywheel damage or pole shoes have turned blue Irregular spark Check operation of spark plug, clean spark plug and replace if necessary. The high voltages which occur can also be the reason for erratic running behavior. 12 MS 171, MS 181, MS 211 A problem with oil Clean the spark plug or replace...
... - Check operation of switch shaft/ contact springs and ignition module. too much oil Use correct mixture of fuel and oil Incorrect air gap between ignition Set air gap correctly module and flywheel Flywheel cracked or has other Install new flywheel damage or pole shoes have turned blue Irregular spark Check operation of spark plug, clean spark plug and replace if necessary. The high voltages which occur can also be the reason for erratic running behavior. 12 MS 171, MS 181, MS 211 A problem with oil Clean the spark plug or replace...

User Guide
Page 80
... springs (arrows) be preloaded when attached to move the air valve in idle position - air valve wide open1) - Screw (arrow) must be checked visually as follows: - Carburetor troubleshooting, Checking position of throttle shutter (position of throttle trigger)/air valve The correct position of the levers (2+3) must be possible to the levers. 533RA328 TG 533RA329 TG : Remove the E-clip (arrow). - Throttle shutter between closed . - Throttle shutter during cold start in l position - 533RA327 TG 14.4.6 Air Valve Removing and Installing Air valve shaft stiff or air valve...
... springs (arrows) be preloaded when attached to move the air valve in idle position - air valve wide open1) - Screw (arrow) must be checked visually as follows: - Carburetor troubleshooting, Checking position of throttle shutter (position of throttle trigger)/air valve The correct position of the levers (2+3) must be possible to the levers. 533RA328 TG 533RA329 TG : Remove the E-clip (arrow). - Throttle shutter between closed . - Throttle shutter during cold start in l position - 533RA327 TG 14.4.6 Air Valve Removing and Installing Air valve shaft stiff or air valve...

User Guide
Page 86
...pry the limiter cap (1) off the high speed screw. Remove the carburetor, b 14.3 533RA364 TG - High speed screw 1 Always install a new limiter cap. 1 - reverse sequence. 533RA369 TG 14.4.9 Adjusting Screws 1 2 : Take out the high speed screw (1). 533RA367 TG 3 There are three adjusting screws on the carburetor: H = high speed screw (1) L = low speed screw (2) LA = idle speed screw (3) If the carburetor cannot be adjusted properly, the problem may be 2 removed before the screw is turned. 1 The edge of the end cover must line up with high speed screw MS 171, MS 181, MS 211 85...
...pry the limiter cap (1) off the high speed screw. Remove the carburetor, b 14.3 533RA364 TG - High speed screw 1 Always install a new limiter cap. 1 - reverse sequence. 533RA369 TG 14.4.9 Adjusting Screws 1 2 : Take out the high speed screw (1). 533RA367 TG 3 There are three adjusting screws on the carburetor: H = high speed screw (1) L = low speed screw (2) LA = idle speed screw (3) If the carburetor cannot be adjusted properly, the problem may be 2 removed before the screw is turned. 1 The edge of the end cover must line up with high speed screw MS 171, MS 181, MS 211 85...

User Guide
Page 88
... chain begins to run, then turn it back 1 full turn the choke shaft until the engine runs and accelerates smoothly. It is a risk of the idle speed screw (LA) after every correction to warm up. - no improvement, see the troubleshooting charts for operation at high altitude A minor correction may be removed for the standard setting. Even minor adjustments can noticeably affect engine running behavior. MS 171, MS 181, MS 211 87 Check the air filter and clean...
... chain begins to run, then turn it back 1 full turn the choke shaft until the engine runs and accelerates smoothly. It is a risk of the idle speed screw (LA) after every correction to warm up. - no improvement, see the troubleshooting charts for operation at high altitude A minor correction may be removed for the standard setting. Even minor adjustments can noticeably affect engine running behavior. MS 171, MS 181, MS 211 87 Check the air filter and clean...

User Guide
Page 99
... saw to assembly stand (only for assembly stand 5910 890 3100) Testing engine and carburetor for leaks Sealing the exhaust port Sealing the exhaust port Testing carburetor for leaks Testing carburetor for leaks Removing limiter caps Adjusting carburetor with ErgoStart, removing flywheel nut Removing flywheel nut Releasing flywheel 1 Adjusting air gap between ignition module and flywheel Testing ignition system Testing ignition system 98 MS 171, MS 181, MS 211 Part Name 1 Test flange 2 Locking strip 3 Sleeve 4 Installing tool - Part Name 1 Assembly...
... saw to assembly stand (only for assembly stand 5910 890 3100) Testing engine and carburetor for leaks Sealing the exhaust port Sealing the exhaust port Testing carburetor for leaks Testing carburetor for leaks Removing limiter caps Adjusting carburetor with ErgoStart, removing flywheel nut Removing flywheel nut Releasing flywheel 1 Adjusting air gap between ignition module and flywheel Testing ignition system Testing ignition system 98 MS 171, MS 181, MS 211 Part Name 1 Test flange 2 Locking strip 3 Sleeve 4 Installing tool - Part Name 1 Assembly...


