Product Instruction Manual
Page 2
... Guide to Using this Manual 2 IMPORTANT SAFETY INSTRUCTIONS 3 SAFETY PRECAUTIONS 6 Mounting the Drive Tube 15 Mounting the Loop Handle 16 Mounting the Deflector 16 Mounting Cutting Tools 17 Fitting the Harness 19 Starting 19 Storing the Machine 20 Main Parts and Control 21 Specifications 23 Maintenance and Repairs 23 Addresses 24 STIHl FSE 60 English / USA Allow only persons who understand this manual to continually improve all of cutting attachment...
... Guide to Using this Manual 2 IMPORTANT SAFETY INSTRUCTIONS 3 SAFETY PRECAUTIONS 6 Mounting the Drive Tube 15 Mounting the Loop Handle 16 Mounting the Deflector 16 Mounting Cutting Tools 17 Fitting the Harness 19 Starting 19 Storing the Machine 20 Main Parts and Control 21 Specifications 23 Maintenance and Repairs 23 Addresses 24 STIHl FSE 60 English / USA Allow only persons who understand this manual to continually improve all of cutting attachment...
Product Instruction Manual
Page 3
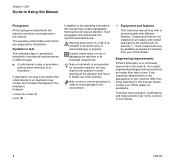
... improve all models and related applications are marked with an asterisk (*). Components that are not installed on correct procedure in this manual. 2 FSE 60 Engineering improvements STIHL's philosophy is not essential for assistance. Example: Loosen the screw (1) Lever (2) ... A description of a step or procedure that refers directly to an illustration may contain item numbers that require your STIHL dealer for using the machine...
... improve all models and related applications are marked with an asterisk (*). Components that are not installed on correct procedure in this manual. 2 FSE 60 Engineering improvements STIHL's philosophy is not essential for assistance. Example: Loosen the screw (1) Lever (2) ... A description of a step or procedure that refers directly to an illustration may contain item numbers that require your STIHL dealer for using the machine...

Product Instruction Manual
Page 4
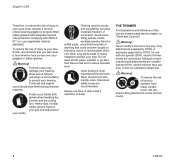
Use of power and overheating. An undersized extension cord set is intended. 7 = Ground Fault Circuit interrupter (GFCI) protection should be sure to use appliance in damp or wet locations. 2 = Don't Use In Rain. 3 = Keep Children Away -All visitors should be caught in moving parts. FSE 60 3 They can be kept at a distance from electrocution, follow basic precautions, including the following: 1 = Avoid...
Use of power and overheating. An undersized extension cord set is intended. 7 = Ground Fault Circuit interrupter (GFCI) protection should be sure to use appliance in damp or wet locations. 2 = Don't Use In Rain. 3 = Keep Children Away -All visitors should be caught in moving parts. FSE 60 3 They can be kept at a distance from electrocution, follow basic precautions, including the following: 1 = Avoid...

Product Instruction Manual
Page 5
... appliance with less likelihood of a risk of appliance cord form the extension cord set during operating: : Insert unit's plug (1) into extension cord coupling (2). 238BA008 KN 238BA009 KN 35 4 Strain relief : Make a loop (3) in use, before servicing, when changing accessories such as blades, and the like. 4 FSE 60 Never carry appliance by cord or yank it was designed. 14= Don´t Overreach - Keep proper...
... appliance with less likelihood of a risk of appliance cord form the extension cord set during operating: : Insert unit's plug (1) into extension cord coupling (2). 238BA008 KN 238BA009 KN 35 4 Strain relief : Make a loop (3) in use, before servicing, when changing accessories such as blades, and the like. 4 FSE 60 Never carry appliance by cord or yank it was designed. 14= Don´t Overreach - Keep proper...

Product Instruction Manual
Page 6
.... 18= Maintain appliance with care. before further use of electric shock, this manual. This plug will operate properly and perform its operation. If the plug does not fit fully in any other ). SAVE THESE INSTRUCTIONS FSE 60 English / USA 5 Inspect appliance cord periodically, and if damaged, have them repaired by an authorized service facility. A guard or other part that is wider than the other condition...
.... 18= Maintain appliance with care. before further use of electric shock, this manual. This plug will operate properly and perform its operation. If the plug does not fit fully in any other ). SAVE THESE INSTRUCTIONS FSE 60 English / USA 5 Inspect appliance cord periodically, and if damaged, have them repaired by an authorized service facility. A guard or other part that is wider than the other condition...

Product Instruction Manual
Page 7
... of the controls and function of the parts of the trimmer. 6 FSE 60 Thrown objects or damaged cutting tools may be allowed in the area where a power trimmer is in contact with your STIHL dealer show you read the safety instructions periodically. Most of these safety precautions and warnings apply to the operator or bystanders. !Warning! Warning! Careless or improper use an electric trimmer. Have...
... of the controls and function of the parts of the trimmer. 6 FSE 60 Thrown objects or damaged cutting tools may be allowed in the area where a power trimmer is in contact with your STIHL dealer show you read the safety instructions periodically. Most of these safety precautions and warnings apply to the operator or bystanders. !Warning! Warning! Careless or improper use an electric trimmer. Have...

Product Instruction Manual
Page 8
..., check with a pacemaker. According to vibrations may result in doubt, however, consult your doctor before operating this unit should not interfere with your physician and pacemaker manufacturer before operating a trimmer. !Warning! FSE 60 7 Proper Clothing !Warning! In order to reduce the risk of an electric trimmer (or other machines) exposing the operator to STIHL´s current knowledge, the electric motor of this tool...
..., check with a pacemaker. According to vibrations may result in doubt, however, consult your doctor before operating this unit should not interfere with your physician and pacemaker manufacturer before operating a trimmer. !Warning! FSE 60 7 Proper Clothing !Warning! In order to reduce the risk of an electric trimmer (or other machines) exposing the operator to STIHL´s current knowledge, the electric motor of this tool...
Product Instruction Manual
Page 9
..., pants, sandals or go bare foot. Wear sturdy boots with gloves when handling the trimmer and the cutting tool. Never modify a trimmer in any metal cutting attachment on this trimmer model. 8 FSE 60 Wear sound barriers (ear plugs or ear mufflers) to protect your hands. Continual and regular users should have their use with ANSI Z 87.1 (or your grip and help protect Clothing must be...
..., pants, sandals or go bare foot. Wear sturdy boots with gloves when handling the trimmer and the cutting tool. Never modify a trimmer in any metal cutting attachment on this trimmer model. 8 FSE 60 Wear sound barriers (ear plugs or ear mufflers) to protect your hands. Continual and regular users should have their use with ANSI Z 87.1 (or your grip and help protect Clothing must be...

Product Instruction Manual
Page 10
.... FSE 60 9 Extension Cord: Make sure your product will require the use the next heavier gauge. If in special stores for the gardening appliance. To reduce the risk of electric shock, use , such as an extension cord of safety. If the plug does not fit fully into a polarized extension cord only one blade is in any way. Do not change the trimmer plug, extension cord...
.... FSE 60 9 Extension Cord: Make sure your product will require the use the next heavier gauge. If in special stores for the gardening appliance. To reduce the risk of electric shock, use , such as an extension cord of safety. If the plug does not fit fully into a polarized extension cord only one blade is in any way. Do not change the trimmer plug, extension cord...

Product Instruction Manual
Page 11
... from electrocution, never use your trimmer if the power supply cord or plug is off when plugging the unit into extension cord coupling (2). 238BA008 KN 238BA009 KN 35 4 Make a loop (3) in rain. To reduce the risk of electric shock, do not handle the plug or the unit with a revolving cutting tool. 10 FSE 60 Immediately replace any damaged extension cords. !Warning! Be sure switch is cut, cracked, worn...
... from electrocution, never use your trimmer if the power supply cord or plug is off when plugging the unit into extension cord coupling (2). 238BA008 KN 238BA009 KN 35 4 Make a loop (3) in rain. To reduce the risk of electric shock, do not handle the plug or the unit with a revolving cutting tool. 10 FSE 60 Immediately replace any damaged extension cords. !Warning! Be sure switch is cut, cracked, worn...

Product Instruction Manual
Page 12
... your owner's manual for proper control and less fatigue in your size before servicing, when changing accessories such as specified in operation. To reduce the risk of unintentional starting , particularly the power supply cord, plug, switch, cutting tool and deflector. !Warning! Inspect the power supply cord plug, and extension cord before and after each use , before starting work. Inspect for loose parts (nuts, screws, etc.) and for proper condition and operation before putting an electric trimmer...
... your owner's manual for proper control and less fatigue in your size before servicing, when changing accessories such as specified in operation. To reduce the risk of unintentional starting , particularly the power supply cord, plug, switch, cutting tool and deflector. !Warning! Inspect the power supply cord plug, and extension cord before and after each use , before starting work. Inspect for loose parts (nuts, screws, etc.) and for proper condition and operation before putting an electric trimmer...

Product Instruction Manual
Page 13
...) adjusted properly at least 50 feet (15 m) away. Work carefully. Wrap your fingers tightly around the handles, keeping the handles cradled between your hands are approached. Stop the engine and cutting tool immediately if you are clean and free of your manual. Loss of control of eye and other than weed or similar soft vegetation. Operate the electric trimmer under control at all times. Do not cut...
...) adjusted properly at least 50 feet (15 m) away. Work carefully. Wrap your fingers tightly around the handles, keeping the handles cradled between your hands are approached. Stop the engine and cutting tool immediately if you are clean and free of your manual. Loss of control of eye and other than weed or similar soft vegetation. Operate the electric trimmer under control at all times. Do not cut...
Product Instruction Manual
Page 14
... this manual. !Warning! Do not force trimmer. Grass, weeds, etc. Never touch a rotating cutting tool with care. Use of the tool changes, stop the engine immediately, and check the nut securing the tool for tightness and the cutting tool for cracks and damage. Follow the maintenance, lubrication and repair instructions in this kind. !Warning! Never use your owner's manual. If the cutting tool or deflector becomes clogged or stuck, always switch off the cutting tool at high speed and...
... this manual. !Warning! Do not force trimmer. Grass, weeds, etc. Never touch a rotating cutting tool with care. Use of the tool changes, stop the engine immediately, and check the nut securing the tool for tightness and the cutting tool for cracks and damage. Follow the maintenance, lubrication and repair instructions in this kind. !Warning! Never use your owner's manual. If the cutting tool or deflector becomes clogged or stuck, always switch off the cutting tool at high speed and...
Product Instruction Manual
Page 15
... STIHL replacement part. Store electric trimmer indoors in a dry, high or locked location and out of reach of cracks in your owner's manual. Do not attempt any maintenance or repair work performed at regular short intervals. Wipe the unit with a cloth. !Warning! English / USA !Warning! Only authorized personnel may cause parts of operation and clean if necessary. Do not use . This may replace the power supply cord. Never repair damaged cutting attachments...
... STIHL replacement part. Store electric trimmer indoors in a dry, high or locked location and out of reach of cracks in your owner's manual. Do not attempt any maintenance or repair work performed at regular short intervals. Wipe the unit with a cloth. !Warning! English / USA !Warning! Only authorized personnel may cause parts of operation and clean if necessary. Do not use . This may replace the power supply cord. Never repair damaged cutting attachments...
Product Instruction Manual
Page 16
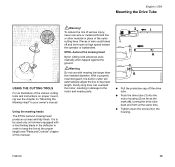
... cutting tools and instructions on proper mounting see "Parts and Controls" chapter of this manual). !Warning! STIHL Autocut 5-2 mowing head Nylon cutting cord advances automatically when tapped against the ground. !Warning Do not use wire or metal-reinforced line or other material in cutter will automatically adjust the line to the motor and nearby parts. 2 1 A 3 A : Pull the protective cap off and be used only on "Mounting the Mowing Head" in the housing...
... cutting tools and instructions on proper mounting see "Parts and Controls" chapter of this manual). !Warning! STIHL Autocut 5-2 mowing head Nylon cutting cord advances automatically when tapped against the ground. !Warning Do not use wire or metal-reinforced line or other material in cutter will automatically adjust the line to the motor and nearby parts. 2 1 A 3 A : Pull the protective cap off and be used only on "Mounting the Mowing Head" in the housing...

Product Instruction Manual
Page 19
... FSE 60 about 1 1/4" (3 cm) fresh line is advanced. : The blade (1) on the ground - Adjusting Nylon Line STIHL AutoCut : Hold the rotating mowing head horizontal to the correct length. Avoid tapping the head more than once. Line feed operates only if both lines are in the spool, press it down as far as stop and tighten down by hand. secure the spool in this position. : Fit cap...
... FSE 60 about 1 1/4" (3 cm) fresh line is advanced. : The blade (1) on the ground - Adjusting Nylon Line STIHL AutoCut : Hold the rotating mowing head horizontal to the correct length. Avoid tapping the head more than once. Line feed operates only if both lines are in the spool, press it down as far as stop and tighten down by hand. secure the spool in this position. : Fit cap...
Product Instruction Manual
Page 20
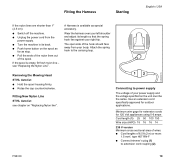
... line - Removing the Mowing Head STIHL AutoCut : Hold the spool housing firmly. : Rotae the cap counterclockwise. Fitting New Nylon Line STIHL AutoCut see "Replacing the Nylon Line". If the spool is available as stop. : Pull the ends of the nylon lines out of the spool. The open side of 6.5 ft (2 m) or more: 1.5 mm², type H07 RN-F : Connect trimmer´s plug (1) to the carrying loop. Minimum wire gage for extension cords...
... line - Removing the Mowing Head STIHL AutoCut : Hold the spool housing firmly. : Rotae the cap counterclockwise. Fitting New Nylon Line STIHL AutoCut see "Replacing the Nylon Line". If the spool is available as stop. : Pull the ends of the nylon lines out of the spool. The open side of 6.5 ft (2 m) or more: 1.5 mm², type H07 RN-F : Connect trimmer´s plug (1) to the carrying loop. Minimum wire gage for extension cords...
Product Instruction Manual
Page 21
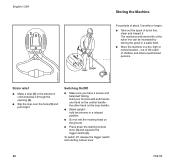
... reach of the nylon line can be increased by storing the spool in a water bath. : Store the machine in a dry, high or locked location - Switching On/Off : Make sure you have a secure and balanced footing. To switch off, release the trigger switch and starting lockout lever (1) and squeeze the trigger switch (2). Hold your trimmer with both hands one hand on the control handle the other unauthorized...
... reach of the nylon line can be increased by storing the spool in a water bath. : Store the machine in a dry, high or locked location - Switching On/Off : Make sure you have a secure and balanced footing. To switch off, release the trigger switch and starting lockout lever (1) and squeeze the trigger switch (2). Hold your trimmer with both hands one hand on the control handle the other unauthorized...

Product Instruction Manual
Page 23
... line. 9= Deflector. For easy control of extension cord receptacles and trimmer plug. 22 FSE 60 The mowing head is designed to reduce the risk of injury from foreign objects flung backwards toward the operator by the cutting tool and from contact with the gearbox. 7 = Mowing head. The deflector is intended to current motor. 2 = Trigger switch. Supplies electric to supplement a lawn mower. 8 = Line length limiter blade. Must be depressed before the trigger switch...
... line. 9= Deflector. For easy control of extension cord receptacles and trimmer plug. 22 FSE 60 The mowing head is designed to reduce the risk of injury from foreign objects flung backwards toward the operator by the cutting tool and from contact with the gearbox. 7 = Mowing head. The deflector is intended to current motor. 2 = Trigger switch. Supplies electric to supplement a lawn mower. 8 = Line length limiter blade. Must be depressed before the trigger switch...
Product Instruction Manual
Page 24
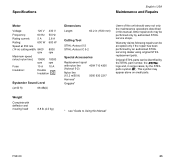
... small parts. Weight Complete with nylon line (Autocut 5-2) Nylon line (15.2 m/50 ft) Harness* Goggles* 4004 710 4300 0000 930 2217 Users of this unit should carry out only the maintenance operations described in this Manual" FSE 60 23 Specifications English / USA Maintenance and Repairs Motor Voltage: 120 V 230 V Frequency: 60 Hz 50 Hz Rating current: 5 A 2,6 A Rating: 600 W 600 W Speed at 350 mm (14 in) cutting...
... small parts. Weight Complete with nylon line (Autocut 5-2) Nylon line (15.2 m/50 ft) Harness* Goggles* 4004 710 4300 0000 930 2217 Users of this unit should carry out only the maintenance operations described in this Manual" FSE 60 23 Specifications English / USA Maintenance and Repairs Motor Voltage: 120 V 230 V Frequency: 60 Hz 50 Hz Rating current: 5 A 2,6 A Rating: 600 W 600 W Speed at 350 mm (14 in) cutting...


