
Instruction Manual
Page 3
... the operating and maintenance instructions in the two manuals. Contents KombiSystem 2 Guide to Using this Manual 2 Safety Precautions and Working Techniques 3 Approved KombiEngines 10 Approved Combinations of Cutting Attachment, Deflector, Handle and Harness 11 Mounting the KombiTool 12 Mounting the Deflector 12 Mounting the Cutting Attachment 13 Fitting the Harness 15 Starting / Stopping the Engine 16 Storing the Machine 17 Maintaining the Mowing Head 17 Maintenance...
... the operating and maintenance instructions in the two manuals. Contents KombiSystem 2 Guide to Using this Manual 2 Safety Precautions and Working Techniques 3 Approved KombiEngines 10 Approved Combinations of Cutting Attachment, Deflector, Handle and Harness 11 Mounting the KombiTool 12 Mounting the Deflector 12 Mounting the Cutting Attachment 13 Fitting the Harness 15 Starting / Stopping the Engine 16 Storing the Machine 17 Maintaining the Mowing Head 17 Maintenance...
Instruction Manual
Page 4
... assistance. 2 FSB-KM Always read and and make sure you understand both instruction manuals before using your power tool for the first time and keep them in this manual may contain item numbers that refers directly to the operating instructions, this manual, please contact your STIHL dealer or the STIHL distributor for your machine differs from time to the machine or its products. Engineering Improvements STIHL's philosophy is...
... assistance. 2 FSB-KM Always read and and make sure you understand both instruction manuals before using your power tool for the first time and keep them in this manual may contain item numbers that refers directly to the operating instructions, this manual, please contact your STIHL dealer or the STIHL distributor for your machine differs from time to the machine or its products. Engineering Improvements STIHL's philosophy is...
Instruction Manual
Page 5
... use of the power tool. FSB-KM 3 FS models with an "R" on your power tool run unattended. the operator 2. The term "trimmer" is used to operate your STIHL dealer show you are using it understands the information contained in these Safety Precautions, to use it off and make sure your KombiEngine and KombiTool periodically. Read the instruction manuals and the safety precautions of your KombiEngine equipped with a loop handle...
... use of the power tool. FSB-KM 3 FS models with an "R" on your power tool run unattended. the operator 2. The term "trimmer" is used to operate your STIHL dealer show you are using it understands the information contained in these Safety Precautions, to use it off and make sure your KombiEngine and KombiTool periodically. Read the instruction manuals and the safety precautions of your KombiEngine equipped with a loop handle...
Instruction Manual
Page 6
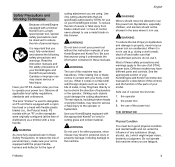
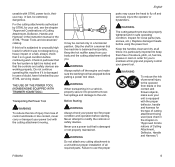
... not protect the operator from all foreign objects (gravel, glass, wire, etc.) thrown back by the rotating cutting attachment. Secure hair so it is very important. WARNING To reduce the risk of the power tool parts see the chapter on proper clothing see the safety precautions in the instruction manual of movement. THE POWER TOOL (KOMBIENGINE EQUIPPED WITH TRIMMER KOMBITOOL) For illustrations...
... not protect the operator from all foreign objects (gravel, glass, wire, etc.) thrown back by the rotating cutting attachment. Secure hair so it is very important. WARNING To reduce the risk of the power tool parts see the chapter on proper clothing see the safety precautions in the instruction manual of movement. THE POWER TOOL (KOMBIENGINE EQUIPPED WITH TRIMMER KOMBITOOL) For illustrations...
Instruction Manual
Page 7
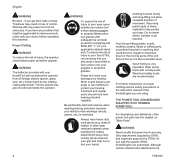
... high loads for you . WARNING Do not attach any cutting attachment to keep them free of control and blade or line contact, never carry or transport your unit, see chart in the chapter on "Approved Combinations of Cutting Attachment, Deflector, Handle and Harness" in the instruction manual or the STIHL "Power Tools and Accessories" catalog. Grip the shaft in a horizontal position. Before Starting WARNING Always check your body and the cutting attachment...
... high loads for you . WARNING Do not attach any cutting attachment to keep them free of control and blade or line contact, never carry or transport your unit, see chart in the chapter on "Approved Combinations of Cutting Attachment, Deflector, Handle and Harness" in the instruction manual or the STIHL "Power Tools and Accessories" catalog. Grip the shaft in a horizontal position. Before Starting WARNING Always check your body and the cutting attachment...
Instruction Manual
Page 8
... 6 FSB-KM Adjust harness (if you are wearing one) and hand grip to the spring hook of the cutting attachment. This also applies to idle. Place the power tool on "Mounting the Deflector" and "Mounting the Cutting Attachment" of your power tool with one hand. With the engine running only at idle, attach the power tool to suit your KombiEngine and KombiTool manuals. Wrap your harness if you to operate your...
... 6 FSB-KM Adjust harness (if you are wearing one) and hand grip to the spring hook of the cutting attachment. This also applies to idle. Place the power tool on "Mounting the Deflector" and "Mounting the Cutting Attachment" of your power tool with one hand. With the engine running only at idle, attach the power tool to suit your KombiEngine and KombiTool manuals. Wrap your harness if you to operate your...

Instruction Manual
Page 9
as tree stumps, roots and ditches to 0 or STOP. Working Conditions Operate and start your power tool using the starting throttle lock, as you are authorized. Control dust at ground level with a chemical substance (such as mold or pollen, can cause susceptible persons to property, also maintain this KombiTool. Use good work on a ladder or on "Proper Clothing") and ensure that bystanders...
as tree stumps, roots and ditches to 0 or STOP. Working Conditions Operate and start your power tool using the starting throttle lock, as you are authorized. Control dust at ground level with a chemical substance (such as mold or pollen, can cause susceptible persons to property, also maintain this KombiTool. Use good work on a ladder or on "Proper Clothing") and ensure that bystanders...
Instruction Manual
Page 10
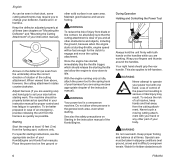
... the Cutting Attachment" in your instruction manual. Mowing heads are to its operating speed. The retaining nut may be worn or damaged and should be replaced. should be cleaned off the trimmer, which may shatter at idle. With a properly mounted deflector, the built-in linelimiting blade will automatically adjust the line to be used only on trimmers equipped with an overly long nylon cutting line increases the load on the engine...
... the Cutting Attachment" in your instruction manual. Mowing heads are to its operating speed. The retaining nut may be worn or damaged and should be replaced. should be cleaned off the trimmer, which may shatter at idle. With a properly mounted deflector, the built-in linelimiting blade will automatically adjust the line to be used only on trimmers equipped with an overly long nylon cutting line increases the load on the engine...
Instruction Manual
Page 11
... using the PolyCut if one blade, always replace all nuts, bolts and screws, except the carburetor adjustment screws, after each use. Install a new mowing head. WARNING If the wear limit marks are ignored, there is best to use wire or metal-reinforced line or other material in a dry and high or locked location out of reach of damaging tree bark etc. Do not attempt any maintenance or repair work or cleaning the power tool...
... using the PolyCut if one blade, always replace all nuts, bolts and screws, except the carburetor adjustment screws, after each use. Install a new mowing head. WARNING If the wear limit marks are ignored, there is best to use wire or metal-reinforced line or other material in a dry and high or locked location out of reach of damaging tree bark etc. Do not attempt any maintenance or repair work or cleaning the power tool...

Instruction Manual
Page 12
This KombiTool may be operated only in combination with the attachment. English Approved KombiEngines KombiEngines Only use KombiEngines supplied or explicitly approved by STIHL for use with the following KombiEngines: STIHL KM 55 R, KM 56 R, KM 94 R 10 FSB-KM Depending on the cutting attachment used, always refer to and observe the chapter on "Approved Combinations of Cutting Attachment, Deflector, Handle and Harness".
This KombiTool may be operated only in combination with the attachment. English Approved KombiEngines KombiEngines Only use KombiEngines supplied or explicitly approved by STIHL for use with the following KombiEngines: STIHL KM 55 R, KM 56 R, KM 94 R 10 FSB-KM Depending on the cutting attachment used, always refer to and observe the chapter on "Approved Combinations of Cutting Attachment, Deflector, Handle and Harness".
Instruction Manual
Page 13
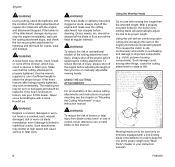
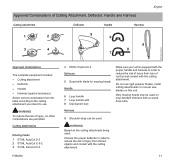
... this unit. Handle - Cutting attachment - WARNING To reduce the risk of control and contact with the cutting attachment. Cutting attachments Mowing heads 1 STIHL AutoCut 5-2 2 STIHL AutoCut C 6-2 3 STIHL DuroCut 5-2 FSB-KM 4 STIHL PolyCut 6-3 Deflector 5 Guard with blade for mowing heads Handle 6 Loop handle 7 Loop handle with 8 Clip (barrier bar) Harness Make sure your unit is equipped with the proper handle and harness in order to use rigid polymer blades, metal cutting attachments or circular saw blades on the cutting attachment being used: Choose...
... this unit. Handle - Cutting attachment - WARNING To reduce the risk of control and contact with the cutting attachment. Cutting attachments Mowing heads 1 STIHL AutoCut 5-2 2 STIHL AutoCut C 6-2 3 STIHL DuroCut 5-2 FSB-KM 4 STIHL PolyCut 6-3 Deflector 5 Guard with blade for mowing heads Handle 6 Loop handle 7 Loop handle with 8 Clip (barrier bar) Harness Make sure your unit is equipped with the proper handle and harness in order to use rigid polymer blades, metal cutting attachments or circular saw blades on the cutting attachment being used: Choose...

Instruction Manual
Page 14
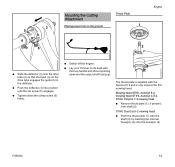
... (1) over the deflector. 12 FSB-KM English Mounting the KombiTool 2 1 Mounting the Deflector Fitting the line limiter blade Mounting the deflector 2 002BA326 KN N Push the lug (1) on the deflector and hold it there. N Insert and tighten down the star knob (4) firmly. N Reverse the above sequence to remove the drive tube. N Tighten down the screw (2) with the end of...
... (1) over the deflector. 12 FSB-KM English Mounting the KombiTool 2 1 Mounting the Deflector Fitting the line limiter blade Mounting the deflector 2 002BA326 KN N Push the lug (1) on the deflector and hold it there. N Insert and tighten down the star knob (4) firmly. N Reverse the above sequence to remove the drive tube. N Tighten down the screw (2) with the end of...
Instruction Manual
Page 15
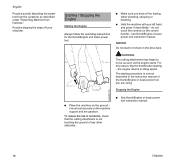
... deflector (3) into position until the set screw (5) engages. The thrust plate is only required for this mowing head. Mowing head STIHL AutoCut 5-2, mowing head STIHL AutoCut C 6-2. N Tighten down and the output shaft facing up. N Switch off the engine. 3 5 b 4 6 Mounting the Cutting Attachment Placing power tool on the ground Thrust Plate 1 3 2 4 English 002BA252 KN 546BA016 KN 541BA001 KN N Slide the deflector (3) onto the drive tube (4) so that...
... deflector (3) into position until the set screw (5) engages. The thrust plate is only required for this mowing head. Mowing head STIHL AutoCut 5-2, mowing head STIHL AutoCut C 6-2. N Tighten down and the output shaft facing up. N Switch off the engine. 3 5 b 4 6 Mounting the Cutting Attachment Placing power tool on the ground Thrust Plate 1 3 2 4 English 002BA252 KN 546BA016 KN 541BA001 KN N Slide the deflector (3) onto the drive tube (4) so that...

Instruction Manual
Page 16
... shaft, insert a suitable tool (1) through the holes (2) in a safe place! Removing the Mowing Head N Hold the mowing head with your hand. turn the thrust plate back and forth if necessary STIHL AutoCut 5-2 Keep the supplement sheet for the mowing head in a safe place! STIHL DuroCut 5-2 Keep the supplement sheet for the mowing head in a safe place! 14 FSB-KM N Push the upper part...
... shaft, insert a suitable tool (1) through the holes (2) in a safe place! Removing the Mowing Head N Hold the mowing head with your hand. turn the thrust plate back and forth if necessary STIHL AutoCut 5-2 Keep the supplement sheet for the mowing head in a safe place! STIHL DuroCut 5-2 Keep the supplement sheet for the mowing head in a safe place! 14 FSB-KM N Push the upper part...

Instruction Manual
Page 17
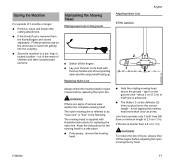
... Head N Block the shaft, see "Blocking the shaft" N Tighten down the power tool as it will go N Block the shaft, see "Blocking the shaft" N Turn the mowing head counterclockwise FSB-KM 0000-GXX-3940-A0 002BA374 KN The type and style of the carabiner. hold the carrying ring steady. Shoulder strap 1 2 N Put on the drive tube - N Adjust the length of Cutting Attachment, Deflector, Handle and Harness". The use...
... Head N Block the shaft, see "Blocking the shaft" N Tighten down the power tool as it will go N Block the shaft, see "Blocking the shaft" N Turn the mowing head counterclockwise FSB-KM 0000-GXX-3940-A0 002BA374 KN The type and style of the carabiner. hold the carrying ring steady. Shoulder strap 1 2 N Put on the drive tube - N Adjust the length of Cutting Attachment, Deflector, Handle and Harness". The use...
Instruction Manual
Page 18
... The cutting attachment may begin to idling speed. For this reason, blip the throttle after starting procedure is not touching the ground of the KombiEngine or basic power tool you have a firm footing, either standing, stooping or kneeling. Stopping the Engine 355BA007 KN N Place the machine on the control handle - N See KombiEngine or basic power tool instruction manual. 16 FSB-KM Starting / Stopping the Engine Starting the Engine Always follow the operating instructions...
... The cutting attachment may begin to idling speed. For this reason, blip the throttle after starting procedure is not touching the ground of the KombiEngine or basic power tool you have a firm footing, either standing, stooping or kneeling. Stopping the Engine 355BA007 KN N Place the machine on the control handle - N See KombiEngine or basic power tool instruction manual. 16 FSB-KM Starting / Stopping the Engine Starting the Engine Always follow the operating instructions...
Instruction Manual
Page 19
... a time. about 3 cm (1.2 in a dry, high or locked location - If the line is supplied with the loop handle and shroud pointing down and the output shaft facing up. N Lay your trimmer on the ground N Switch off the engine before replacing the nylon line. Replacing Nylon Line Adjusting Nylon Line STIHL AutoCut 2 1 English 546BA016 KN 232BA007 KN Always check the mowing head for the mowing head in ). Line feed operates only if both lines...
... a time. about 3 cm (1.2 in a dry, high or locked location - If the line is supplied with the loop handle and shroud pointing down and the output shaft facing up. N Lay your trimmer on the ground N Switch off the engine before replacing the nylon line. Replacing Nylon Line Adjusting Nylon Line STIHL AutoCut 2 1 English 546BA016 KN 232BA007 KN Always check the mowing head for the mowing head in ). Line feed operates only if both lines...
Instruction Manual
Page 20
... the mowing head on the spool as far as described in a safe place. Replacing Cutting Blades Maintenance and Care The following . N Press down the cap on the machine. English N Turn the machine over. WARNING To reduce the risk of wear before installing new cutting blades. 18 FSB-KM Replacing Nylon Line STIHL DuroCut WARNING To reduce the risk of injury, always shut off the engine before adjusting the nylon...
... the mowing head on the spool as far as described in a safe place. Replacing Cutting Blades Maintenance and Care The following . N Press down the cap on the machine. English N Turn the machine over. WARNING To reduce the risk of wear before installing new cutting blades. 18 FSB-KM Replacing Nylon Line STIHL DuroCut WARNING To reduce the risk of injury, always shut off the engine before adjusting the nylon...
Instruction Manual
Page 21
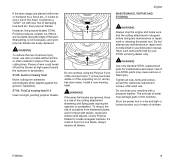
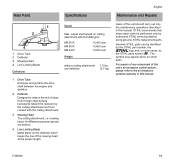
... the maintenance operations described in this manual. output shaft speed on small parts. English Main Parts Specifications Maintenance and Repairs 1 2 3 4 1 Drive Tube 2 Deflector 3 Mowing Head 4 Line Limiting Blade Definitions 681BA054 KN Speed Max. Genuine STIHL parts can be performed only by the STIHL parts symbol K. STIHL recommends that other repair work be identified by the STIHL part number, the { logo and, in some cases, by authorized STIHL servicing dealers using genuine STIHL replacement parts. The symbol may appear alone on cutting attachment...
... the maintenance operations described in this manual. output shaft speed on small parts. English Main Parts Specifications Maintenance and Repairs 1 2 3 4 1 Drive Tube 2 Deflector 3 Mowing Head 4 Line Limiting Blade Definitions 681BA054 KN Speed Max. Genuine STIHL parts can be performed only by the STIHL parts symbol K. STIHL recommends that other repair work be identified by the STIHL part number, the { logo and, in some cases, by authorized STIHL servicing dealers using genuine STIHL replacement parts. The symbol may appear alone on cutting attachment...

Instruction Manual
Page 22
...; FARM BOSS® iCademy® MAGNUM® MasterWrench Service® MotoMix® OILOMATIC® 4-MIX ™ BioPlus ™ Easy2Start ™ EasySpool ™ ElastoStart ™ Ematic ™ FixCut ™ IntelliCarb ™ Master Control Lever ™ Micro ™ Pro Mark ™ Quiet Line ™ STIHL M-Tronic ™ 20 FSB-KM Contact your STIHL servicing dealer for environmentfriendly recycling. Take the product, accessories and...
...; FARM BOSS® iCademy® MAGNUM® MasterWrench Service® MotoMix® OILOMATIC® 4-MIX ™ BioPlus ™ Easy2Start ™ EasySpool ™ ElastoStart ™ Ematic ™ FixCut ™ IntelliCarb ™ Master Control Lever ™ Micro ™ Pro Mark ™ Quiet Line ™ STIHL M-Tronic ™ 20 FSB-KM Contact your STIHL servicing dealer for environmentfriendly recycling. Take the product, accessories and...


