
Product Instruction Manual
Page 3
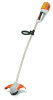
... Charger 18 Switching On 18 Switching Off 19 Storing the Machine 20 Replacing Nylon Line 21 Maintenance and Care 23 Main Parts 24 Specifications 25 Special Accessories 26 Troubleshooting 27 Maintenance and Repairs 29 Battery Recycling 29 Disposal 29 Trademarks 30 Addresses 31 { FSA 65, FSA 85 English Allow only persons who fully understand this manual. To receive maximum performance and satisfaction from your trimmer. Always...
... Charger 18 Switching On 18 Switching Off 19 Storing the Machine 20 Replacing Nylon Line 21 Maintenance and Care 23 Main Parts 24 Specifications 25 Special Accessories 26 Troubleshooting 27 Maintenance and Repairs 29 Battery Recycling 29 Disposal 29 Trademarks 30 Addresses 31 { FSA 65, FSA 85 English Allow only persons who fully understand this manual. To receive maximum performance and satisfaction from your trimmer. Always...
Product Instruction Manual
Page 4
... if operation is not depressed when inserting the battery. 2 FSA 65, FSA 85 Do not carry trimmer with the symbols and signal words described below: Danger! The individual steps or procedures described in the manual may contain item numbers that for assistance. A description of fire, electric shock and personal injury, including the following: READ ALL INSTRUCTIONS 1. Wear protective hair covering to...
... if operation is not depressed when inserting the battery. 2 FSA 65, FSA 85 Do not carry trimmer with the symbols and signal words described below: Danger! The individual steps or procedures described in the manual may contain item numbers that for assistance. A description of fire, electric shock and personal injury, including the following: READ ALL INSTRUCTIONS 1. Wear protective hair covering to...
Product Instruction Manual
Page 5
..., and high, locked place with a nylon line head. 8. Don't Force Trimmer - Keep cutting attachment clean for changing accessories. Keep handles dry, clean, and free from loss of control, never attempt to use may be observed to the power tool reflects the types of parts, mounting, and any other part that may affect its intended function. Check Damaged Parts - Keep Guards In Place And In Working Order 15. Careless or improper use a metal blade or...
..., and high, locked place with a nylon line head. 8. Don't Force Trimmer - Keep cutting attachment clean for changing accessories. Keep handles dry, clean, and free from loss of control, never attempt to use may be observed to the power tool reflects the types of parts, mounting, and any other part that may affect its intended function. Check Damaged Parts - Keep Guards In Place And In Working Order 15. Careless or improper use a metal blade or...
Product Instruction Manual
Page 6
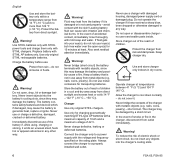
... objects (gravel, glass, wire, etc.) thrown back by national or local regulations. Always remove the battery and move retaining latch to the use of your performance requirements. This avoids the risk of the power tool. They are fatigued. Safe use of original STIHL replacement parts. the power tool 3. the use this machine may also ricochet and strike the operator. 4 FSA 65, FSA 85 THE OPERATOR Physical Condition You...
... objects (gravel, glass, wire, etc.) thrown back by national or local regulations. Always remove the battery and move retaining latch to the use of your performance requirements. This avoids the risk of the power tool. They are fatigued. Safe use of original STIHL replacement parts. the power tool 3. the use this machine may also ricochet and strike the operator. 4 FSA 65, FSA 85 THE OPERATOR Physical Condition You...
Product Instruction Manual
Page 7
.... Using the batteries in this power tool in the instruction manual or the STIHL "Cutting Attachments, Parts & Accessories" catalog. As for use may, in fact, be monitored (fire watch) in good condition before continuing work - Use inert absorbent to the area until the battery has cooled sufficiently. Good footing is above 212 °F (100 °C), expose to microwaves or high pressures. In case of clean-up...
.... Using the batteries in this power tool in the instruction manual or the STIHL "Cutting Attachments, Parts & Accessories" catalog. As for use may, in fact, be monitored (fire watch) in good condition before continuing work - Use inert absorbent to the area until the battery has cooled sufficiently. Good footing is above 212 °F (100 °C), expose to microwaves or high pressures. In case of clean-up...
Product Instruction Manual
Page 8
... contact, immediately rinse thoroughly with damaged housing, damaged power supply cord or damaged plug. Immediately discontinue use away from direct sunlight and excess heat or cold (14 °F - 122 °F (-10 °C - +50 °C)). To reduce the risk of the battery if, while using, charging or storing, it . Never insert objects into the charger's cooling slots. 6 FSA 65, FSA 85
... contact, immediately rinse thoroughly with damaged housing, damaged power supply cord or damaged plug. Immediately discontinue use away from direct sunlight and excess heat or cold (14 °F - 122 °F (-10 °C - +50 °C)). To reduce the risk of the battery if, while using, charging or storing, it . Never insert objects into the charger's cooling slots. 6 FSA 65, FSA 85
Product Instruction Manual
Page 9
... cutting attachment moving parts or otherwise be stepped on ,). To reduce the risk of injury from loss of moisture, pitch, oil, grease 3905BA000 KN FSA 65, FSA 85 7 Grip the shaft in use the power supply cord for short distances. The trigger switch and the trigger switch lockout must be used , plug the charger into a properly wired 16 gauge (AWG 16) or heavier gauge extension cord with regulations. Warning! Always switch off the power tool...
... cutting attachment moving parts or otherwise be stepped on ,). To reduce the risk of injury from loss of moisture, pitch, oil, grease 3905BA000 KN FSA 65, FSA 85 7 Grip the shaft in use the power supply cord for short distances. The trigger switch and the trigger switch lockout must be used , plug the charger into a properly wired 16 gauge (AWG 16) or heavier gauge extension cord with regulations. Warning! Always switch off the power tool...
Product Instruction Manual
Page 10
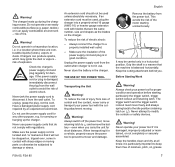
... other insecure support. Keep proper footing and balance at all times. During Operation Holding and Controlling the Power Tool Always hold the cutting attachment above waist height. 3905BA026 KN English or resin in order for you are working on "Mounting the Deflector" of your power tool. Replace damaged cutting attachments before starting work area, even when starting instructions, see chapter on slopes or uneven ground. 8 FSA 65, FSA 85...
... other insecure support. Keep proper footing and balance at all times. During Operation Holding and Controlling the Power Tool Always hold the cutting attachment above waist height. 3905BA026 KN English or resin in order for you are working on "Mounting the Deflector" of your power tool. Replace damaged cutting attachments before starting work area, even when starting instructions, see chapter on slopes or uneven ground. 8 FSA 65, FSA 85...

Product Instruction Manual
Page 11
... cutting attachment stops, and check the nut securing the attachment for tightness and the attachment for a short period after the trigger switch is normally to control. English Never use , switch off the motor immediately if you start work practices, such as mold or pollen, can cause susceptible persons to ƒ and remove the battery. Substantial or repeated inhalation of the attachment changes during use metal blades or rigid polymer blades...
... cutting attachment stops, and check the nut securing the attachment for tightness and the attachment for a short period after the trigger switch is normally to control. English Never use , switch off the motor immediately if you start work practices, such as mold or pollen, can cause susceptible persons to ƒ and remove the battery. Substantial or repeated inhalation of the attachment changes during use metal blades or rigid polymer blades...
Product Instruction Manual
Page 12
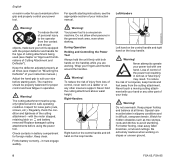
... operating speed. Check condition and tightness, look for this power tool in cutting behavior: - Mowing heads are to be replaced. STIHL AutoCut mowing head Nylon cutting cord advances automatically when tapped against electric shock. Replace a cracked, damaged or wornout head immediately, even if damage is a noticeable change in the vicinity of wire could break off the motor, remove the battery and make sure the cutting attachment has stopped before replacing the cutting attachment. Grass, weeds, etc. Remove the battery...
... operating speed. Check condition and tightness, look for this power tool in cutting behavior: - Mowing heads are to be replaced. STIHL AutoCut mowing head Nylon cutting cord advances automatically when tapped against electric shock. Replace a cracked, damaged or wornout head immediately, even if damage is a noticeable change in the vicinity of wire could break off the motor, remove the battery and make sure the cutting attachment has stopped before replacing the cutting attachment. Grass, weeds, etc. Remove the battery...
Product Instruction Manual
Page 13
... nonapproved replacement parts were used, STIHL may cause parts of the cutting attachment to ƒ, remove the battery and make a warranty claim for maintenance and repair. Always move retaining latch to come off the motor, move retaining latch to the maintenance chart in your instruction manual. The solid jet of aging. English Store the power tool in serious or fatal injuries. Tighten all nuts, bolts and screws after each use aggressive detergents. Electrical...
... nonapproved replacement parts were used, STIHL may cause parts of the cutting attachment to ƒ, remove the battery and make a warranty claim for maintenance and repair. Always move retaining latch to come off the motor, move retaining latch to the maintenance chart in your instruction manual. The solid jet of aging. English Store the power tool in serious or fatal injuries. Tighten all nuts, bolts and screws after each use aggressive detergents. Electrical...
Product Instruction Manual
Page 14
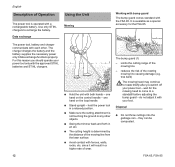
... the mowing head to come to recharge the battery. one hand on the control handle - N Hold the unit with a rechargeable battery. Limits the cutting range of the mowing line from the lawn surface. N The cutting height is determined by the distance of the mowing line - hold the power tool in a relaxed position. they can - English Description of Operation Using the Unit The power tool is operated with both...
... the mowing head to come to recharge the battery. one hand on the control handle - N Hold the unit with a rechargeable battery. Limits the cutting range of the mowing line from the lawn surface. N The cutting height is determined by the distance of the mowing line - hold the power tool in a relaxed position. they can - English Description of Operation Using the Unit The power tool is operated with both...

Product Instruction Manual
Page 15
... blades, metal cutting attachments or circular saw blades on the shaft, but it must be used. English Approved Combinations of Cutting Attachment and Deflector Cutting attachment The trimmer comes from thrown objects and contact with the cutting attachment. N Turn the handle to suit your unit is supplied with a deflector. Only this unit. Adjusting the Loop Handle Your new power tool comes with the loop handle mounted on this deflector may be turned and lined...
... blades, metal cutting attachments or circular saw blades on the shaft, but it must be used. English Approved Combinations of Cutting Attachment and Deflector Cutting attachment The trimmer comes from thrown objects and contact with the cutting attachment. N Turn the handle to suit your unit is supplied with a deflector. Only this unit. Adjusting the Loop Handle Your new power tool comes with the loop handle mounted on this deflector may be turned and lined...

Product Instruction Manual
Page 16
... remove the battery. N Insert the screws (3) and tighten them down the star knob so that the mowing head (1) faces up. If the line is empty, see "Replacing Nylon Line". 14 FSA 65, FSA 85 If the spool is shorter than once at a time. N Tighten down firmly. Adjusting Nylon Line N Hold the rotating mowing head above the ground - N Pull the ends of the lines out of 1.0 in : N Switch off the trimmer...
... remove the battery. N Insert the screws (3) and tighten them down the star knob so that the mowing head (1) faces up. If the line is empty, see "Replacing Nylon Line". 14 FSA 65, FSA 85 If the spool is shorter than once at a time. N Tighten down firmly. Adjusting Nylon Line N Hold the rotating mowing head above the ground - N Pull the ends of the lines out of 1.0 in : N Switch off the trimmer...

Product Instruction Manual
Page 21
... trigger switch. one hand on the loop handle. N Make sure the cutting attachment is on , and the trigger switch lockout (3) and trigger switch (4) are operated simultaneously. 3905BA013 KN 3905BA012 KN 2 N Release the trigger switch lockout (1) and the trigger switch (2). 3 2 N Move the retaining latch (3) to ƒ - one hand on the control handle - Motor speed is locked to ,. 2 3 4 N Push down the trigger switch lockout (3) and depress the trigger switch (4) and hold them in that position. the power tool...
... trigger switch. one hand on the loop handle. N Make sure the cutting attachment is on , and the trigger switch lockout (3) and trigger switch (4) are operated simultaneously. 3905BA013 KN 3905BA012 KN 2 N Release the trigger switch lockout (1) and the trigger switch (2). 3 2 N Move the retaining latch (3) to ƒ - one hand on the control handle - Motor speed is locked to ,. 2 3 4 N Push down the trigger switch lockout (3) and depress the trigger switch (4) and hold them in that position. the power tool...
Product Instruction Manual
Page 23
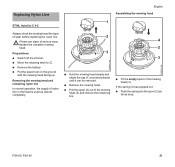
... Assembling the mowing head 1 3905BA017 KN 3905BA018 KN Always check the mowing head for signs of nylon line in the mowing head (3). N Move the retaining latch to ƒ. Removing the mowing head and remaining nylon line In normal operation, the supply of wear before replacing the nylon line. N Pull the spool (2) out of serious wear, replace the complete mowing head. FSA 65, FSA 85 21 N Remove the battery N Put the power tool on...
... Assembling the mowing head 1 3905BA017 KN 3905BA018 KN Always check the mowing head for signs of nylon line in the mowing head (3). N Move the retaining latch to ƒ. Removing the mowing head and remaining nylon line In normal operation, the supply of wear before replacing the nylon line. N Pull the spool (2) out of serious wear, replace the complete mowing head. FSA 65, FSA 85 21 N Remove the battery N Put the power tool on...

Product Instruction Manual
Page 27
... Charges the battery. 17. Wing Screw Locks loop handle in the unit. 2. Battery Locking Tabs Secure the battery in the unit. 10. Battery Supplies the motor with STIHL type AP batteries. Drive Tube Encloses and protects the cables between the motor and control handle. 9. Specifications English Battery Type: Lithium-Ion The power tool can be operated with electrical power. 11. Trigger Switch Switches the motor on Battery Indicate the state of charge and operating condition of machine during cutting work. 7. Power tool running time depends on...
... Charges the battery. 17. Wing Screw Locks loop handle in the unit. 2. Battery Locking Tabs Secure the battery in the unit. 10. Battery Supplies the motor with STIHL type AP batteries. Drive Tube Encloses and protects the cables between the motor and control handle. 9. Specifications English Battery Type: Lithium-Ion The power tool can be operated with electrical power. 11. Trigger Switch Switches the motor on Battery Indicate the state of charge and operating condition of machine during cutting work. 7. Power tool running time depends on...

Product Instruction Manual
Page 28
...FSA 65: FSA 85: 60 in. (1530 mm) 65 in UN-Manual ST/SG/AC.10/11/Rev.5 Part III, Subsection 38.3. The user can transport STIHL batteries by road transport to the place where the machine is to be available for your STIHL dealer for air or sea transport. 26 FSA 65, FSA 85 up to 100% capacity: with AP 80: - STIHL batteries...used without battery, with cutting attachment and deflector FSA 65: 6.0 lbs (2.7 kg) FSA 85: 6.2 lbs (2.8 kg) Transport Contact your product. up to 80% capacity: - up to 80% capacity: - up to 100% capacity: with AP 80: - English Charging Times...
...FSA 65: FSA 85: 60 in. (1530 mm) 65 in UN-Manual ST/SG/AC.10/11/Rev.5 Part III, Subsection 38.3. The user can transport STIHL batteries by road transport to the place where the machine is to be available for your STIHL dealer for air or sea transport. 26 FSA 65, FSA 85 up to 100% capacity: with AP 80: - STIHL batteries...used without battery, with cutting attachment and deflector FSA 65: 6.0 lbs (2.7 kg) FSA 85: 6.2 lbs (2.8 kg) Transport Contact your product. up to 80% capacity: - up to 80% capacity: - up to 100% capacity: with AP 80: - English Charging Times...

Product Instruction Manual
Page 29
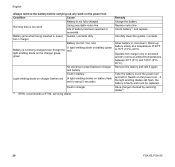
... power tool and refit it again FSA 65, FSA 85 27 Allow power tool/battery to 70°F (15°C-20°C). Troubleshooting English Always remove the battery before carrying out any work on the power tool - allow the battery and power tool to cool down Remove the battery and refit it . Fault in power tool and/or battery Battery or power tool circuitry too hot Electrical malfunction Take the battery out of the power tool; Switch on the power tool...
... power tool and refit it again FSA 65, FSA 85 27 Allow power tool/battery to 70°F (15°C-20°C). Troubleshooting English Always remove the battery before carrying out any work on the power tool - allow the battery and power tool to cool down Remove the battery and refit it . Fault in power tool and/or battery Battery or power tool circuitry too hot Electrical malfunction Take the battery out of the power tool; Switch on the power tool...
Product Instruction Manual
Page 30
...) Fault in power Guides / contacts dirty tool / charger Battery too hot / too cold (1 light emitting diode on battery glows Battery is faulty and must be replaced. Have charger checked by servicing dealer1) 28 FSA 65, FSA 85 English Always remove the battery before carrying out any work on the power tool - Switch on the power tool. Remedy Charge the battery Replace nylon line Check battery1) and replace Carefully clean the guides / contacts Allow battery to 70°...
...) Fault in power Guides / contacts dirty tool / charger Battery too hot / too cold (1 light emitting diode on battery glows Battery is faulty and must be replaced. Have charger checked by servicing dealer1) 28 FSA 65, FSA 85 English Always remove the battery before carrying out any work on the power tool - Switch on the power tool. Remedy Charge the battery Replace nylon line Check battery1) and replace Carefully clean the guides / contacts Allow battery to 70°...


