
Instruction Manual
Page 2
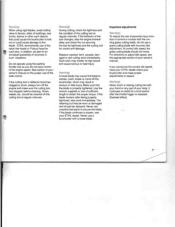
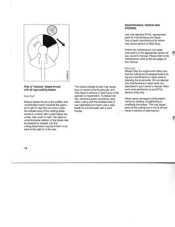
... stop Mounting the Cutting Tools - STIHL Autocut 24-2 - Grass Cutting Blade 230 - Brush Knife 250 - Waiblingen 100813970 0458 357 3021. Contents Parts and Controls - Version A - STIHL Autocut 30-2 - STIHL Fixed Line Head - Grass Cutting Blade 230-4 - Careless or 55 improper use may cause serious or even fatal injury. Circular Saw Blade 200 Fuel Fueling Fitting the Harness Starting 2 Adjusting Carburetor 4 Operating Instructions Checking Spark Plug 4 Cleaning Air Filter Lubricating Gearbox 6 Lubricating Drive Shaft 18 Sharpening Cutting Tools 20 - To receive...
... stop Mounting the Cutting Tools - STIHL Autocut 24-2 - Grass Cutting Blade 230 - Brush Knife 250 - Waiblingen 100813970 0458 357 3021. Contents Parts and Controls - Version A - STIHL Autocut 30-2 - STIHL Fixed Line Head - Grass Cutting Blade 230-4 - Careless or 55 improper use may cause serious or even fatal injury. Circular Saw Blade 200 Fuel Fueling Fitting the Harness Starting 2 Adjusting Carburetor 4 Operating Instructions Checking Spark Plug 4 Cleaning Air Filter Lubricating Gearbox 6 Lubricating Drive Shaft 18 Sharpening Cutting Tools 20 - To receive...
Instruction Manual
Page 3
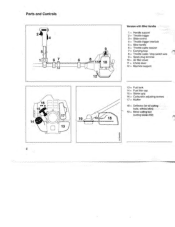
Parts and Controls 2 1 2 Version with Bike Handle 1 = Handle support 2 = Throttle trigger 3 = Slide control 4 = Throttle trigger interlock 5 = Bike handle 9 6 = Throttle cable retainer 7 = Carrying loop 8 = Throttle cable / stop switch wire 9 = Spark plug terminal 10 = Air filter cover 11 = Choke lever = 12 Machine support 13 = Fuel tank 14 = Fuel filler cap 15 = Starter grip 16 = Carburetor adjusting screws 17 = Muffler 18 = Deflector (for all cutting tools, without skirt) 19 = Metal cutting Itool (cutting blade 230)
Parts and Controls 2 1 2 Version with Bike Handle 1 = Handle support 2 = Throttle trigger 3 = Slide control 4 = Throttle trigger interlock 5 = Bike handle 9 6 = Throttle cable retainer 7 = Carrying loop 8 = Throttle cable / stop switch wire 9 = Spark plug terminal 10 = Air filter cover 11 = Choke lever = 12 Machine support 13 = Fuel tank 14 = Fuel filler cap 15 = Starter grip 16 = Carburetor adjusting screws 17 = Muffler 18 = Deflector (for all cutting tools, without skirt) 19 = Metal cutting Itool (cutting blade 230)

Instruction Manual
Page 4
... hold the brushcutter with the cutting tool. 19. Connects the drive shaft to the harness. 12. For tuning carburetor. 17. Starting throttle lock and stop switch wire. Attenuates exhaust noises and diverts exhaust gases away from metal for different purposes (special accessory). .......> 3 Throttle cable/stop switch. Spark plug terminal. Carburetor adjusting screws. The cutting attachment, i. Choke lever. The device to connect the brushcutler to the handle bars. 2. Definitions 1. Covers the air filter element. 11. For fuel and oil mixture. 14.
... hold the brushcutter with the cutting tool. 19. Connects the drive shaft to the harness. 12. For tuning carburetor. 17. Starting throttle lock and stop switch wire. Attenuates exhaust noises and diverts exhaust gases away from metal for different purposes (special accessory). .......> 3 Throttle cable/stop switch. Spark plug terminal. Carburetor adjusting screws. The cutting attachment, i. Choke lever. The device to connect the brushcutler to the handle bars. 2. Definitions 1. Covers the air filter element. 11. For fuel and oil mixture. 14.

Instruction Manual
Page 5
Version with Loop Handle and loop handle with standoff lever 1 = Loop handle 8 2 = Standoff lever 3 = Carrying loop (not all markets) 4 = Slide control = 5 Throttle trigger 6 = Throttle trigger interlock 7 = Throttle cable / stop switch wire 8 = Spark plug terminal 9 = Air filter cover 10= Choke lever = 11 Machine support 12 = Fuel tank 13 = Fuel filler cap 14 = Starter grip 15 = Carburetor adjusting screws 16 = Muffler 17 = Deflector (for mowing heads) = 18 Line limiting blade 17 19 = Cutting tool 19 18 4
Version with Loop Handle and loop handle with standoff lever 1 = Loop handle 8 2 = Standoff lever 3 = Carrying loop (not all markets) 4 = Slide control = 5 Throttle trigger 6 = Throttle trigger interlock 7 = Throttle cable / stop switch wire 8 = Spark plug terminal 9 = Air filter cover 10= Choke lever = 11 Machine support 12 = Fuel tank 13 = Fuel filler cap 14 = Starter grip 15 = Carburetor adjusting screws 16 = Muffler 17 = Deflector (for mowing heads) = 18 Line limiting blade 17 19 = Cutting tool 19 18 4

Instruction Manual
Page 6
... Starter grip. For tuning carburetor 16. The cutting attachment, i. cutting head, for different purposes (special accessory). ....,. 5 Helps keep the line of injury from operator. 17. Air filter cover. Machine support. Throttle trigger interlock. Muffler. Covers the air filter element. 10. Keeps the throttle partially open during cutting work. 2. Standoff lever. The device to connect the brushcutter to start the engine. 15. Starting throttle lock and stop switch wire. Throttle cable/stop switch. Throttle trigger. The grip of the engine...
... Starter grip. For tuning carburetor 16. The cutting attachment, i. cutting head, for different purposes (special accessory). ....,. 5 Helps keep the line of injury from operator. 17. Air filter cover. Machine support. Throttle trigger interlock. Muffler. Covers the air filter element. 10. Keeps the throttle partially open during cutting work. 2. Standoff lever. The device to connect the brushcutter to start the engine. 15. Starting throttle lock and stop switch wire. Throttle cable/stop switch. Throttle trigger. The grip of the engine...

Instruction Manual
Page 9
... "Parts and Controls"! Only attachments supplied by STIHL or expressly approved by a spark or other ignition source, it to prevent turnover, fuel spillage and damage to the idle position.The cutting tool must move freely and always spring back to the brushcutter. The throttle trigger must be extremely dangerous. Ir spilled or ignited by STIHL for proper condition and operation before putting a brushcutter down. Use extreme caution when handling...
... "Parts and Controls"! Only attachments supplied by STIHL or expressly approved by a spark or other ignition source, it to prevent turnover, fuel spillage and damage to the idle position.The cutting tool must move freely and always spring back to the brushcutter. The throttle trigger must be extremely dangerous. Ir spilled or ignited by STIHL for proper condition and operation before putting a brushcutter down. Use extreme caution when handling...
Instruction Manual
Page 10
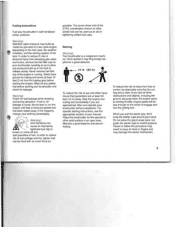
... enough for the clutch to follow this happens, change your brushcutter without assistance. Starting Warning! arnmg! The screw driver end of the STIHL combination wrench or other solid surface in tightening slotted fuel caps. To reduce the risk of eye and other obstructions and objects, including the ground, because when the engine starts at starting the engine. Stop the engine and cutting tool immediately if...
... enough for the clutch to follow this happens, change your brushcutter without assistance. Starting Warning! arnmg! The screw driver end of the STIHL combination wrench or other solid surface in tightening slotted fuel caps. To reduce the risk of eye and other obstructions and objects, including the ground, because when the engine starts at starting the engine. Stop the engine and cutting tool immediately if...
Instruction Manual
Page 11
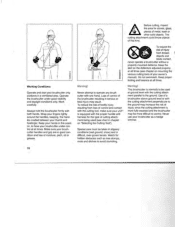
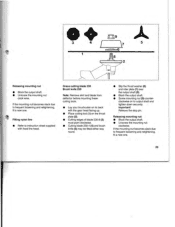
... chapter on the deflectors adjusted properly I at ground level with the cutting attachment parallel to operate any brush cutter with one hand. \ f\ .;'.":.; Work carefully. Before cutting, inspect the area for stones, glass, pieces of the brushcutter resulting in chapter on "Selecting the Cutting Tool"). Watch for the type of cutting attachment being used at all times. CD 8 o Working Conditions Operate and start your brushcutter only outdoors...
... chapter on the deflectors adjusted properly I at ground level with the cutting attachment parallel to operate any brush cutter with one hand. \ f\ .;'.":.; Work carefully. Before cutting, inspect the area for stones, glass, pieces of the brushcutter resulting in chapter on "Selecting the Cutting Tool"). Watch for the type of cutting attachment being used at all times. CD 8 o Working Conditions Operate and start your brushcutter only outdoors...
Instruction Manual
Page 12
... injury from loss of control or contact with the running grass cutting blade, do not have your STIHL dealer check your owner's manual. W mmg! Grass, weeds, etc. At correct idle speed, the grass cutting blade should be replaced. For directions to fences, sides of your brushcutter and make sure the cutting tool has stopped, before cleaning. When using the starting throttle lock as you cannot set the correct idle speed, have control of the tool changes, stop work immediately. See...
... injury from loss of control or contact with the running grass cutting blade, do not have your STIHL dealer check your owner's manual. W mmg! Grass, weeds, etc. At correct idle speed, the grass cutting blade should be replaced. For directions to fences, sides of your brushcutter and make sure the cutting tool has stopped, before cleaning. When using the starting throttle lock as you cannot set the correct idle speed, have control of the tool changes, stop work immediately. See...
Instruction Manual
Page 13
...';.I'IIIIII II 1111 ,I' '11'11',111 i'1I"1, '111,:11'11,11 1,'1,,111,8 flector, handle and harness for the type of any ~ brush-cutter can cause serious or fatal personal injury. To reduce the risk of personal injury to the operator from blade con- Read, understand and follow all safety instructions in chapter on "Selecting the Cut- ting Tool").
...';.I'IIIIII II 1111 ,I' '11'11',111 i'1I"1, '111,:11'11,11 1,'1,,111,8 flector, handle and harness for the type of any ~ brush-cutter can cause serious or fatal personal injury. To reduce the risk of personal injury to the operator from blade con- Read, understand and follow all safety instructions in chapter on "Selecting the Cut- ting Tool").
Instruction Manual
Page 14
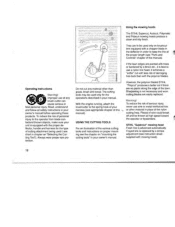
To reduce the risk of serious injury from breakage of the Polycut. f STIHL "Polymatic" mowing head Frayed line is replaced by a simple adjustment (see instruction sheet supplied with mowing head). Three rectangular wear limit marks are applied to the base (periphery) of the head or blades, the Polycut must not be used I,I'~ 11111'11111111111111111, ,I"l' ,ill Ii'! '1'I2j;lIlIll" ,/ 11'11'1 1111111'111111: IIIJ ,i1It1,,:1111111 1 ..IIi STIHL "Autocut" mowing head Nylon cutting cord advances automatically when tapped against the ground. STIHL "Polycut" mowing head Important!
To reduce the risk of serious injury from breakage of the Polycut. f STIHL "Polymatic" mowing head Frayed line is replaced by a simple adjustment (see instruction sheet supplied with mowing head). Three rectangular wear limit marks are applied to the base (periphery) of the head or blades, the Polycut must not be used I,I'~ 11111'11111111111111111, ,I"l' ,ill Ii'! '1'I2j;lIlIll" ,/ 11'11'1 1111111'111111: IIIJ ,i1It1,,:1111111 1 ..IIi STIHL "Autocut" mowing head Nylon cutting cord advances automatically when tapped against the ground. STIHL "Polycut" mowing head Important!
Instruction Manual
Page 16
Instruction Manual
Page 17
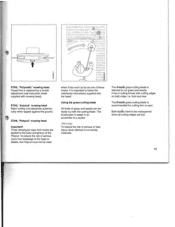
;N; ~ § Risk of "kickout" (blade thrust) with all rigid cutting blades Warning l Kickout (blade thrust) is the sudden and uncontrolled motion towards the operator's right or rear that can occur when the shaded area of the rotating blade comes in cont
;N; ~ § Risk of "kickout" (blade thrust) with all rigid cutting blades Warning l Kickout (blade thrust) is the sudden and uncontrolled motion towards the operator's right or rear that can occur when the shaded area of the rotating blade comes in cont

Instruction Manual
Page 18
... loss. Keep spark plug and wire connection tight and clean. Store brushcutter in good condition. Failure to use unauthorized parts to a unit without proper installation of the muffler or spark arrestor. Do not operate your STIHL dealer. The spark plug electrode gap should be checked with a spark-arresting screen to reduce the risk of fire, do not modify or remove any part of all nuts, bolts and screws except the carburetor adjustment screws after being properly...
... loss. Keep spark plug and wire connection tight and clean. Store brushcutter in good condition. Failure to use unauthorized parts to a unit without proper installation of the muffler or spark arrestor. Do not operate your STIHL dealer. The spark plug electrode gap should be checked with a spark-arresting screen to reduce the risk of fire, do not modify or remove any part of all nuts, bolts and screws except the carburetor adjustment screws after being properly...
Instruction Manual
Page 30
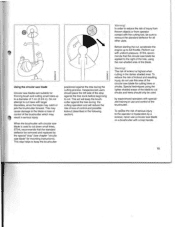
... securely. deflector before mounting these • Screw mounting nut (9) counter- clockwise on to instruction sheet supplied • Cutting blade 230-4 (4) and brush clockwise. fit a new one . 29 the output shaft (8). • Unscrew the mounting nut Note: Remove skirt and blade from • Block the output shaft. Remove the stop pin. • Place cutting tool (1) on its back Important! cutting tools. with the gear head facing up. to frequent loosening and...
... securely. deflector before mounting these • Screw mounting nut (9) counter- clockwise on to instruction sheet supplied • Cutting blade 230-4 (4) and brush clockwise. fit a new one . 29 the output shaft (8). • Unscrew the mounting nut Note: Remove skirt and blade from • Block the output shaft. Remove the stop pin. • Place cutting tool (1) on its back Important! cutting tools. with the gear head facing up. to frequent loosening and...
Instruction Manual
Page 33
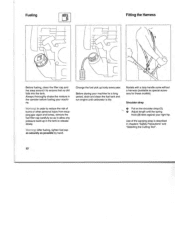
... fueling, tighten fuel cap as securely as special accessory for a long period, drain and clean the fuel tank and run engine until the spring hook (3) rests against your right hip. Use of bums or other personal injury from escaping gas vapor and fumes, remove the fuel filler cap carefully so as to allow any pressure build-up body every year. Before storing your machine. Adjust length until carburetor...
... fueling, tighten fuel cap as securely as special accessory for a long period, drain and clean the fuel tank and run engine until the spring hook (3) rests against your right hip. Use of bums or other personal injury from escaping gas vapor and fumes, remove the fuel filler cap carefully so as to allow any pressure build-up body every year. Before storing your machine. Adjust length until carburetor...
Instruction Manual
Page 38
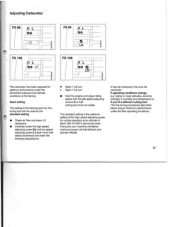
... the high speed adjusting screw for fine tuning and can be used as the standard setting. • Check air filter and clean it if necessary. • Carefully screw the high speed adjusting screw (H) and low speed adjusting screw (L) down onto their seats (clockwise) and make the following adjustments: H Open 1 full turn L Open 1 full tum • Start the engine and adjust idling speed with the idle speed adjusting screw LA or LD: cutting tool must not rotate. Adjusting Carburetor FS88 { II t R L I ~~ /-1=1 I L-!@ IfF L.... ~ FS 108 I { II FS 88...
... the high speed adjusting screw for fine tuning and can be used as the standard setting. • Check air filter and clean it if necessary. • Carefully screw the high speed adjusting screw (H) and low speed adjusting screw (L) down onto their seats (clockwise) and make the following adjustments: H Open 1 full turn L Open 1 full tum • Start the engine and adjust idling speed with the idle speed adjusting screw LA or LD: cutting tool must not rotate. Adjusting Carburetor FS88 { II t R L I ~~ /-1=1 I L-!@ IfF L.... ~ FS 108 I { II FS 88...
Instruction Manual
Page 42
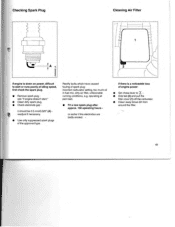
... is a noticeable loss of engine power: • Set choke lever to start or runs poorly at part load. • Fit a new spark plug after approx. 100 operating hours - it should be 0.5 mmlO.020" (A) readjust if necessary. • Use only suppressed spark plugs of spark plug: Incorrect carburetor setting, too much oil in fuel mix, dirty air filter, unfavorable running conditions, e.g. operating at idling speed, first check the spark plug. • Remove spark plug see "If engine doesn't start:" • Clean dirty spark plug. • Check electrode gap - Rectify faults which have...
... is a noticeable loss of engine power: • Set choke lever to start or runs poorly at part load. • Fit a new spark plug after approx. 100 operating hours - it should be 0.5 mmlO.020" (A) readjust if necessary. • Use only suppressed spark plugs of spark plug: Incorrect carburetor setting, too much oil in fuel mix, dirty air filter, unfavorable running conditions, e.g. operating at idling speed, first check the spark plug. • Remove spark plug see "If engine doesn't start:" • Clean dirty spark plug. • Check electrode gap - Rectify faults which have...

Instruction Manual
Page 43
...; the drive tube. Fit the filter cover (1) - warm soapy water) and then dry. about 5 - 10 g (1/4 oz), Do not completely fill the gear housing with grease. • Refit the filler plug and tighten it must snap into position. • Check grease level after about •• every 50 hours of the gear head on the insi- Lubricating Gearbox Lubricating Drive Shaft 34 5 t 01 10 2 • Remove the...
...; the drive tube. Fit the filter cover (1) - warm soapy water) and then dry. about 5 - 10 g (1/4 oz), Do not completely fill the gear housing with grease. • Refit the filler plug and tighten it must snap into position. • Check grease level after about •• every 50 hours of the gear head on the insi- Lubricating Gearbox Lubricating Drive Shaft 34 5 t 01 10 2 • Remove the...
Instruction Manual
Page 54
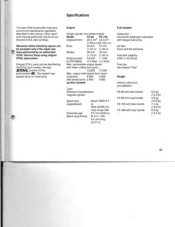
... position diaphragm carburetor with integral fuel pump Air filter: Foam and felt elements Fuel tank capacity: 0.69 I (1.45 US pt) Fuel mix: see chapter "Fuel" Weight without cutting tool and deflector: FS 88 with bike handle FS 88 with loop handle FS 108 with bike handle FS 1-08 with metal cutting tool (rpm): 12,000 12,000 Max. Other repair work may be identified by an authorized STIHL Service Shop. warranty claims following repairs can be performed only by the STIHL part number...
... position diaphragm carburetor with integral fuel pump Air filter: Foam and felt elements Fuel tank capacity: 0.69 I (1.45 US pt) Fuel mix: see chapter "Fuel" Weight without cutting tool and deflector: FS 88 with bike handle FS 88 with loop handle FS 108 with bike handle FS 1-08 with metal cutting tool (rpm): 12,000 12,000 Max. Other repair work may be identified by an authorized STIHL Service Shop. warranty claims following repairs can be performed only by the STIHL part number...


