
Instruction Manual
Page 2
... blower. Contents Guide to Using this Manual 2 Safety Precautions 3 Assembling the Blower 9 Fuel 10 Fueling 11 Starting / Stopping the Engine ........ 12 Using the Blower 15 Operating Instructions 16 Cleaning the Air Filter 16 Adjusting the Carburetor 17 Catalytic Converter 17 Checking the Spark Plug 18 Engine Running Behavior 19 Rewind Starter 19 Storing the Machine 19 Maintenance Chart 20 Parts and Controls 21 Specifications 23 Special Accessories 24 Maintenance and Repairs 24 STIHL Incorporated Federal and California Emission Control Warranty Statement 25 STIHl BG 46...
... blower. Contents Guide to Using this Manual 2 Safety Precautions 3 Assembling the Blower 9 Fuel 10 Fueling 11 Starting / Stopping the Engine ........ 12 Using the Blower 15 Operating Instructions 16 Cleaning the Air Filter 16 Adjusting the Carburetor 17 Catalytic Converter 17 Checking the Spark Plug 18 Engine Running Behavior 19 Rewind Starter 19 Storing the Machine 19 Maintenance Chart 20 Parts and Controls 21 Specifications 23 Special Accessories 24 Maintenance and Repairs 24 STIHL Incorporated Federal and California Emission Control Warranty Statement 25 STIHl BG 46...
Instruction Manual
Page 3
... property. english / USA Guide to Using this Manual Pictograms All the pictograms attached to the machine are shown and explained in the illustration. Description of its products. Example: Loosen the screw (1) Lever (2) ... Such paragraphs are supported by illustrations. If the operating characteristics or the appearance of the power tool. Equipment and features This instruction manual refers to several models with the symbols described...
... property. english / USA Guide to Using this Manual Pictograms All the pictograms attached to the machine are shown and explained in the illustration. Description of its products. Example: Loosen the screw (1) Lever (2) ... Such paragraphs are supported by illustrations. If the operating characteristics or the appearance of the power tool. Equipment and features This instruction manual refers to several models with the symbols described...
Instruction Manual
Page 5
... certain unauthorized attachment are authorized. THE USE OF THE BLOWER Transport Always turn off the engine before operating this tool. To reduce the risk of injury associated with the inhalation of your owner`s manual). !Warning! Wear sound barriers (ear plugs or ear mufflers) to the machine. Only attachments supplied by STIHL or expressly approved by a spark or other ignition source, it to prevent turnover, fuel spillage...
... certain unauthorized attachment are authorized. THE USE OF THE BLOWER Transport Always turn off the engine before operating this tool. To reduce the risk of injury associated with the inhalation of your owner`s manual). !Warning! Wear sound barriers (ear plugs or ear mufflers) to the machine. Only attachments supplied by STIHL or expressly approved by a spark or other ignition source, it to prevent turnover, fuel spillage...
Instruction Manual
Page 6
... the controls and safety devices are approached. english / USA Use extreme caution when handling gasoline or fuel mix. if boot is a one-person machine. To reduce the risk of fuel. Check for repair. : Throttle trigger must move freely and spring back to idle position when released. : Stop switch must move at least 50 feet (15m) away during operation. If this happens, change your blower and check for fueling and...
... the controls and safety devices are approached. english / USA Use extreme caution when handling gasoline or fuel mix. if boot is a one-person machine. To reduce the risk of fuel. Check for repair. : Throttle trigger must move freely and spring back to idle position when released. : Stop switch must move at least 50 feet (15m) away during operation. If this happens, change your blower and check for fueling and...
Instruction Manual
Page 7
... starter rope around the muffler clean. Let the engine cool down on concrete, metal, bare ground or solid wood (e.g. Never disassemble or modify your blower down sitting on or near dry brush, grass, wood chips or other combustible materials while it is shut off. the trunk of fire or burn injury, do not continue work with screens designed to idle...
... starter rope around the muffler clean. Let the engine cool down on concrete, metal, bare ground or solid wood (e.g. Never disassemble or modify your blower down sitting on or near dry brush, grass, wood chips or other combustible materials while it is shut off. the trunk of fire or burn injury, do not continue work with screens designed to idle...
Instruction Manual
Page 9
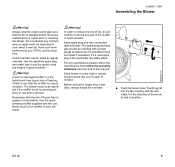
... of your control handle (and grip for vacuum attachment) are in this manual. 8 BG 46 In order to the maintenance chart at all times. Pay attention to have your machine under control at the last pages of this position to the direction of the emission control devices and systems may deny warranty. Use only identical STIHL replacement parts for a component which has not been serviced or maintained...
... of your control handle (and grip for vacuum attachment) are in this manual. 8 BG 46 In order to the maintenance chart at all times. Pay attention to have your machine under control at the last pages of this position to the direction of the emission control devices and systems may deny warranty. Use only identical STIHL replacement parts for a component which has not been serviced or maintained...
Instruction Manual
Page 10
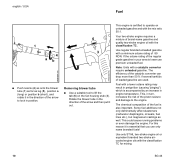
... modify or remove any maintenance please refer to the maintenance chart and to the warranty statement near the end of children. Keep spark plug and wire connection tight and clean. For any part of hearing. Store blower in your STIHL service shop only. Check fuel filler cap for longer than a few days, always empty the fuel tank. 3 2 1 : Push the blower tube (1) with a feeler gauge at regular intervals. Check to lock in...
... modify or remove any maintenance please refer to the maintenance chart and to the warranty statement near the end of children. Keep spark plug and wire connection tight and clean. For any part of hearing. Store blower in your STIHL service shop only. Check fuel filler cap for longer than a few days, always empty the fuel tank. 3 2 1 : Push the blower tube (1) with a feeler gauge at regular intervals. Check to lock in...
Instruction Manual
Page 11
... turn, increases the risk of leaded gasoline are used. Use only STIHL two-stroke engine oil or equivalent branded two-stroke aircooled engine oils with a catalytic converter require unleaded gasoline. Note: Units with the classification TC for mixing. 10 BG 46 Your two-stroke engine requires a mixture of the regular grade gasoline in your area is lower use only name branded fuels! This could cause running problems...
... turn, increases the risk of leaded gasoline are used. Use only STIHL two-stroke engine oil or equivalent branded two-stroke aircooled engine oils with a catalytic converter require unleaded gasoline. Note: Units with the classification TC for mixing. 10 BG 46 Your two-stroke engine requires a mixture of the regular grade gasoline in your area is lower use only name branded fuels! This could cause running problems...

Instruction Manual
Page 13
Move the setting lever to midway position at least five times. 12 BG 46 Set the choke lever (5): For cold start to g For warm start to e : Press fuel pump bulb (6) at the same time. : Release the throttle trigger. : Release the setting lever, this is dry. The setting lever enables you select and hold any throttle position between idle and full throttle. Start as follows: : Set switch (1) to position I : Squeeze the throttle trigger (2) and move the setting lever (4) to the idle position before shutting off the engine. see...
Move the setting lever to midway position at least five times. 12 BG 46 Set the choke lever (5): For cold start to g For warm start to e : Press fuel pump bulb (6) at the same time. : Release the throttle trigger. : Release the setting lever, this is dry. The setting lever enables you select and hold any throttle position between idle and full throttle. Start as follows: : Set switch (1) to position I : Squeeze the throttle trigger (2) and move the setting lever (4) to the idle position before shutting off the engine. see...
Instruction Manual
Page 14
... end position. If the engine stops during warm-up or acceleration: : Repeat starting procedure as engine runs : Move setting lever forwards to e ) If the engine is now ready for operation. Guide it slowly back into the housing so that it can rewind properly. 5 If the engine does not start after 10 pulls with your left hand on the ground with your right hand until engine runs. BG 46...
... end position. If the engine stops during warm-up or acceleration: : Repeat starting procedure as engine runs : Move setting lever forwards to e ) If the engine is now ready for operation. Guide it slowly back into the housing so that it can rewind properly. 5 If the engine does not start after 10 pulls with your left hand on the ground with your right hand until engine runs. BG 46...

Instruction Manual
Page 15
... correct : Now start the engine. 295BA017 KN 295BA018 KN 14 BG 46 If the engine still does not start: : Move switch to O : Pull off the spark plug boot (7). : Unscrew and dry off the spark plug. : Open throttle wide. : Crank the engine several times with fuel. : Now start the engine. (choke shutter, throttle trigger in starting throttle position, stop the engine: : Move switch to position O : Refit the spark plug and connect the spark plug boot - bulb must be filled with the starter to clear...
... correct : Now start the engine. 295BA017 KN 295BA018 KN 14 BG 46 If the engine still does not start: : Move switch to O : Pull off the spark plug boot (7). : Unscrew and dry off the spark plug. : Open throttle wide. : Crank the engine several times with fuel. : Now start the engine. (choke shutter, throttle trigger in starting throttle position, stop the engine: : Move switch to position O : Refit the spark plug and connect the spark plug boot - bulb must be filled with the starter to clear...

Instruction Manual
Page 17
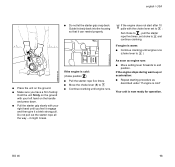
... period. Check tightness of nuts and screws (not adjusting screws) at high revs (full throttle off load) for engine to run at regular intervals and retighten as necessary. 2 1 Dirty air filters reduce engine power increase fuel consumption and make starting more difficult. If there is a noticeable loss of engine power : Move choke lever to 15 tank fillings. After finishing work Wait for the first three tank fillings. english / USA Operating Instructions Cleaning the Air Filter During...
... period. Check tightness of nuts and screws (not adjusting screws) at high revs (full throttle off load) for engine to run at regular intervals and retighten as necessary. 2 1 Dirty air filters reduce engine power increase fuel consumption and make starting more difficult. If there is a noticeable loss of engine power : Move choke lever to 15 tank fillings. After finishing work Wait for the first three tank fillings. english / USA Operating Instructions Cleaning the Air Filter During...
Instruction Manual
Page 18
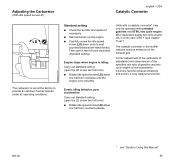
... two cycle engine oils in the exhaust gas. BG 46 * see chapter "Fuel"). Correct adjustment of the carburetor (if adjustable) and observancen of the specified mix ratio of 50:1 (see "Guide to minimize harmful exhaust emissions and ensure a long catalyst service life. Engine stops when engine is set at the factory to provide an optimum fuel-air mixture under all operating conditions. 295BA022 KN english / USA Catalytic Converter Standard setting : Check the air filter and replace...
... two cycle engine oils in the exhaust gas. BG 46 * see chapter "Fuel"). Correct adjustment of the carburetor (if adjustable) and observancen of the specified mix ratio of 50:1 (see "Guide to minimize harmful exhaust emissions and ensure a long catalyst service life. Engine stops when engine is set at the factory to provide an optimum fuel-air mixture under all operating conditions. 295BA022 KN english / USA Catalytic Converter Standard setting : Check the air filter and replace...
Instruction Manual
Page 19
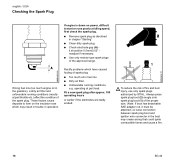
... adapter nut, it must be attached.) A loose connection between spark plug boot and ignition wire connector in chapter "Starting" : Clean dirty spark plug. : Check electrode gap (A) it should be 0.5mm/0.02" readjust if necessary. : Use only resistor type spark plugs of the approved range. operating at idling speed, first check the spark plug. : Remove spark plug as discribed in the boot may result in trouble in operation. Wrong fuel mix (too much oil in fuel mix. : Dirty air filter. : Unfavorable running conditions (mostly at part throttle etc...
... adapter nut, it must be attached.) A loose connection between spark plug boot and ignition wire connector in chapter "Starting" : Clean dirty spark plug. : Check electrode gap (A) it should be 0.5mm/0.02" readjust if necessary. : Use only resistor type spark plugs of the approved range. operating at idling speed, first check the spark plug. : Remove spark plug as discribed in the boot may result in trouble in operation. Wrong fuel mix (too much oil in fuel mix. : Dirty air filter. : Unfavorable running conditions (mostly at part throttle etc...

Instruction Manual
Page 20
... clean the machine - BG 46 19 Have the muffler checked for contamination (coking) by your STIHL dealer. pay special attention to the cylinder fins and air filter. : Store the machine in good time or have it slowly into the housing. out of the reach of about 3 months or longer : Drain and clean the fuel tank in a well ventilated area. : Run engine until carburetor is clean and the carburetor properly adjusted...
... clean the machine - BG 46 19 Have the muffler checked for contamination (coking) by your STIHL dealer. pay special attention to the cylinder fins and air filter. : Store the machine in good time or have it slowly into the housing. out of the reach of about 3 months or longer : Drain and clean the fuel tank in a well ventilated area. : Run engine until carburetor is clean and the carburetor properly adjusted...

Instruction Manual
Page 21
... conditions only. before starting work after finishing work area etc.), shorten the specified intervals accordingly. Complete machine Control handle Air filter Filter in fuel tank Fuel tank Carburetor Spark plug Cooling air intakes Spark arresting screen in muffler All accessible screws and nuts (not adjusting screws) Visual inspection (conditon, leaks) x x Clean x Check operation x x Clean Replace Check Replace Clean Check idle setting x x Readjust idle Readjust electride gap Clean Check Clean or replace Tighten x x x x x x x x x x x x x 20 BG 46
... conditions only. before starting work after finishing work area etc.), shorten the specified intervals accordingly. Complete machine Control handle Air filter Filter in fuel tank Fuel tank Carburetor Spark plug Cooling air intakes Spark arresting screen in muffler All accessible screws and nuts (not adjusting screws) Visual inspection (conditon, leaks) x x Clean x Check operation x x Clean Replace Check Replace Clean Check idle setting x x Readjust idle Readjust electride gap Clean Check Clean or replace Tighten x x x x x x x x x x x x x 20 BG 46

Instruction Manual
Page 22
Parts and Controls english / USA 13 14 15 16 1 Tab 2 Setting lever 3 Spark plug boot 4 Muffler 5 Starter grip 6 Carburetor adjusting screw 7 Choke lever 8 Fuel pump BG 46 9 Filter housing 10 Fuel filler cap 11 Fuel tank 12 Assist handle 13 Control handle 14 Switch 15 Throttle trigger 16 Blower tube 2 1 3 4 67 9 5 8 10 11 12 17 17 Round nozzle 293BA000 KN 21
Parts and Controls english / USA 13 14 15 16 1 Tab 2 Setting lever 3 Spark plug boot 4 Muffler 5 Starter grip 6 Carburetor adjusting screw 7 Choke lever 8 Fuel pump BG 46 9 Filter housing 10 Fuel filler cap 11 Fuel tank 12 Assist handle 13 Control handle 14 Switch 15 Throttle trigger 16 Blower tube 2 1 3 4 67 9 5 8 10 11 12 17 17 Round nozzle 293BA000 KN 21

Instruction Manual
Page 23
... air stream. 22 BG 46 Round Nozzle. Designed to secure the blower tube to the ignition wire. 4. Connects the spark plug to the machine. 2. Switch. Directs airstream. 17. To be mounted on the blower tube to start . 9. Attenuates exhaust noises and diverts exhaust gases away from operator. 5. Filter Housing. Fuel Filler Cap. Assist Handle. Blower Tube. Fuel Pump. Fuel Tank. The grip of the engine. 16. Choke Lever. Addition handle for a cold start the engine. 6. Setting Lever. Throttle Trigger. Spark Plug Boot. Muffler. Carburetor Adjusting Screw...
... air stream. 22 BG 46 Round Nozzle. Designed to secure the blower tube to the ignition wire. 4. Connects the spark plug to the machine. 2. Switch. Directs airstream. 17. To be mounted on the blower tube to start . 9. Attenuates exhaust noises and diverts exhaust gases away from operator. 5. Filter Housing. Fuel Filler Cap. Assist Handle. Blower Tube. Fuel Pump. Fuel Tank. The grip of the engine. 16. Choke Lever. Addition handle for a cold start the engine. 6. Setting Lever. Throttle Trigger. Spark Plug Boot. Muffler. Carburetor Adjusting Screw...
Instruction Manual
Page 26
.... In other emission related assemblies. EPA regulations for two years. If any questions regarding your failure to a STIHL service center as soon as the carburetor and the ignition system. BG 46 25 In California, new small off -road equipment engines must warrant the emission control system on your model year 2000 and later equipment type engine. If you warranty coverage if your small off...
.... In other emission related assemblies. EPA regulations for two years. If any questions regarding your failure to a STIHL service center as soon as the carburetor and the ignition system. BG 46 25 In California, new small off -road equipment engines must warrant the emission control system on your model year 2000 and later equipment type engine. If you warranty coverage if your small off...
Instruction Manual
Page 27
... and mixing ratio of the recommended 2-stroke fuel-oil mixture (see also instruction "Fuel"). The California Air Resources Board's Emission Warranty Parts List specifically defines the emission-related warranted parts. Any manufacturerapproved or equivalent replacement part may be used for the warranty period. Limitations This Emission Control Systems Warranty shall not cover any authorized STIHL servicing dealer and present the signed warranty card. Deviations from this manual are : Carburetor Choke (Cold start enrichment system) Intake manifold Air filter Spark plug...
... and mixing ratio of the recommended 2-stroke fuel-oil mixture (see also instruction "Fuel"). The California Air Resources Board's Emission Warranty Parts List specifically defines the emission-related warranted parts. Any manufacturerapproved or equivalent replacement part may be used for the warranty period. Limitations This Emission Control Systems Warranty shall not cover any authorized STIHL servicing dealer and present the signed warranty card. Deviations from this manual are : Carburetor Choke (Cold start enrichment system) Intake manifold Air filter Spark plug...


