
Instruction Manual
Page 3
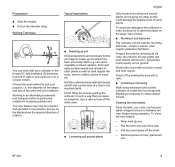
.... Original Instruction Manual Printed on chlorine-free paper Printing inks contain vegetable oils, paper can go to operate this Manual 2 Safety Precautions and Working Techniques 3 Using the Unit 8 Approved KombiEngines 10 Assembling the Unit 10 Mounting the KombiTool 11 Fitting the Harness 12 Starting / Stopping the Engine 13 Storing the Machine 13 Maintenance and Care 14 Main Parts 15 Specifications 16 Maintenance and Repairs 16...
.... Original Instruction Manual Printed on chlorine-free paper Printing inks contain vegetable oils, paper can go to operate this Manual 2 Safety Precautions and Working Techniques 3 Using the Unit 8 Approved KombiEngines 10 Assembling the Unit 10 Mounting the KombiTool 11 Fitting the Harness 12 Starting / Stopping the Engine 13 Storing the Machine 13 Maintenance and Care 14 Main Parts 15 Specifications 16 Maintenance and Repairs 16...
Instruction Manual
Page 4
... read and make sure you understand both instruction manuals before using your area for the power tool. Example: N Loosen the screw (1). Therefore, some changes, modifications and improvements may be used together for assistance. In this manual. Symbols in this instruction manual the functional unit formed by illustrations. English KombiSystem In the STIHL KombiSystem a number of different KombiEngines and KombiTools can be combined to time.
... read and make sure you understand both instruction manuals before using your area for the power tool. Example: N Loosen the screw (1). Therefore, some changes, modifications and improvements may be used together for assistance. In this manual. Symbols in this instruction manual the functional unit formed by illustrations. English KombiSystem In the STIHL KombiSystem a number of different KombiEngines and KombiTools can be combined to time.
Instruction Manual
Page 5
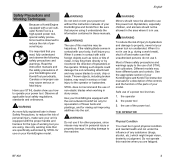
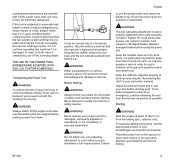
... the instruction manuals of your power tool run unattended. STIHL does not recommend the use of non-elastic blades when working tool you read, fully understand and observe the following safety precautions and warnings. Use your KombiEngine model. WARNING To reduce the risk of injury to bystanders and damage to use on your KombiEngine equipped with the proper handle and harness for the type...
... the instruction manuals of your power tool run unattended. STIHL does not recommend the use of non-elastic blades when working tool you read, fully understand and observe the following safety precautions and warnings. Use your KombiEngine model. WARNING To reduce the risk of injury to bystanders and damage to use on your KombiEngine equipped with the proper handle and harness for the type...
Instruction Manual
Page 6
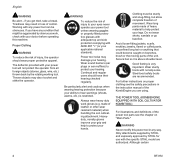
... STIHL for use with any way. Wear long pants made of control. Secure hair so it is very important. WARNING Never modify this machine. Working with the specific STIHL model are authorized. Thrown objects may result in any power tool can be sturdy and snug-fitting, but allow complete freedom of the power tool parts see the safety precautions in the instruction manual...
... STIHL for use with any way. Wear long pants made of control. Secure hair so it is very important. WARNING Never modify this machine. Working with the specific STIHL model are authorized. Thrown objects may result in any power tool can be sturdy and snug-fitting, but allow complete freedom of the power tool parts see the safety precautions in the instruction manual...
Instruction Manual
Page 7
... checked by your STIHL servicing dealer. Never attempt to unusually high loads for proper condition and operation before using the power tool. it is particularly important to keep them free of control and blade contact, never carry or transport your KombiEngine and KombiTool manuals. Starting WARNING Start the engine at least 10 feet (3 m) from loss of moisture, pitch, oil, fuel mix, grease or resin in a horizontal position. For specific starting instructions, see chapter "Assembling...
... checked by your STIHL servicing dealer. Never attempt to unusually high loads for proper condition and operation before using the power tool. it is particularly important to keep them free of control and blade contact, never carry or transport your KombiEngine and KombiTool manuals. Starting WARNING Start the engine at least 10 feet (3 m) from loss of moisture, pitch, oil, fuel mix, grease or resin in a horizontal position. For specific starting instructions, see chapter "Assembling...
Instruction Manual
Page 8
... throttle trigger, which should release the starting . See also the safety precautions on the handles while you and all times. For better footing, clear away scrub and cuttings. Working Conditions Operate and start " your power tool. Operate it under good visibility and daylight conditions only. This also applies to the spring hook of your harness (see appropriate chapter of this manual). Loss of control...
... throttle trigger, which should release the starting . See also the safety precautions on the handles while you and all times. For better footing, clear away scrub and cuttings. Working Conditions Operate and start " your power tool. Operate it under good visibility and daylight conditions only. This also applies to the spring hook of your harness (see appropriate chapter of this manual). Loss of control...
Instruction Manual
Page 9
... cracks. Operating Instructions WARNING Do not operate your power tool using the starting throttle lock, as you do not have an allergic or asthmatic reaction. move the slide control / stop switch / momentary stop switch to have control of the unit. To reduce the risk of this distance from the operator. The soil cultivating attachment could come into contact with serious or fatal consequences. WARNING Replace a cracked...
... cracks. Operating Instructions WARNING Do not operate your power tool using the starting throttle lock, as you do not have an allergic or asthmatic reaction. move the slide control / stop switch / momentary stop switch to have control of the unit. To reduce the risk of this distance from the operator. The soil cultivating attachment could come into contact with serious or fatal consequences. WARNING Replace a cracked...
Instruction Manual
Page 10
.... Grass, weeds, etc. Tighten all nuts, bolts and screws, except the carburetor adjustment screws, after each use. should be damaged if its roots are particularly suitable for maintenance and repair. WARNING The gearbox becomes hot during operation. Use of burn injury, do not touch the gear housing when it . To reduce the risk of non-STIHL parts may also be cleaned off and result in a dry and high or locked location...
.... Grass, weeds, etc. Tighten all nuts, bolts and screws, except the carburetor adjustment screws, after each use. should be damaged if its roots are particularly suitable for maintenance and repair. WARNING The gearbox becomes hot during operation. Use of burn injury, do not touch the gear housing when it . To reduce the risk of non-STIHL parts may also be cleaned off and result in a dry and high or locked location...
Instruction Manual
Page 11
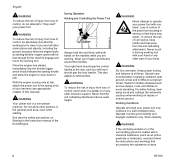
... operated in a circular motion. Use a rake to break up soil A few preparations are necessary before you leave no footprints. Wear work with your cultivator in the forward (1) and backward (2) directions, from left to suit your purpose, i.e. Cleaning the rotor blades Parts of the axle. - last year's vegetable or flower garden). Pull the hitch pins out of plants, e.g. Remove...
... operated in a circular motion. Use a rake to break up soil A few preparations are necessary before you leave no footprints. Wear work with your cultivator in the forward (1) and backward (2) directions, from left to suit your purpose, i.e. Cleaning the rotor blades Parts of the axle. - last year's vegetable or flower garden). Pull the hitch pins out of plants, e.g. Remove...
Instruction Manual
Page 12
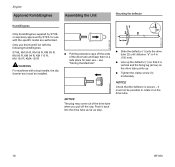
... the deflector KombiEngines Only KombiEngines supplied by STIHL or expressly approved by STIHL for later use with a loop handle, the clip (barrier bar) must not be installed. N Pull the protective caps off the cap. Push it on the drive tube points up the deflector (1) so that the deflector is vertical and the fixing lug (arrow) on the drive tube. 10 BF-KM N Line up .
... the deflector KombiEngines Only KombiEngines supplied by STIHL or expressly approved by STIHL for later use with a loop handle, the clip (barrier bar) must not be installed. N Pull the protective caps off the cap. Push it on the drive tube points up the deflector (1) so that the deflector is vertical and the fixing lug (arrow) on the drive tube. 10 BF-KM N Line up .

Instruction Manual
Page 13
... on the drive tube. The hub of the inner blade is marked with the end of the outer blade. check the direction of rotation again (arrows). N Use the same procedure to lose the two washers on the shaft until the housing is approximately in the shaft - BF-KM 11 turn the gearbox back and forth as stop. 3 002BA327 KN N Line up . N Tighten...
... on the drive tube. The hub of the inner blade is marked with the end of the outer blade. check the direction of rotation again (arrows). N Use the same procedure to lose the two washers on the shaft until the housing is approximately in the shaft - BF-KM 11 turn the gearbox back and forth as stop. 3 002BA327 KN N Line up . N Tighten...

Instruction Manual
Page 14
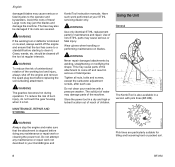
... carrying ring (2) on the drive tube - Practice quickly detaching the power tool from Harness". N Adjust the length of imminent danger. Attaching Machine to Harness 2 1 1 2 N Attach the carabiner (1) to the ground when practicing. Practice removing and putting down the bar on the 1 carabiner (1) and pull the carrying ring (2) out of the harness, carrying ring and carabiner (spring hook) depend on the...
... carrying ring (2) on the drive tube - Practice quickly detaching the power tool from Harness". N Adjust the length of imminent danger. Attaching Machine to Harness 2 1 1 2 N Attach the carabiner (1) to the ground when practicing. Practice removing and putting down the bar on the 1 carabiner (1) and pull the carrying ring (2) out of the harness, carrying ring and carabiner (spring hook) depend on the...
Instruction Manual
Page 15
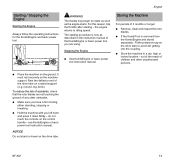
... N Remove, clean and inspect the rotor blades. mound, log, brick). N Make sure you have a firm footing, either standing, stooping or kneeling. NOTICE Do not stand or kneel on the control handle - Stopping the Engine N See KombiEngine or basic power tool instruction manual. English Starting / Stopping the Engine Starting the Engine Always follow the operating instructions for the KombiEngine and basic power tool. WARNING The blades may begin to idling speed. the engine...
... N Remove, clean and inspect the rotor blades. mound, log, brick). N Make sure you have a firm footing, either standing, stooping or kneeling. NOTICE Do not stand or kneel on the control handle - Stopping the Engine N See KombiEngine or basic power tool instruction manual. English Starting / Stopping the Engine Starting the Engine Always follow the operating instructions for the KombiEngine and basic power tool. WARNING The blades may begin to idling speed. the engine...

Instruction Manual
Page 16
English Maintenance and Care The following intervals apply to normal operating conditions only. All accessible screws and nuts N Retighten if necessary Sweeping attachments and deflectors N Visual inspection, check tightness before starting work area, etc.), shorten the specified intervals accordingly. If your daily working time is longer or operating conditions are difficult (very dusty work and after every refueling stop N Replace if damaged Safety labels N Replace illegible safety labels 14 BF-KM
English Maintenance and Care The following intervals apply to normal operating conditions only. All accessible screws and nuts N Retighten if necessary Sweeping attachments and deflectors N Visual inspection, check tightness before starting work area, etc.), shorten the specified intervals accordingly. If your daily working time is longer or operating conditions are difficult (very dusty work and after every refueling stop N Replace if damaged Safety labels N Replace illegible safety labels 14 BF-KM
Instruction Manual
Page 17
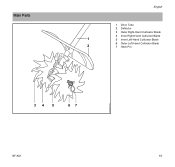
Main Parts English 1 Drive Tube 2 Deflector 3 Outer Right-Hand Cultivator Blade 4 Inner Right-Hand Cultivator Blade 1 5 Inner Left-Hand Cultivator Blade 6 Outer Left-Hand Cultivator Blade 2 7 Hitch Pin 504BA019 KN 34 5 67 BF-KM 15
Main Parts English 1 Drive Tube 2 Deflector 3 Outer Right-Hand Cultivator Blade 4 Inner Right-Hand Cultivator Blade 1 5 Inner Left-Hand Cultivator Blade 6 Outer Left-Hand Cultivator Blade 2 7 Hitch Pin 504BA019 KN 34 5 67 BF-KM 15

Instruction Manual
Page 18
... the maintenance operations described in this manual. 16 BF-KM Specifications Gearbox Single-stage worm gear Gear ratio: 44:1 Attachment Four rotor blades, double-edged, rotate in same direction Diameter: 230 mm (9 in) Working width: 220 mm (8.7 in) Weight Complete with pointed or curved tines. Genuine STIHL parts can be performed only by authorized STIHL servicing dealers using genuine STIHL replacement parts. English Definitions 1 Drive Tube Encloses and protects the drive shaft...
... the maintenance operations described in this manual. 16 BF-KM Specifications Gearbox Single-stage worm gear Gear ratio: 44:1 Attachment Four rotor blades, double-edged, rotate in same direction Diameter: 230 mm (9 in) Working width: 220 mm (8.7 in) Weight Complete with pointed or curved tines. Genuine STIHL parts can be performed only by authorized STIHL servicing dealers using genuine STIHL replacement parts. English Definitions 1 Drive Tube Encloses and protects the drive shaft...
Instruction Manual
Page 19
... STIHL's Common Law Trademarks STIHL InjectionTM BF-KM AutoCut® FARM BOSS® iCademy® MAGNUM® MasterWrench Service® MotoMix® OILOMATIC® 4-MIX ™ BioPlus ™ Easy2Start ™ EasySpool ™ ElastoStart ™ Ematic ™ FixCut ™ IntelliCarb ™ Master Control Lever ™ Micro ™ Pro Mark ™ Quiet Line ™ STIHL M-Tronic ™ 17 Disposal Trademarks Observe all country-specific...
... STIHL's Common Law Trademarks STIHL InjectionTM BF-KM AutoCut® FARM BOSS® iCademy® MAGNUM® MasterWrench Service® MotoMix® OILOMATIC® 4-MIX ™ BioPlus ™ Easy2Start ™ EasySpool ™ ElastoStart ™ Ematic ™ FixCut ™ IntelliCarb ™ Master Control Lever ™ Micro ™ Pro Mark ™ Quiet Line ™ STIHL M-Tronic ™ 17 Disposal Trademarks Observe all country-specific...

Instruction Manual
Page 20
English STIHL OUTFITTERS ™ STIHL PICCO ™ STIHL PolyCut ™ STIHL PowerSweep ™ STIHL Precision Series ™ STIHL RAPID ™ STIHL SuperCut ™ TapAction ™ TrimCut ™ This listing of ANDREAS STIHL AG & Co. KG, Waiblingen is subject to change. Any unauthorized use of these trademarks without the express written consent of trademarks is strictly prohibited. 18 BF-KM
English STIHL OUTFITTERS ™ STIHL PICCO ™ STIHL PolyCut ™ STIHL PowerSweep ™ STIHL Precision Series ™ STIHL RAPID ™ STIHL SuperCut ™ TapAction ™ TrimCut ™ This listing of ANDREAS STIHL AG & Co. KG, Waiblingen is subject to change. Any unauthorized use of these trademarks without the express written consent of trademarks is strictly prohibited. 18 BF-KM


