Primary User Manual
Page 3
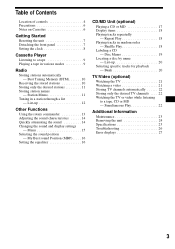
... sound and display settings - Menu 15 Selecting the sound position - Table of Contents Location of controls 4 Precautions 6 Notes on Cassettes 6 Getting Started Resetting the unit 7 Detaching the front panel 7 Setting the clock 8 Cassette Player Listening to a tape, CD or MD - Best Tuning Memory (BTM 10 Receiving the stored stations 10 Storing only the...
... sound and display settings - Menu 15 Selecting the sound position - Table of Contents Location of controls 4 Precautions 6 Notes on Cassettes 6 Getting Started Resetting the unit 7 Detaching the front panel 7 Setting the clock 8 Cassette Player Listening to a tape, CD or MD - Best Tuning Memory (BTM 10 Receiving the stored stations 10 Storing only the...
Primary User Manual
Page 4
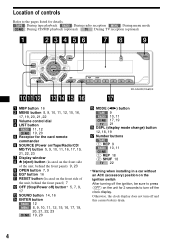
... radio reception MENU : During menu mode CD/MD : During CD/MD playback (optional) TV : During TV reception (optional) XR-CA610X/CA600X a MBP button 16 b MENU button 8, 9, 10, 11, 12, 15, 16, 17, 19, 20, 21, 22...9 RADIO 10, 11 CD/MD (1) REP 18 (2) SHUF 18 TV 22 * Warning when installing in a car without an ACC (accessory) position on the ignition switch After turning off the ignition, be sure to press (OFF... on the unit for 2 seconds to the pages listed for details. Location of the unit, behind the front panel) 9, 23 i OPEN button 7, 9 j EQ7 button 16 k RESET button (located on the front side ...
... radio reception MENU : During menu mode CD/MD : During CD/MD playback (optional) TV : During TV reception (optional) XR-CA610X/CA600X a MBP button 16 b MENU button 8, 9, 10, 11, 12, 15, 16, 17, 19, 20, 21, 22...9 RADIO 10, 11 CD/MD (1) REP 18 (2) SHUF 18 TV 22 * Warning when installing in a car without an ACC (accessory) position on the ignition switch After turning off the ignition, be sure to press (OFF... on the unit for 2 seconds to the pages listed for details. Location of the unit, behind the front panel) 9, 23 i OPEN button 7, 9 j EQ7 button 16 k RESET button (located on the front side ...
Primary User Manual
Page 7
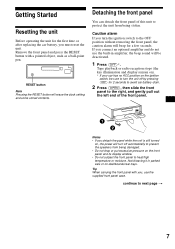
... a pointed object, such as a ball-point pen. Caution alarm If you turn off by pressing (OFF) for 2 seconds to avoid car battery drain. 2 Press (OPEN), then slide the front panel to the right, and gently pull out the left end of this unit to protect the unit from being damaged. • Do... beep for the first time or after replacing the car battery, you detach the panel while the unit is still turned on the front panel and its display window. • Do not subject the front panel to heat/high temperature or moisture. Remove the front panel and press the RESET button with you connect an...
... a pointed object, such as a ball-point pen. Caution alarm If you turn off by pressing (OFF) for 2 seconds to avoid car battery drain. 2 Press (OPEN), then slide the front panel to the right, and gently pull out the left end of this unit to protect the unit from being damaged. • Do... beep for the first time or after replacing the car battery, you detach the panel while the unit is still turned on the front panel and its display window. • Do not subject the front panel to heat/high temperature or moisture. Remove the front panel and press the RESET button with you connect an...

Primary User Manual
Page 8
... set the minute. 2 Press (ENTER). x 1 Press (ENTER). Note Do not put anything on the unit, then lightly push the left side in. Attaching the front panel Place hole A of the front panel onto the spindle B on the inner surface of the front...
... set the minute. 2 Press (ENTER). x 1 Press (ENTER). Note Do not put anything on the unit, then lightly push the left side in. Attaching the front panel Place hole A of the front panel onto the spindle B on the inner surface of the front...
Primary User Manual
Page 9
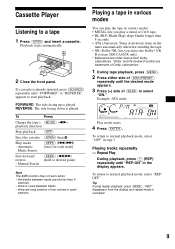
...the desired mode appears. 3 Press (+) side of (SEEK) to normal playback mode, select "REPOFF." Cassette Player Listening to normal playback mode, select "OFF" in step 3. there is played. Playing a ... the tape. • NR (Dolby NR) lets you select the Dolby* NR B system (XR-CA610X only). * Manufacutured under license from the display and repeat mode is canceled. 9 Example: ...starts. 4 Press (ENTER). To return to select "ON." Playback starts automatically. 2 Close the front panel. "Dolby" and the double-D symbol are trademarks of Dolby Laboratories. 1 During tape playback, press (...
...the desired mode appears. 3 Press (+) side of (SEEK) to normal playback mode, select "REPOFF." Cassette Player Listening to normal playback mode, select "OFF" in step 3. there is played. Playing a ... the tape. • NR (Dolby NR) lets you select the Dolby* NR B system (XR-CA610X only). * Manufacutured under license from the display and repeat mode is canceled. 9 Example: ...starts. 4 Press (ENTER). To return to select "ON." Playback starts automatically. 2 Close the front panel. "Dolby" and the double-D symbol are trademarks of Dolby Laboratories. 1 During tape playback, press (...
Primary User Manual
Page 23
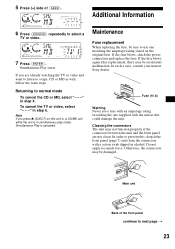
...replacing the fuse, be sure to use a fuse with an amperage rating exceeding the one matching the amperage rating stated on this , detach the front panel (page 7) and clean the connectors with the unit as well, follow the same steps. Note If you are not clean. Do not apply too... much force. Returning to select a TV or video. 7 Press (ENTER). Otherwise, the connectors may be damaged. In such a case, consult your nearest Sony dealer. If you press Z (EJECT) on the original fuse. If the fuse blows, check the power connection and replace the fuse. If the fuse blows...
...replacing the fuse, be sure to use a fuse with an amperage rating exceeding the one matching the amperage rating stated on this , detach the front panel (page 7) and clean the connectors with the unit as well, follow the same steps. Note If you are not clean. Do not apply too... much force. Returning to select a TV or video. 7 Press (ENTER). Otherwise, the connectors may be damaged. In such a case, consult your nearest Sony dealer. If you press Z (EJECT) on the original fuse. If the fuse blows, check the power connection and replace the fuse. If the fuse blows...
Primary User Manual
Page 24
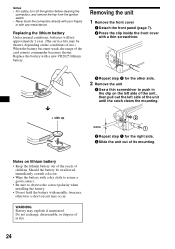
... of children. Do not recharge, disassemble, or dispose of the card remote commander becomes shorter. Removing the unit 1 Remove the front cover 1 Detach the front panel (page 7). 2 Press the clip inside the front cover with any metal device. Replacing the lithium battery Under normal conditions, batteries will last approximately 1 year. (The...
... of children. Do not recharge, disassemble, or dispose of the card remote commander becomes shorter. Removing the unit 1 Remove the front cover 1 Detach the front panel (page 7). 2 Press the clip inside the front cover with any metal device. Replacing the lithium battery Under normal conditions, batteries will last approximately 1 year. (The...
Primary User Manual
Page 25
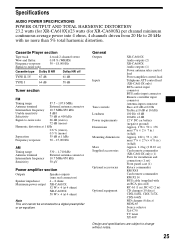
...XR-CA610X)/23 watts (for installation and connections (1 set) Front panel case (1) Rotary commander RM-X4S Card remote commander RM-X114 BUS cable (supplied with no more than 5% total harmonic distortion. Cassette Player section Tape track Wow and flutter Frequency response Signal-to-noise ratio 4-track 2-channel stereo... 0.08 % (WRMS) 30 - 18,000 Hz Cassette type Dolby B NR Dolby NR off TYPE II, IV 67 dB 61 dB TYPE I 64 dB 58 dB Tuner section FM...8 ohms XR-CA610X: 52 W × 4 (at 4 ohms) XR-CA600X: 50 W × 4 (at 16 kHz 100 Hz +8 dB 10 kHz +2 dB 12 V DC car battery (...
...XR-CA610X)/23 watts (for installation and connections (1 set) Front panel case (1) Rotary commander RM-X4S Card remote commander RM-X114 BUS cable (supplied with no more than 5% total harmonic distortion. Cassette Player section Tape track Wow and flutter Frequency response Signal-to-noise ratio 4-track 2-channel stereo... 0.08 % (WRMS) 30 - 18,000 Hz Cassette type Dolby B NR Dolby NR off TYPE II, IV 67 dB 61 dB TYPE I 64 dB 58 dB Tuner section FM...8 ohms XR-CA610X: 52 W × 4 (at 4 ohms) XR-CA600X: 50 W × 4 (at 16 kHz 100 Hz +8 dB 10 kHz +2 dB 12 V DC car battery (...
Primary User Manual
Page 26
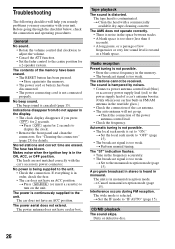
...(SOURCE) (or insert a cassette) to "IF AUTO" (... • Remove the front panel and clean the connectors. t ...fuse. • The car does not have been erased...power supply lead of a car's antenna booster. (Only ...car has built-in FM/AM antenna in the rear/side glass.) • Check the connection of the car... antenna. • The auto antenna will not go up. The power is too weak. The car... Clean the head with the car's accessory power connector. The...cleaning cassette. Interference occurs during FM reception....
...(SOURCE) (or insert a cassette) to "IF AUTO" (... • Remove the front panel and clean the connectors. t ...fuse. • The car does not have been erased...power supply lead of a car's antenna booster. (Only ...car has built-in FM/AM antenna in the rear/side glass.) • Check the connection of the car... antenna. • The auto antenna will not go up. The power is too weak. The car... Clean the head with the car's accessory power connector. The...cleaning cassette. Interference occurs during FM reception....


