
Limited Warranty (U.S. Only)
Page 1
... Limited Warranty period or for your unit. For specific instructions on your product, Visit Sony's Web Site: www.sony.com/service Or call : 1-800-488-SONY (7669) Repair / Replacement Warranty: This Limited Warranty shall apply to the Sony authorized service facility specified. This Limited Warranty is invalid if the factory-applied serial number has been altered or removed from your responsibility to backup any...
... Limited Warranty period or for your unit. For specific instructions on your product, Visit Sony's Web Site: www.sony.com/service Or call : 1-800-488-SONY (7669) Repair / Replacement Warranty: This Limited Warranty shall apply to the Sony authorized service facility specified. This Limited Warranty is invalid if the factory-applied serial number has been altered or removed from your responsibility to backup any...
Installation/Connection
Page 1
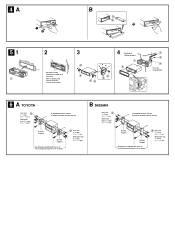
... to the battery. seat railing). • Before making connections, disconnect the ground terminal of an optional power amplifier This connection is only for safety. 3-227-099-11 (1) FM/AM Cassette Car Stereo Installation/Connections Installation/Connexions XR-CA610X XR-CA600X Sony Corporation © 2001 Printed in Thailand 1 1 2 3 4 5 6 7 8 × 4 × 2 Equipment used in illustrations (not supplied) Appareils utilisés dans les illustrations (non fournis) Front speaker Haut-parleur frontal Rear speaker Haut...
... to the battery. seat railing). • Before making connections, disconnect the ground terminal of an optional power amplifier This connection is only for safety. 3-227-099-11 (1) FM/AM Cassette Car Stereo Installation/Connections Installation/Connexions XR-CA610X XR-CA600X Sony Corporation © 2001 Printed in Thailand 1 1 2 3 4 5 6 7 8 × 4 × 2 Equipment used in illustrations (not supplied) Appareils utilisés dans les illustrations (non fournis) Front speaker Haut-parleur frontal Rear speaker Haut...
Installation/Connection
Page 3
... 5 × 8 mm (7/32 × 11/32 in .) Dimension max. 5 × 8 mm (7/32 × 11/32 po.) Bracket Support Bracket Support Existing parts supplied with your car Pièces existantes fournies avec la voiture 5 max. size 5 × 8 mm (7/32 × 11/32 in .) Dimension max. 5 &#... Dimension max. 5 × 8 mm (7/32 × 11/32 po.) to dashboard/center console au tableau de bord/console centrale Bracket Support Bracket Support Existing parts supplied with your car Pièces existantes fournies avec la voiture 5 max. 4A B c 51 1 2 Bend these claws outward for a tight fit, if...
... 5 × 8 mm (7/32 × 11/32 in .) Dimension max. 5 × 8 mm (7/32 × 11/32 po.) Bracket Support Bracket Support Existing parts supplied with your car Pièces existantes fournies avec la voiture 5 max. size 5 × 8 mm (7/32 × 11/32 in .) Dimension max. 5 &#... Dimension max. 5 × 8 mm (7/32 × 11/32 po.) to dashboard/center console au tableau de bord/console centrale Bracket Support Bracket Support Existing parts supplied with your car Pièces existantes fournies avec la voiture 5 max. 4A B c 51 1 2 Bend these claws outward for a tight fit, if...
Primary User Manual
Page 1
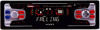
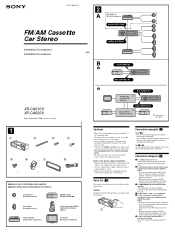
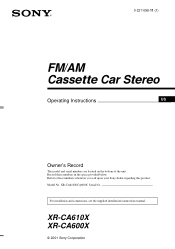
For installation and connections, see the supplied installation/connections manual. Record these numbers whenever you call upon your Sony dealer regarding this product. Refer to these numbers in the space provided below. XR-CA610X/CA600X Serial No. Model No. 3-227-098-11 (1) FM/AM Cassette Car Stereo Operating Instructions US Owner's Record The model and serial numbers are located on the bottom of the unit. XR-CA610X XR-CA600X © 2001 Sony Corporation
For installation and connections, see the supplied installation/connections manual. Record these numbers whenever you call upon your Sony dealer regarding this product. Refer to these numbers in the space provided below. XR-CA610X/CA600X Serial No. Model No. 3-227-098-11 (1) FM/AM Cassette Car Stereo Operating Instructions US Owner's Record The model and serial numbers are located on the bottom of the unit. XR-CA610X XR-CA600X © 2001 Sony Corporation
Primary User Manual
Page 2
... any changes or modifications not expressly approved in accordance with the instructions, may cause harmful interference to radio communications. You can radiate radio frequency energy and, if not installed and used in this manual could void your authority to operate this Sony Cassette Player. Warning This equipment has been tested and found to comply with Sony products only. *2 A CD TEXT disc is an audio CD...
... any changes or modifications not expressly approved in accordance with the instructions, may cause harmful interference to radio communications. You can radiate radio frequency energy and, if not installed and used in this manual could void your authority to operate this Sony Cassette Player. Warning This equipment has been tested and found to comply with Sony products only. *2 A CD TEXT disc is an audio CD...
Primary User Manual
Page 3
... Tuning Memory (BTM 10 Receiving the stored stations 10 Storing only the desired stations 11 Storing station names - Disc Memo 19 Locating a disc by name - Table of Contents Location of controls 4 Precautions 6 Notes on Cassettes 6 Getting Started Resetting the unit 7 Detaching the front panel 7 Setting the clock 8 Cassette Player Listening to a tape, CD or MD - Shuffle Play 18 Labeling a CD - Simultaneous Play 22 Additional Information Maintenance 23 Removing the unit 24 Specifications 25 Troubleshooting 26 Error displays...
... Tuning Memory (BTM 10 Receiving the stored stations 10 Storing only the desired stations 11 Storing station names - Disc Memo 19 Locating a disc by name - Table of Contents Location of controls 4 Precautions 6 Notes on Cassettes 6 Getting Started Resetting the unit 7 Detaching the front panel 7 Setting the clock 8 Cassette Player Listening to a tape, CD or MD - Shuffle Play 18 Labeling a CD - Simultaneous Play 22 Additional Information Maintenance 23 Removing the unit 24 Specifications 25 Troubleshooting 26 Error displays...
Primary User Manual
Page 4
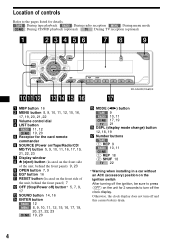
..., 23 g Display window h Z (eject) button (located on the front side of the unit, behind the front panel) 7 l OFF (Stop/Power off) button* 5, 7, 9, 17 m SOUND button 14, 16 n ENTER button RADIO 12 MENU 8, 9, 10, 11, 12, 15, 16, 17, 19, 20, 21, 22, 23 CD/MD 19, 20 o MODE (o) button TAPE 9 RADIO 10, 11 CD/MD 17, 19 TV 21 p DSPL (display mode change) button 12, 18, 19 q Number buttons TAPE (1) REP 9 RADIO 10...
..., 23 g Display window h Z (eject) button (located on the front side of the unit, behind the front panel) 7 l OFF (Stop/Power off) button* 5, 7, 9, 17 m SOUND button 14, 16 n ENTER button RADIO 12 MENU 8, 9, 10, 11, 12, 15, 16, 17, 19, 20, 21, 22, 23 CD/MD 19, 20 o MODE (o) button TAPE 9 RADIO 10, 11 CD/MD 17, 19 TV 21 p DSPL (display mode change) button 12, 18, 19 q Number buttons TAPE (1) REP 9 RADIO 10...
Primary User Manual
Page 5
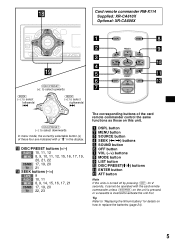
... ENTER ATT The corresponding buttons of these four are indicated with a " M" in the display. SOURCE SOUND OFF DISC - Card remote commander RM-X114 Supplied: XR-CA610X Optional: XR-CA600X DSPL MODE (DISC/PRESET) (+): to select upwards (SEEK) (-): to select leftwards/ . (SEEK) (+): to select rightwards/ > (DISC/PRESET) (-): to select downwards In menu mode, the currently selectable button (s) of the card remote commander control the same functions as those on this unit. a DSPL button b MENU button c SOURCE button d SEEK ( PRESET - + VOL - r DISC/PRESET buttons (+/-) RADIO...
... ENTER ATT The corresponding buttons of these four are indicated with a " M" in the display. SOURCE SOUND OFF DISC - Card remote commander RM-X114 Supplied: XR-CA610X Optional: XR-CA600X DSPL MODE (DISC/PRESET) (+): to select upwards (SEEK) (-): to select leftwards/ . (SEEK) (+): to select rightwards/ > (DISC/PRESET) (-): to select downwards In menu mode, the currently selectable button (s) of the card remote commander control the same functions as those on this unit. a DSPL button b MENU button c SOURCE button d SEEK ( PRESET - + VOL - r DISC/PRESET buttons (+/-) RADIO...
Primary User Manual
Page 6
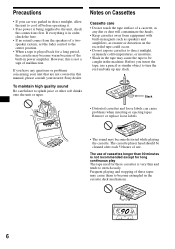
... cassette may become entangled in power amplifier. Before you have any questions or problems concerning your unit that are not covered in the machine. The use . The cassette player head should be caught in this is not a sign of a cassette, as any slack. Slack • Distorted cassettes and loose labels can cause problems when inserting or ejecting tapes. Remove or replace loose labels. • The sound...
... cassette may become entangled in power amplifier. Before you have any questions or problems concerning your unit that are not covered in the machine. The use . The cassette player head should be caught in this is not a sign of a cassette, as any slack. Slack • Distorted cassettes and loose labels can cause problems when inserting or ejecting tapes. Remove or replace loose labels. • The sound...
Primary User Manual
Page 7
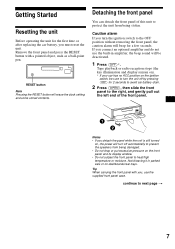
... dashboards/rear trays. Remove the front panel and press the RESET button with you must reset the unit. Tip When carrying the front panel with a pointed object, such as a ball-point pen. Getting Started Resetting the unit Before operating the unit for the first time or after replacing the car battery, you , use the built-in parked cars or on the ignition switch, be deactivated. 1 Press (OFF)*. If you connect...
... dashboards/rear trays. Remove the front panel and press the RESET button with you must reset the unit. Tip When carrying the front panel with a pointed object, such as a ball-point pen. Getting Started Resetting the unit Before operating the unit for the first time or after replacing the car battery, you , use the built-in parked cars or on the ignition switch, be deactivated. 1 Press (OFF)*. If you connect...
Primary User Manual
Page 10
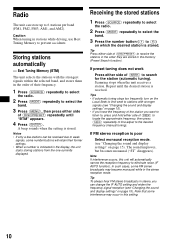
... (see "Changing the sound and display settings" on the Local Seek to limit seek to stations with the strongest signals within the selected band, and stores them in the memory (Preset Search function). Tips • If automatic tuning stops too frequently, turn on page 15). Note If interference occurs, this setting. 10 Caution When tuning in the stereo reception mode. Scanning stops when the unit receives a station. Repeat...
... (see "Changing the sound and display settings" on the Local Seek to limit seek to stations with the strongest signals within the selected band, and stores them in the memory (Preset Search function). Tips • If automatic tuning stops too frequently, turn on page 15). Note If interference occurs, this setting. 10 Caution When tuning in the stereo reception mode. Scanning stops when the unit receives a station. Repeat...
Primary User Manual
Page 11
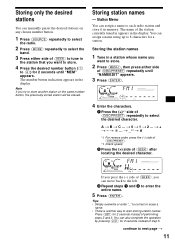
... the operation by pressing (LIST) for 2 seconds instead of (DISC/PRESET) repeatedly to store another way to 8 characters for a station. Storing station names - Storing the station names 1 Tune in a station whose name you want to store. 4 Press the desired number button ((1) to each radio station and store it in the display. t + * t - The number button indication appears in the station that you want to store. 2 Press (MENU), then...
... the operation by pressing (LIST) for 2 seconds instead of (DISC/PRESET) repeatedly to store another way to 8 characters for a station. Storing station names - Storing the station names 1 Tune in a station whose name you want to store. 4 Press the desired number button ((1) to each radio station and store it in the display. t + * t - The number button indication appears in the station that you want to store. 2 Press (MENU), then...
Primary User Manual
Page 13
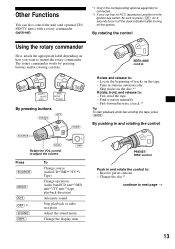
... tape, press (MODE). Receive preset stations. - SOUND MODE DSPL DSPL MODE SOUND By pressing buttons (ATT) (SOUND) (MODE) (SOURCE) OFF (DSPL) Rotate the VOL control to adjust the volume. (OFF) Press (SOURCE) (MODE) (ATT) (OFF)*2 (SOUND) (DSPL) To Change source (radio/CD*1/MD*1/TV*1/ Tape) Change operation (radio band/CD unit*1/MD unit*1/TV unit*1/tape playback direction) Attenuate sound Stop playback or radio reception Adjust the sound menu Change the display item SEEK/AMS control Rotate and release to : - By pushing in and rotating the control PRESET/ DISC control Push in...
... tape, press (MODE). Receive preset stations. - SOUND MODE DSPL DSPL MODE SOUND By pressing buttons (ATT) (SOUND) (MODE) (SOURCE) OFF (DSPL) Rotate the VOL control to adjust the volume. (OFF) Press (SOURCE) (MODE) (ATT) (OFF)*2 (SOUND) (DSPL) To Change source (radio/CD*1/MD*1/TV*1/ Tape) Change operation (radio band/CD unit*1/MD unit*1/TV unit*1/tape playback direction) Attenuate sound Stop playback or radio reception Adjust the sound menu Change the display item SEEK/AMS control Rotate and release to : - By pushing in and rotating the control PRESET/ DISC control Push in...
Primary User Manual
Page 14
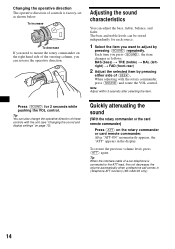
... cable of a car telephone is factory-set as follows: BAS (bass) t TRE (treble) t BAL (leftright) t FAD (front-rear) 2 Adjust the selected item by pressing (SOUND) repeatedly. Each time you can adjust the bass, treble, balance, and fader. Note Adjust within 3 seconds after selecting the item. After "ATT-ON" momentarily appears, the "ATT" appears in (Telephone ATT function) (XR-CA610X only). 14 To restore the previous volume level, press (ATT) again. The bass and treble levels can also change the operative direction...
... cable of a car telephone is factory-set as follows: BAS (bass) t TRE (treble) t BAL (leftright) t FAD (front-rear) 2 Adjust the selected item by pressing (SOUND) repeatedly. Each time you can adjust the bass, treble, balance, and fader. Note Adjust within 3 seconds after selecting the item. After "ATT-ON" momentarily appears, the "ATT" appears in (Telephone ATT function) (XR-CA610X only). 14 To restore the previous volume level, press (ATT) again. The bass and treble levels can also change the operative direction...
Primary User Manual
Page 15
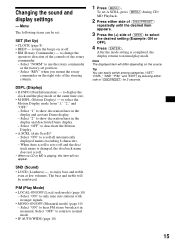
... treble even at the same time (on the source. Select "1" to select the desired setting (Example: ON or OFF). 4 Press (ENTER). SND (Sound) • LOUD (Loudness) - Select "ON" to change the operative direction of the controls of (DISC/PRESET) for 2 seconds. 15 To set to off . • RM (Rotary Commander) - After the mode setting is playing, this item will not appear. Menu The following items can easily switch among categories ("SET...
... treble even at the same time (on the source. Select "1" to select the desired setting (Example: ON or OFF). 4 Press (ENTER). SND (Sound) • LOUD (Loudness) - Select "ON" to change the operative direction of the controls of (DISC/PRESET) for 2 seconds. 15 To set to off . • RM (Rotary Commander) - After the mode setting is playing, this item will not appear. Menu The following items can easily switch among categories ("SET...
Primary User Manual
Page 16
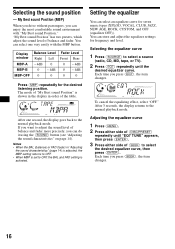
... two presets, which adjust the sound level of (DISC/PRESET) repeatedly until the desired equalizer curve. Setting the equalizer You can select an equalizer curve for frequency and level. You can select one second, the display goes back to select the desired equalizer curve, then press (ENTER). You can store and adjust the equalizer settings for seven music types (XPLOD, VOCAL, CLUB, JAZZ, NEW AGE, ROCK, CUSTOM, and OFF (equalizer OFF)). The mode of...
... two presets, which adjust the sound level of (DISC/PRESET) repeatedly until the desired equalizer curve. Setting the equalizer You can select an equalizer curve for frequency and level. You can select one second, the display goes back to select the desired equalizer curve, then press (ENTER). You can store and adjust the equalizer settings for seven music types (XPLOD, VOCAL, CLUB, JAZZ, NEW AGE, ROCK, CUSTOM, and OFF (equalizer OFF)). The mode of...

Primary User Manual
Page 17
... the factory-set equalizer curve, press (ENTER) for each track] (SEEK) (m/M) [hold to desired point] 17 Playing a CD or MD 1 Press (SOURCE) repeatedly to +10 dB. 4 Select the desired frequency and level. 1 Press either side of (SEEK) to select the desired frequency. Each time you play a CD TEXT disc. If you connect an optional CD unit with the CD TEXT function and the custom file function, the...
... the factory-set equalizer curve, press (ENTER) for each track] (SEEK) (m/M) [hold to desired point] 17 Playing a CD or MD 1 Press (SOURCE) repeatedly to +10 dB. 4 Select the desired frequency and level. 1 Press either side of (SEEK) to select the desired frequency. Each time you play a CD TEXT disc. If you connect an optional CD unit with the CD TEXT function and the custom file function, the...
Primary User Manual
Page 24
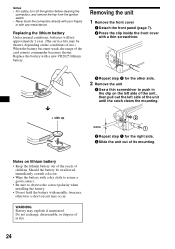
... before cleaning the connectors, and remove the key from the ignition switch. • Never touch the connectors directly with your fingers or with a thin screwdriver. Removing the unit 1 Remove the front cover 1 Detach the front panel (page 7). 2 Press the clip inside the front cover with any metal device. Replacing the lithium battery Under normal conditions, batteries will last approximately 1 year. (The service life may...
... before cleaning the connectors, and remove the key from the ignition switch. • Never touch the connectors directly with your fingers or with a thin screwdriver. Removing the unit 1 Remove the front cover 1 Detach the front panel (page 7). 2 Press the clip inside the front cover with any metal device. Replacing the lithium battery Under normal conditions, batteries will last approximately 1 year. (The service life may...
Primary User Manual
Page 25
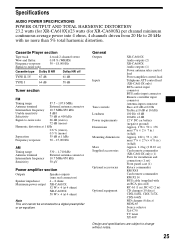
... accessories Optional equipment XR-CA610X: Audio outputs (2) XR-CA600X: Audio outputs (1) Power antenna relay control lead Power amplifier control lead Telephone ATT control lead (XR-CA610X only) BUS control input connector BUS audio input connector Remote controller input connector Antenna input connector Bass ±10 dB at 62 Hz Treble ±10 dB at 4 ohms) Note This unit cannot be connected to 20 kHz with an RCA pin cord) RC-61 (1 m), RC-62 (2 m) CD changer (10 discs) CDX-848X, CDX-747X, CDX-646X MD changer (6 discs) MDX-65 Source selector XA-C30 TV tuner XT-40V...
... accessories Optional equipment XR-CA610X: Audio outputs (2) XR-CA600X: Audio outputs (1) Power antenna relay control lead Power amplifier control lead Telephone ATT control lead (XR-CA610X only) BUS control input connector BUS audio input connector Remote controller input connector Antenna input connector Bass ±10 dB at 62 Hz Treble ±10 dB at 4 ohms) Note This unit cannot be connected to 20 kHz with an RCA pin cord) RC-61 (1 m), RC-62 (2 m) CD changer (10 discs) CDX-848X, CDX-747X, CDX-646X MD changer (6 discs) MDX-65 Source selector XA-C30 TV tuner XT-40V...
Primary User Manual
Page 26
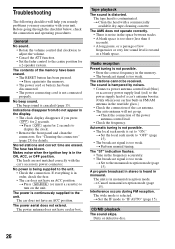
... connection. The sound is in monaural reception mode. No power is set to turn on the unit. The tape head is in the rear/side glass.) • Check the connection of the memory have an ACC position. The stations cannot be received. Indications disappear from/do not appear in the display. • The clock display disappears if you may encounter with your car has built-in FM/AM antenna...
... connection. The sound is in monaural reception mode. No power is set to turn on the unit. The tape head is in the rear/side glass.) • Check the connection of the memory have an ACC position. The stations cannot be received. Indications disappear from/do not appear in the display. • The clock display disappears if you may encounter with your car has built-in FM/AM antenna...


