Operating Instructions
Page 5
...characteristics 48 Optimizing sound for the listening position - RBE 49 Adjusting the speaker volume 50 Monitor Adjustment Adjusting the monitor angle (XNV-770BT only 50 Touch panel calibration 50 Setting the background screen 51 Selecting the picture quality - Intelligent Time Alignment 48 Precisely calibrating... 58 Setting the security code 60 Setting the clock 60 Using Optional Equipment Auxiliary audio/video equipment 61 Rear view camera 61 Rear view camera settings 62 continue to next page t 5 ZAPPIN 36 Using Gesture Command 37 Handsfree Calling and Audio Streaming -...
...characteristics 48 Optimizing sound for the listening position - RBE 49 Adjusting the speaker volume 50 Monitor Adjustment Adjusting the monitor angle (XNV-770BT only 50 Touch panel calibration 50 Setting the background screen 51 Selecting the picture quality - Intelligent Time Alignment 48 Precisely calibrating... 58 Setting the security code 60 Setting the clock 60 Using Optional Equipment Auxiliary audio/video equipment 61 Rear view camera 61 Rear view camera settings 62 continue to next page t 5 ZAPPIN 36 Using Gesture Command 37 Handsfree Calling and Audio Streaming -...
Operating Instructions
Page 7
... foreign object into the unit while functioning, as it may cause injury or damage to the unit. - Park your safety, even if the rear view camera is automatically switched to chemicals, such as insecticide, hair spray, insect repellent, etc. - If the car starts moving during video playback, the picture is connected...
... foreign object into the unit while functioning, as it may cause injury or damage to the unit. - Park your safety, even if the rear view camera is automatically switched to chemicals, such as insecticide, hair spray, insect repellent, etc. - If the car starts moving during video playback, the picture is connected...
Operating Instructions
Page 51
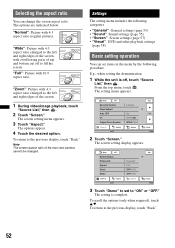
...," then . 2 Touch "Screen." To return to adjust their levels. The setting display appears. of the following options. Note The picture quality of the rear view camera cannot be adjusted. 51
...," then . 2 Touch "Screen." To return to adjust their levels. The setting display appears. of the following options. Note The picture quality of the rear view camera cannot be adjusted. 51
Operating Instructions
Page 52
... aspect ratio You can set to "ON" or "OFF." "Wide": Picture with 4:3 aspect ratio enlarged to the left and right edges of the rear view camera cannot be changed. Settings The setting menu includes the following procedure. The options are indicated below.
... aspect ratio You can set to "ON" or "OFF." "Wide": Picture with 4:3 aspect ratio enlarged to the left and right edges of the rear view camera cannot be changed. Settings The setting menu includes the following procedure. The options are indicated below.
Operating Instructions
Page 54
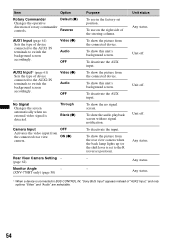
...(page 61) Sets the type of "AUX2 Input," and only options "Video" and "Audio" are selectable. 54 Rear View Camera Setting - (page 62) Monitor Angle - (XNV-770BT only) (page 50) Purpose To use on the right side of the steering column. To show this unit's background screen.... is connected to BUS CONTROL IN, "Sony BUS Input" appears instead of device connected to the AUX1 IN terminals to switch the background screen accordingly. Unit off . Through Blank (z) Camera Input OFF Activates the video input from the rear view camera when the back lamp lights up (or...
...(page 61) Sets the type of "AUX2 Input," and only options "Video" and "Audio" are selectable. 54 Rear View Camera Setting - (page 62) Monitor Angle - (XNV-770BT only) (page 50) Purpose To use on the right side of the steering column. To show this unit's background screen.... is connected to BUS CONTROL IN, "Sony BUS Input" appears instead of device connected to the AUX1 IN terminals to switch the background screen accordingly. Unit off . Through Blank (z) Camera Input OFF Activates the video input from the rear view camera when the back lamp lights up (or...

Operating Instructions
Page 61
...device before playback. To return to scroll, then "AUX1 Input" or "AUX2 Input." 3 Touch "Audio" or "Video." The picture from a rear view camera does not appear in the rear monitor. Adjusting the volume level Be sure to the R (reverse) position). If not, touch "General." 2 Touch v/V ...to the previous display, touch "Back." To deactivate the AUX input, select "OFF." Tip Even if a rear view camera is connected, you can set to adjust the volume for each connected device, the background screen can connect up your usual listening volume on the...
...device before playback. To return to scroll, then "AUX1 Input" or "AUX2 Input." 3 Touch "Audio" or "Video." The picture from a rear view camera does not appear in the rear monitor. Adjusting the volume level Be sure to the R (reverse) position). If not, touch "General." 2 Touch v/V ...to the previous display, touch "Back." To deactivate the AUX input, select "OFF." Tip Even if a rear view camera is connected, you can set to adjust the volume for each connected device, the background screen can connect up your usual listening volume on the...
Operating Instructions
Page 62
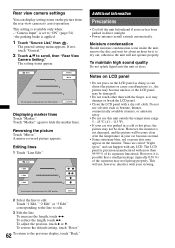
... the LCD panel. • Clean the LCD panel with the finger, as doing so can display setting items on the picture from the rear view camera to "ON" (page 54). - Do not use solvents such as benzine, thinner, commercially available cleaners, or antistatic spray. • Do not use this...LCD panel • Do not press on the LCD panel as it to edit. Touch "Marker" again to edit. 3 Edit the line. Rear view camera settings You can distort the picture or cause a malfunction (i.e., the picture may become clear after the temperature in your car becomes normal. • Some stationary...
... the LCD panel. • Clean the LCD panel with the finger, as doing so can display setting items on the picture from the rear view camera to "ON" (page 54). - Do not use solvents such as benzine, thinner, commercially available cleaners, or antistatic spray. • Do not use this...LCD panel • Do not press on the LCD panel as it to edit. Touch "Marker" again to edit. 3 Edit the line. Rear view camera settings You can distort the picture or cause a malfunction (i.e., the picture may become clear after the temperature in your car becomes normal. • Some stationary...
Operating Instructions
Page 67
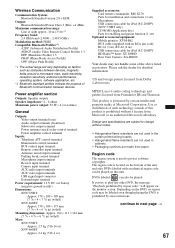
... pin cord): RC-61 (1 m), RC-62 (2 m) USB connection cable for iPod: RC-200IPV HD Radio™ tuner: XT-100HD Rear View Camera: XA-R800C Your dealer may be played on this product is protected by region code." Design and specifications are subject to play any other DVD... 4 3/8 × 6 1/2 in the certain printed wiring boards. • Halogenated flame retardants are not used to next page t 67 Please ask the dealer for enabling navigation function (1 set ) Microphone USB connection cable for iPod: RC-200IPV (XNV-770BT only) CD-ROM (Application disc) Parts for detailed information.
... pin cord): RC-61 (1 m), RC-62 (2 m) USB connection cable for iPod: RC-200IPV HD Radio™ tuner: XT-100HD Rear View Camera: XA-R800C Your dealer may be played on this product is protected by region code." Design and specifications are subject to play any other DVD... 4 3/8 × 6 1/2 in the certain printed wiring boards. • Halogenated flame retardants are not used to next page t 67 Please ask the dealer for enabling navigation function (1 set ) Microphone USB connection cable for iPod: RC-200IPV (XNV-770BT only) CD-ROM (Application disc) Parts for detailed information.
Operating Instructions
Page 69
... cracks. • A connection has not been made correctly. • Check the connection to the connected equipment, and set the input selector of the rear view camera is incorrect. t Set the color system to "PAL" or "NTSC" according to this unit. • Defective or dirty disc. • Installation is not correct...is not applied. RDS PTY displays "None." • The current station is not correct. t No picture appears in a sturdy part of the rear view camera is not 40 to "ON" (page 19). Automatic tuning is not possible. • Setting of the car. • The MP3 file sampling rate ...
... cracks. • A connection has not been made correctly. • Check the connection to the connected equipment, and set the input selector of the rear view camera is incorrect. t Set the color system to "PAL" or "NTSC" according to this unit. • Defective or dirty disc. • Installation is not correct...is not applied. RDS PTY displays "None." • The current station is not correct. t No picture appears in a sturdy part of the rear view camera is not 40 to "ON" (page 19). Automatic tuning is not possible. • Setting of the car. • The MP3 file sampling rate ...
Operating Instructions
Page 75
...) 58 Program Types (PTY) 24, 25 R Radio Data System (RDS) 24 Rear Bass Enhancer (RBE) 49, 56 Rear view camera 61 Rear view camera input (Camera Input) 54 Rear view camera settings (Rear View Camera Setting) 62 Receive menu (Receive Menu) 19 Repeat play (Repeat) 27, 29, 35 Reset 16 Resume play 22 Ring tone...
...) 58 Program Types (PTY) 24, 25 R Radio Data System (RDS) 24 Rear Bass Enhancer (RBE) 49, 56 Rear view camera 61 Rear view camera input (Camera Input) 54 Rear view camera settings (Rear View Camera Setting) 62 Receive menu (Receive Menu) 19 Repeat play (Repeat) 27, 29, 35 Reset 16 Resume play 22 Ring tone...


