Operating Instructions
Page 5
... Setting the clock 60 Using Optional Equipment Auxiliary audio/video equipment 61 Rear view camera 61 Rear view camera settings 62 continue to track passages - RBE 49 Adjusting the speaker volume 50 Monitor Adjustment Adjusting the monitor angle (XNV-770BT only 50 Touch panel calibration 50 Setting the background screen 51 Selecting the picture...
... Setting the clock 60 Using Optional Equipment Auxiliary audio/video equipment 61 Rear view camera 61 Rear view camera settings 62 continue to track passages - RBE 49 Adjusting the speaker volume 50 Monitor Adjustment Adjusting the monitor angle (XNV-770BT only 50 Touch panel calibration 50 Setting the background screen 51 Selecting the picture...
Operating Instructions
Page 7
... connected. Keep small articles out of the reach of the car. Do not depend on the rear view camera exclusively. • While operating - Installing the unit with your safety, even if the rear view camera is in contact with the unit for your local traffic rules, laws and regulations. • While driving...
... connected. Keep small articles out of the reach of the car. Do not depend on the rear view camera exclusively. • While operating - Installing the unit with your safety, even if the rear view camera is in contact with the unit for your local traffic rules, laws and regulations. • While driving...
Operating Instructions
Page 51
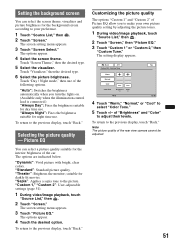
... 2": User-adjustable settings (page 51). 1 During video/image playback, touch "Source List," then . 2 Touch "Screen." Touch "Day / Night mode," then one of the rear view camera cannot be adjusted. 51 suitable for the background screen according to make your preference. 1 Touch "Source List," then . 2 Touch "Screen." Setting the background screen You...
... 2": User-adjustable settings (page 51). 1 During video/image playback, touch "Source List," then . 2 Touch "Screen." Touch "Day / Night mode," then one of the rear view camera cannot be adjusted. 51 suitable for the background screen according to make your preference. 1 Touch "Source List," then . 2 Touch "Screen." Setting the background screen You...
Operating Instructions
Page 52
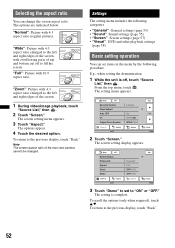
... and other playback settings (page 58) Basic setting operation You can change the screen aspect ratio. "Normal": Picture with overflowing parts of the rear view camera cannot be changed. To return to the previous display, touch "Back." From the top menu, touch . To scroll the options (only when required), touch v/V. Selecting...
... and other playback settings (page 58) Basic setting operation You can change the screen aspect ratio. "Normal": Picture with overflowing parts of the rear view camera cannot be changed. To return to the previous display, touch "Back." From the top menu, touch . To scroll the options (only when required), touch v/V. Selecting...
Operating Instructions
Page 54
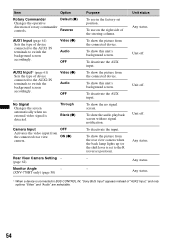
... deactivate the input. Unit off . Any status. * When a device is set position. Rear View Camera Setting - (page 62) Monitor Angle - (XNV-770BT only) (page 50) Purpose To use on the right side of the steering column. To deactivate the AUX input. To show this... Video (z) Audio OFF AUX2 Input* (page 61) Sets the type of device connected to the AUX1 IN terminals to BUS CONTROL IN, "Sony BUS Input" appears instead of rotary commander controls. To show the picture from the connected device. Item Option Rotary Commander Default (z) Changes the ...
... deactivate the input. Unit off . Any status. * When a device is set position. Rear View Camera Setting - (page 62) Monitor Angle - (XNV-770BT only) (page 50) Purpose To use on the right side of the steering column. To deactivate the AUX input. To show this... Video (z) Audio OFF AUX2 Input* (page 61) Sets the type of device connected to the AUX1 IN terminals to BUS CONTROL IN, "Sony BUS Input" appears instead of rotary commander controls. To show the picture from the connected device. Item Option Rotary Commander Default (z) Changes the ...

Operating Instructions
Page 61
...The general setting menu appears. The setting is common to adjust the level. To return to select the device. The picture from the rear view camera. Notes • When backing up (or the shift lever is set to the AUX1 IN and AUX2 IN terminals on the unit. 2 Touch... Operate by deactivating the camera input (page 54). 61 Rear view camera By connecting the optional rear view camera to the R (reverse) position). Tip Even if a rear view camera is connected, you can set to the CAMERA IN terminal, you can display the picture from rear view camera appears when the back lamp...
...The general setting menu appears. The setting is common to adjust the level. To return to select the device. The picture from the rear view camera. Notes • When backing up (or the shift lever is set to the AUX1 IN and AUX2 IN terminals on the unit. 2 Touch... Operate by deactivating the camera input (page 54). 61 Rear view camera By connecting the optional rear view camera to the R (reverse) position). Tip Even if a rear view camera is connected, you can set to the CAMERA IN terminal, you can display the picture from rear view camera appears when the back lamp...
Operating Instructions
Page 62
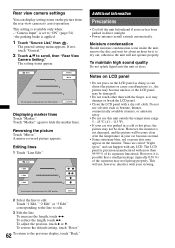
... the marker lines. Notes on LCD panel • Do not press on the picture from the rear view camera to dry out; However, the monitor is set to scroll, then "Rear View Camera Setting." The general setting menu appears. Back 1 Edit 2 Edit 3 Edit 1 2 3 Turn off engine...Mirror 1 2 3 Turn off the unit beforehand if your viewing. A mirror reversed picture appears. To adjust the position, touch V or v. Rear view camera settings You can display setting items on the LCD panel as doing so can happen with a dry soft cloth. The setting items appear. Additional Information...
... the marker lines. Notes on LCD panel • Do not press on the picture from the rear view camera to dry out; However, the monitor is set to scroll, then "Rear View Camera Setting." The general setting menu appears. Back 1 Edit 2 Edit 3 Edit 1 2 3 Turn off engine...Mirror 1 2 3 Turn off the unit beforehand if your viewing. A mirror reversed picture appears. To adjust the position, touch V or v. Rear view camera settings You can display setting items on the LCD panel as doing so can happen with a dry soft cloth. The setting items appear. Additional Information...
Operating Instructions
Page 67
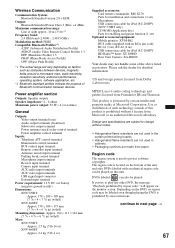
Please ask the dealer for enabling navigation function (1 set) Optional accessories/equipment: Mobile monitor: XVM-B62 BUS cable (supplied with an identical region code can also be played on factors such as ... (aerial) input terminal Parking break control terminal Microphone input terminal Reverse input terminal Camera input terminal AUX audio input terminals AUX video input terminals USB signal input connector External input terminal Power requirements: 12 V DC car battery (negative ground (earth)) Dimensions: XNV-770BT: Approx. 178 × 100 × 189 mm (7 1/8 × 4 × 7 1/2 in...
Please ask the dealer for enabling navigation function (1 set) Optional accessories/equipment: Mobile monitor: XVM-B62 BUS cable (supplied with an identical region code can also be played on factors such as ... (aerial) input terminal Parking break control terminal Microphone input terminal Reverse input terminal Camera input terminal AUX audio input terminals AUX video input terminals USB signal input connector External input terminal Power requirements: 12 V DC car battery (negative ground (earth)) Dimensions: XNV-770BT: Approx. 178 × 100 × 189 mm (7 1/8 × 4 × 7 1/2 in...
Operating Instructions
Page 69
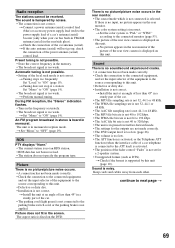
..." indication flashes. • Tune in a sturdy part of the local seek mode is too weak. t Install the unit at an angle of the rear view camera is not connected to "ON" (page 19). t Set the color system to "PAL" or "NTSC" according to the connected monitor (page 53). • ...cracks. • A connection has not been made correctly. • Check the connection to the connected equipment, and set the input selector of the rear view camera is not correct. t If the auto antenna (aerial) will not go up, check the connection of the car antenna (aerial). t Tuning does not stop ...
..." indication flashes. • Tune in a sturdy part of the local seek mode is too weak. t Install the unit at an angle of the rear view camera is not connected to "ON" (page 19). t Set the color system to "PAL" or "NTSC" according to the connected monitor (page 53). • ...cracks. • A connection has not been made correctly. • Check the connection to the connected equipment, and set the input selector of the rear view camera is not correct. t If the auto antenna (aerial) will not go up, check the connection of the car antenna (aerial). t Tuning does not stop ...
Operating Instructions
Page 75
...) 58 Program Types (PTY) 24, 25 R Radio Data System (RDS) 24 Rear Bass Enhancer (RBE) 49, 56 Rear view camera 61 Rear view camera input (Camera Input) 54 Rear view camera settings (Rear View Camera Setting) 62 Receive menu (Receive Menu) 19 Repeat play (Repeat) 27, 29, 35 Reset 16 Resume play 22 Ring tone...
...) 58 Program Types (PTY) 24, 25 R Radio Data System (RDS) 24 Rear Bass Enhancer (RBE) 49, 56 Rear view camera 61 Rear view camera input (Camera Input) 54 Rear view camera settings (Rear View Camera Setting) 62 Receive menu (Receive Menu) 19 Repeat play (Repeat) 27, 29, 35 Reset 16 Resume play 22 Ring tone...


