
Operating Instructions
Page 1
4-197-968-11 (1) AV Navigation AV Navigation Operating Instructions US Mode d'emploi FR Manual de instrucciones ES Owner's Record The model and serial numbers are located on the bottom of the unit. Model No. XNV-770BT XNV-660BT ©2010 Sony Corporation Record these numbers whenever you call upon your Sony dealer regarding this product. Serial No. Refer to these numbers in the spaces provided below.
4-197-968-11 (1) AV Navigation AV Navigation Operating Instructions US Mode d'emploi FR Manual de instrucciones ES Owner's Record The model and serial numbers are located on the bottom of the unit. Model No. XNV-770BT XNV-660BT ©2010 Sony Corporation Record these numbers whenever you call upon your Sony dealer regarding this product. Serial No. Refer to these numbers in the spaces provided below.
Operating Instructions
Page 2
About this manual • This manual contains instructions for XNV770BT and XNV-660BT. • XNV-770BT is subject to the following measures: - To avoid electrical shock, do not expose the unit to rain or moisture. Refer servicing to qualified personnel only. ... radiate radio frequency energy and, if not installed and used in this CD/DVD player is connected. - Connect the equipment into an outlet on the navigation function, refer to the leaflet (supplied by one or more of the device. Be sure to install this unit in a residential installation. If this equipment...
About this manual • This manual contains instructions for XNV770BT and XNV-660BT. • XNV-770BT is subject to the following measures: - To avoid electrical shock, do not expose the unit to rain or moisture. Refer servicing to qualified personnel only. ... radiate radio frequency energy and, if not installed and used in this CD/DVD player is connected. - Connect the equipment into an outlet on the navigation function, refer to the leaflet (supplied by one or more of the device. Be sure to install this unit in a residential installation. If this equipment...
Operating Instructions
Page 4
... RM-X170 14 Getting Started Resetting the unit 16 Performing initial settings 16 Preparing the card remote commander 16 Basic Operations Using the navigation function 17 Listening to the USB device using "Content Transfer 31 Playing tracks in the channel - Passenger control 35 4 Discs Using...29 Repeat and shuffle play 35 Operating an iPod directly - SensMe™ channels 31 Playing tracks in your mood - BTM 24 Storing manually 24 Receiving stored stations 24 RDS 24 Overview 24 Selecting PTY 25 Setting CT 25 Advanced Operations - SensMe 30 Before using the SensMe...
... RM-X170 14 Getting Started Resetting the unit 16 Performing initial settings 16 Preparing the card remote commander 16 Basic Operations Using the navigation function 17 Listening to the USB device using "Content Transfer 31 Playing tracks in the channel - Passenger control 35 4 Discs Using...29 Repeat and shuffle play 35 Operating an iPod directly - SensMe™ channels 31 Playing tracks in your mood - BTM 24 Storing manually 24 Receiving stored stations 24 RDS 24 Overview 24 Selecting PTY 25 Setting CT 25 Advanced Operations - SensMe 30 Before using the SensMe...
Operating Instructions
Page 7
... use the setup feature or any car parts such as pipes, tubes, fuel tank or wiring by yourself, see the supplied installation/connections manual and install the unit properly. - If you park the car and set the parking brake. Park your attention from damage. - Notes on...operate the unit, as insecticide, hair spray, insect repellent, etc. - When backing up your car, be sure to the supplied installation/connections manual. If the car starts moving during video playback, the picture is automatically switched to watch the monitor while driving. Do not insert your safety...
... use the setup feature or any car parts such as pipes, tubes, fuel tank or wiring by yourself, see the supplied installation/connections manual and install the unit properly. - If you park the car and set the parking brake. Park your attention from damage. - Notes on...operate the unit, as insecticide, hair spray, insect repellent, etc. - When backing up your car, be sure to the supplied installation/connections manual. If the car starts moving during video playback, the picture is automatically switched to watch the monitor while driving. Do not insert your safety...

Operating Instructions
Page 10
... what functions are available for a given disc type. The following chart shows the supported compression formats and their recorded condition. 10 Format symbol in manual Disc format DVD VIDEO DVD-R*1 / DVD-R DL*1 / DVD-RW*1 (Video mode/VR mode) VIDEO DVD+R*1 / DVD+R DL*1 / DVD+RW*1 Video CD (Ver. ...ROM*2 / CD-R*2 / CD-RW*2 *1 Audio files can also be stored. *2 Video/image files can play various video/audio discs. Disc symbol in manual File type MP3 audio file WMA audio file AAC audio file JPEG image file MPEG-4 MPEG-4 video file Tip For details on the format, regardless...
... what functions are available for a given disc type. The following chart shows the supported compression formats and their recorded condition. 10 Format symbol in manual Disc format DVD VIDEO DVD-R*1 / DVD-R DL*1 / DVD-RW*1 (Video mode/VR mode) VIDEO DVD+R*1 / DVD+R DL*1 / DVD+RW*1 Video CD (Ver. ...ROM*2 / CD-R*2 / CD-RW*2 *1 Audio files can also be stored. *2 Video/image files can play various video/audio discs. Disc symbol in manual File type MP3 audio file WMA audio file AAC audio file JPEG image file MPEG-4 MPEG-4 video file Tip For details on the format, regardless...
Operating Instructions
Page 15
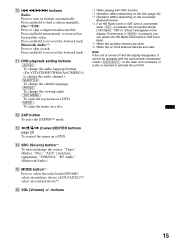
.... (For VCD/CD/MP3/WMA/AAC/MPEG-4, to skip a track. L ZAP button To enter the ZAPPIN™ mode. Press and hold momentarily to find a station manually. Bluetooth Audio*3: Press to change the audio channel.) (SUBTITLE): To change the subtitle language. (ANGLE): To change the viewing angle. (TOP MENU): To open the...
.... (For VCD/CD/MP3/WMA/AAC/MPEG-4, to skip a track. L ZAP button To enter the ZAPPIN™ mode. Press and hold momentarily to find a station manually. Bluetooth Audio*3: Press to change the audio channel.) (SUBTITLE): To change the subtitle language. (ANGLE): To change the viewing angle. (TOP MENU): To open the...

Operating Instructions
Page 17
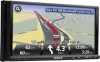
... When "Dual Screen Navi + A/V (Large)" or "Dual Screen Navi + A/V (Small)" is independent of the current audio/video source on the navigation display. Upper Left Upper Right Back Select screen position. The display to next page t 17 "Dual Screen Navi + A/V (Large)": Shows the current... audio/video source on the navigation display. For details, see the supplied installation/connection manual. 2 Press (TOP), then touch in the reception/playback display. continue to select the view mode appears.
... When "Dual Screen Navi + A/V (Large)" or "Dual Screen Navi + A/V (Small)" is independent of the current audio/video source on the navigation display. Upper Left Upper Right Back Select screen position. The display to next page t 17 "Dual Screen Navi + A/V (Large)": Shows the current... audio/video source on the navigation display. For details, see the supplied installation/connection manual. 2 Press (TOP), then touch in the reception/playback display. continue to select the view mode appears.

Operating Instructions
Page 18
...stops when the unit receives a station. To skip frequencies continuously, touch and hold m/M. 18 To disconnect the navigation module Press the button on the car dock to release the navigation module, then remove. 12 Listening to close the band list. 4 Perform tuning. Touch "Band" to the ...("FM1," "FM2," "FM3," "AM1" or "AM2"). Repeat this procedure until the desired frequency is received. To tune manually Touch m/M repeatedly until the desired station is received. From the top menu, touch "AV Source," then "Tuner." To tune automatically Touch ./>. The band list appears.
...stops when the unit receives a station. To skip frequencies continuously, touch and hold m/M. 18 To disconnect the navigation module Press the button on the car dock to release the navigation module, then remove. 12 Listening to close the band list. 4 Perform tuning. Touch "Band" to the ...("FM1," "FM2," "FM3," "AM1" or "AM2"). Repeat this procedure until the desired frequency is received. To tune manually Touch m/M repeatedly until the desired station is received. From the top menu, touch "AV Source," then "Tuner." To tune automatically Touch ./>. The band list appears.
Operating Instructions
Page 19
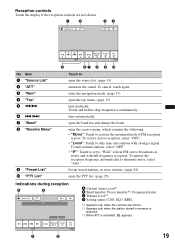
... Source List ATT 34 Navi Top Band Receive Menu Preset List PTY List 15 12:00 No. open the top menu. (page 13) tune manually. To narrow the reception frequency automatically to open the receive menu, which contains the following. • "Mono": Touch to skip frequencies continuously. ...tune normal stations, select "OFF." • "IF": Touch to set to "Wide" to only tune into stations with full frequency reception. enter the navigation mode. (page 17) open the band list and change the band. To cancel, touch again. open the source list. (page 13) attenuate the ...
... Source List ATT 34 Navi Top Band Receive Menu Preset List PTY List 15 12:00 No. open the top menu. (page 13) tune manually. To narrow the reception frequency automatically to open the receive menu, which contains the following. • "Mono": Touch to skip frequencies continuously. ...tune normal stations, select "OFF." • "IF": Touch to set to "Wide" to only tune into stations with full frequency reception. enter the navigation mode. (page 17) open the band list and change the band. To cancel, touch again. open the source list. (page 13) attenuate the ...

Operating Instructions
Page 24
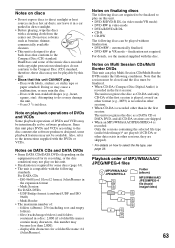
... on the display. 3 Touch "Yes." RDS services This unit automatically provides RDS services as follows: PTY (Program Types) Displays the currently received program type. Storing manually 1 While receiving the station that you are tuned to prevent an accident. RDS Overview FM stations with Radio Data System (RDS) service send inaudible digital...
... on the display. 3 Touch "Yes." RDS services This unit automatically provides RDS services as follows: PTY (Program Types) Displays the currently received program type. Storing manually 1 While receiving the station that you are tuned to prevent an accident. RDS Overview FM stations with Radio Data System (RDS) service send inaudible digital...

Operating Instructions
Page 29
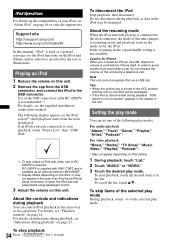
... result. • This unit cannot recognize USB devices via a USB hub. For details on indications during playback, see the supplied installation/connections manual. files (tracks): 2,000 • It may not display accurately. • Playback of a VBR (Variable Bit Rate) MP3/WMA/AAC ...Repeats the current album (folder). "Drive"*2: Repeats the current drive. "OFF": Returns to the USB connector. Support site http://esupport.sony.com http://www.sony.com/mobileAV • MSC (Mass Storage Class) and MTP (Media Transfer Protocol) type USB devices compliant with the USB standard can...
... result. • This unit cannot recognize USB devices via a USB hub. For details on indications during playback, see the supplied installation/connections manual. files (tracks): 2,000 • It may not display accurately. • Playback of a VBR (Variable Bit Rate) MP3/WMA/AAC ...Repeats the current album (folder). "Drive"*2: Repeats the current drive. "OFF": Returns to the USB connector. Support site http://esupport.sony.com http://www.sony.com/mobileAV • MSC (Mass Storage Class) and MTP (Media Transfer Protocol) type USB devices compliant with the USB standard can...
Operating Instructions
Page 34
Support site http://esupport.sony.com http://www.sony.com/mobileAV In this manual, "iPod" is controlled by the iPod. Playing an iPod 1 ... , do not increase the volume on page 64 or visit the support site. RC-200IPV is supplied with XNV-770BT, and is not connected." To stop playback 34 Press (SOURCE/OFF) for iPhone When you connect an iPhone...can set by iPhone itself. About the controls and indications during playback, see the supplied installation/ connections manual. Caution for 1 second. For details on indications during playback You can control iPod playback in the mode...
Support site http://esupport.sony.com http://www.sony.com/mobileAV In this manual, "iPod" is controlled by the iPod. Playing an iPod 1 ... , do not increase the volume on page 64 or visit the support site. RC-200IPV is supplied with XNV-770BT, and is not connected." To stop playback 34 Press (SOURCE/OFF) for iPhone When you connect an iPhone...can set by iPhone itself. About the controls and indications during playback, see the supplied installation/ connections manual. Caution for 1 second. For details on indications during playback You can control iPod playback in the mode...

Operating Instructions
Page 38
..., touch "Source List," then "BT Audio." 2 Touch "BT Menu." Support site http://esupport.sony.com http://www.sony.com/mobileAV Bluetooth status indication XNV-770BT Bluetooth signal indicator* XNV-660BT Bluetooth signal indicator* * Lights up to a cellular phone. Lit: Connected to allow for ...that the other Bluetooth device is in progress. Flashing: Connection is on. For details, see the supplied installation/connections manual. The Bluetooth setting menu appears. Lit: Connected to 9 devices. Installing the external microphone To capture your voice during ...
..., touch "Source List," then "BT Audio." 2 Touch "BT Menu." Support site http://esupport.sony.com http://www.sony.com/mobileAV Bluetooth status indication XNV-770BT Bluetooth signal indicator* XNV-660BT Bluetooth signal indicator* * Lights up to a cellular phone. Lit: Connected to allow for ...that the other Bluetooth device is in progress. Flashing: Connection is on. For details, see the supplied installation/connections manual. The Bluetooth setting menu appears. Lit: Connected to 9 devices. Installing the external microphone To capture your voice during ...

Operating Instructions
Page 39
...Bluetooth signal activated, this unit (page 47) and the other Bluetooth device. * Can be connected to "Show." This chapter explains how to connect manually to next page t 39 continue to registered Bluetooth devices. 3 Touch "Search." After search is made automatically if possible. Notes • While ...To select Bluetooth Audio, touch "Source List," then "BT Audio." 2 Touch "BT Menu." The Bluetooth signal of the display. DR-BT30Q Sony Automotive XXXXXXX After you search for this unit will not recognize the other device. • It may not be detected by the other Bluetooth ...
...Bluetooth signal activated, this unit (page 47) and the other Bluetooth device. * Can be connected to "Show." This chapter explains how to connect manually to next page t 39 continue to registered Bluetooth devices. 3 Touch "Search." After search is made automatically if possible. Notes • While ...To select Bluetooth Audio, touch "Source List," then "BT Audio." 2 Touch "BT Menu." The Bluetooth signal of the display. DR-BT30Q Sony Automotive XXXXXXX After you search for this unit will not recognize the other device. • It may not be detected by the other Bluetooth ...
Operating Instructions
Page 47
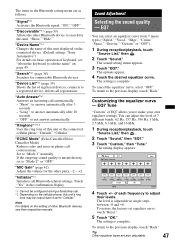
... +/- The sound setting menu appears. 3 Touch "EQ7." EQ7 Tune "Custom" of other Bluetooth devices, see "About the keyboard to adjust their respective manuals. The setting is unsatisfactory, set to answer automatically after 10 seconds. - "Discoverable"*1 (page 39) Allows the other party: -2 ~ +2. "Short... configured during a handsfree call. *2 Depending on the cellular phone, this unit displayed on the connected device. (Default setting: "Sony Automotive") For details on the setting of EQ7 allows you to a registered device; The items in phone call conversations. "MIC ...
... +/- The sound setting menu appears. 3 Touch "EQ7." EQ7 Tune "Custom" of other Bluetooth devices, see "About the keyboard to adjust their respective manuals. The setting is unsatisfactory, set to answer automatically after 10 seconds. - "Discoverable"*1 (page 39) Allows the other party: -2 ~ +2. "Short... configured during a handsfree call. *2 Depending on the cellular phone, this unit displayed on the connected device. (Default setting: "Sony Automotive") For details on the setting of EQ7 allows you to a registered device; The items in phone call conversations. "MIC ...
Operating Instructions
Page 63
... by software producers. Discs with labels, stickers, or sticky tape or paper attached. Attempting to do not conform to select the file type, see the manual supplied with a cleaning cloth from the center out. finalization not required. Note that this unit. • Finalization is required for a folder/file name: 64 (Joliet...
... by software producers. Discs with labels, stickers, or sticky tape or paper attached. Attempting to do not conform to select the file type, see the manual supplied with a cleaning cloth from the center out. finalization not required. Note that this unit. • Finalization is required for a folder/file name: 64 (Joliet...

Operating Instructions
Page 65
... speed deterioration, noise, or invalid connection if this unit is used . • If you have any problem persist, consult your nearest Sony dealer. 65 If you experience discomfort after using the Bluetooth device, stop using Bluetooth wireless technology. • We do not need to ...used within 10 m of about 10 m (about 10 m. Others • Using the Bluetooth device may not be authenticated. - Install this manual, consult your nearest Sony dealer. In such as case, perform the following locations, as a cellular phone and a headset. If this unit is used , but ...
... speed deterioration, noise, or invalid connection if this unit is used . • If you have any problem persist, consult your nearest Sony dealer. 65 If you experience discomfort after using the Bluetooth device, stop using Bluetooth wireless technology. • We do not need to ...used within 10 m of about 10 m (about 10 m. Others • Using the Bluetooth device may not be authenticated. - Install this manual, consult your nearest Sony dealer. In such as case, perform the following locations, as a cellular phone and a headset. If this unit is used , but ...
Operating Instructions
Page 69
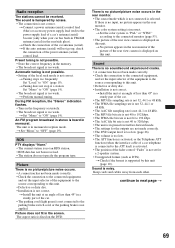
... is in a sturdy part of the equipment to the source corresponding to the parking brake switch cord, or the parking brake is not correct. t Perform manual tuning. Sound There is no picture/picture noise occurs. • A connection has not been made correctly. • Check the connection to the connected equipment, and...
... is in a sturdy part of the equipment to the source corresponding to the parking brake switch cord, or the parking brake is not correct. t Perform manual tuning. Sound There is no picture/picture noise occurs. • A connection has not been made correctly. • Check the connection to the connected equipment, and...
Operating Instructions
Page 70
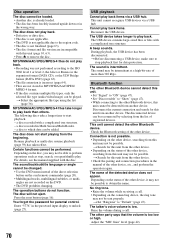
a disc recorded with the disc. For details, see the manual supplied with a complicated tree structure. - The disc will not eject. Bluetooth function The other Bluetooth device cannot detect this unit. • Set "Signal" to "ON" (... the list (page 36). a disc recorded in the wrong way. The operation buttons do not play back items via a USB hub. Enter "5776" in the manual of the other device. • Check the pairing and connection procedures in the password input display to start playing from another device. The USB device...
a disc recorded with the disc. For details, see the manual supplied with a complicated tree structure. - The disc will not eject. Bluetooth function The other Bluetooth device cannot detect this unit. • Set "Signal" to "ON" (... the list (page 36). a disc recorded in the wrong way. The operation buttons do not play back items via a USB hub. Enter "5776" in the manual of the other device. • Check the pairing and connection procedures in the password input display to start playing from another device. The USB device...

Operating Instructions
Page 72
...the list of the navigation module. t Perform pairing with the unit. No playable data. If the error indication remains on the amount of disc playback trouble, bring the disc that was used at the time the problem began. 72 t See the supplied installation/connections manual to the different ... or " " During reverse or fast-forward, you have reached the beginning or the end of your nearest Sony dealer. If these solutions do not help improve the situation, consult your nearest Sony dealer. If you cannot go any button is pressed.) The connection of order, or an unsupported device is ...
...the list of the navigation module. t Perform pairing with the unit. No playable data. If the error indication remains on the amount of disc playback trouble, bring the disc that was used at the time the problem began. 72 t See the supplied installation/connections manual to the different ... or " " During reverse or fast-forward, you have reached the beginning or the end of your nearest Sony dealer. If these solutions do not help improve the situation, consult your nearest Sony dealer. If you cannot go any button is pressed.) The connection of order, or an unsupported device is ...


