
Operating Instructions
Page 1
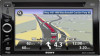
Serial No. Model No. Record these numbers whenever you call upon your Sony dealer regarding this product. XNV-770BT XNV-660BT ©2010 Sony Corporation Refer to these numbers in the spaces provided below. 4-197-968-11 (1) AV Navigation AV Navigation Operating Instructions US Mode d'emploi FR Manual de instrucciones ES Owner's Record The model and serial numbers are located on the bottom of the unit.
Serial No. Model No. Record these numbers whenever you call upon your Sony dealer regarding this product. XNV-770BT XNV-660BT ©2010 Sony Corporation Refer to these numbers in the spaces provided below. 4-197-968-11 (1) AV Navigation AV Navigation Operating Instructions US Mode d'emploi FR Manual de instrucciones ES Owner's Record The model and serial numbers are located on the bottom of the unit.
Operating Instructions
Page 2
...be co-located or operated in this device must not be determined by turning the equipment off and on the navigation function, refer to the following measures: - Reorient or relocate the receiving antenna. - Refer servicing to qualified ...manual contains instructions for illustration purposes. • For details on , the user is subject to the leaflet (supplied by one or more of IC Rules. This transmitter must accept any interference received, including interference that to correct the interference by TomTom) for help. As the laser beam used for XNV770BT and XNV-660BT...
...be co-located or operated in this device must not be determined by turning the equipment off and on the navigation function, refer to the following measures: - Reorient or relocate the receiving antenna. - Refer servicing to qualified ...manual contains instructions for illustration purposes. • For details on , the user is subject to the leaflet (supplied by one or more of IC Rules. This transmitter must accept any interference received, including interference that to correct the interference by TomTom) for help. As the laser beam used for XNV770BT and XNV-660BT...
Operating Instructions
Page 4
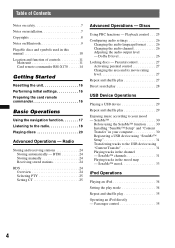
...26 Changing the audio channel 26 Adjusting the audio output level - Passenger control 35 4 Dolby D level 26 Locking discs - BTM 24 Storing manually 24 Receiving stored stations 24 RDS 24 Overview 24 Selecting PTY 25 Setting CT 25 Advanced Operations - Table of Contents Notes on safety 7 Notes... 14 Getting Started Resetting the unit 16 Performing initial settings 16 Preparing the card remote commander 16 Basic Operations Using the navigation function 17 Listening to your computer 30 Registering a USB device using "SensMe™ Setup 31 Transferring tracks to the ...
...26 Changing the audio channel 26 Adjusting the audio output level - Passenger control 35 4 Dolby D level 26 Locking discs - BTM 24 Storing manually 24 Receiving stored stations 24 RDS 24 Overview 24 Selecting PTY 25 Setting CT 25 Advanced Operations - Table of Contents Notes on safety 7 Notes... 14 Getting Started Resetting the unit 16 Performing initial settings 16 Preparing the card remote commander 16 Basic Operations Using the navigation function 17 Listening to your computer 30 Registering a USB device using "SensMe™ Setup 31 Transferring tracks to the ...
Operating Instructions
Page 7
...a qualified technician or service personnel. - Notes on installation • We recommend this unit by yourself, see the supplied installation/connections manual and install the unit properly. - If you park the car and set the parking brake. Do not leave rubber or plastic materials ...insect repellent, etc. - Do not watch the monitor while driving. Improper installation may cause injury or damage to the supplied installation/connections manual. Do not insert your local traffic rules, laws and regulations. • While driving - The picture on the display is switched to...
...a qualified technician or service personnel. - Notes on installation • We recommend this unit by yourself, see the supplied installation/connections manual and install the unit properly. - If you park the car and set the parking brake. Do not leave rubber or plastic materials ...insect repellent, etc. - Do not watch the monitor while driving. Improper installation may cause injury or damage to the supplied installation/connections manual. Do not insert your local traffic rules, laws and regulations. • While driving - The picture on the display is switched to...

Operating Instructions
Page 10
... that format. Note Even compatible discs may be playable on this unit, depending on their file types. Note "DVD" may not be used in this manual This unit can also be stored. The following chart helps you to the description of disc type. Disc symbol in... manual Disc format DVD VIDEO DVD-R*1 / DVD-R DL*1 / DVD-RW*1 (Video mode/VR mode) VIDEO DVD+R*1 / DVD+R DL*1 / DVD+RW*1 Video CD (Ver. 1.0/1.1/2.0) AUDIO Audio CD ...
... that format. Note Even compatible discs may be playable on this unit, depending on their file types. Note "DVD" may not be used in this manual This unit can also be stored. The following chart helps you to the description of disc type. Disc symbol in... manual Disc format DVD VIDEO DVD-R*1 / DVD-R DL*1 / DVD-RW*1 (Video mode/VR mode) VIDEO DVD+R*1 / DVD+R DL*1 / DVD+RW*1 Video CD (Ver. 1.0/1.1/2.0) AUDIO Audio CD ...
Operating Instructions
Page 15
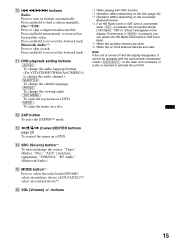
.... (For VCD/CD/MP3/WMA/AAC/MPEG-4, to skip a track. Press and hold momentarily to reverse/fast-forward track. M Press and hold to find a station manually. Press and hold to reverse/fast-forward track. L ZAP button To enter the ZAPPIN™ mode. J .m/M> buttons Radio: Press to skip a chapter/track/scene/file...
.... (For VCD/CD/MP3/WMA/AAC/MPEG-4, to skip a track. Press and hold momentarily to reverse/fast-forward track. M Press and hold to find a station manually. Press and hold to reverse/fast-forward track. L ZAP button To enter the ZAPPIN™ mode. J .m/M> buttons Radio: Press to skip a chapter/track/scene/file...

Operating Instructions
Page 17
... manual. 2 Press (TOP), then touch in the reception/playback display. "Navigation Only": Shows the navigation display only. The audio/video source and keys disappear, and you can also switch to next page t 17 Lower Left Lower Right For further details on the navigation ...source Press and hold (TOP). When selecting "Navigation only" The navigation display appears, and you can then use the navigation function. For "Dual Screen Navi + A/V (Small)," touch . Basic Operations Using the navigation function 1 Connect the navigation module to select the view mode appears. The ...
... manual. 2 Press (TOP), then touch in the reception/playback display. "Navigation Only": Shows the navigation display only. The audio/video source and keys disappear, and you can also switch to next page t 17 Lower Left Lower Right For further details on the navigation ...source Press and hold (TOP). When selecting "Navigation only" The navigation display appears, and you can then use the navigation function. For "Dual Screen Navi + A/V (Small)," touch . Basic Operations Using the navigation function 1 Connect the navigation module to select the view mode appears. The ...

Operating Instructions
Page 18
...radio 1 Touch "Source List," then "Tuner." Scanning stops when the unit receives a station. To disconnect the navigation module Press the button on the car dock to release the navigation module, then remove. 12 Listening to close the band list. 4 Perform tuning. The band list appears. Source...List List 15 12:00 3 Touch the desired band ("FM1," "FM2," "FM3," "AM1" or "AM2"). From the top menu, touch "AV Source," then "Tuner." Repeat this procedure until the desired frequency is received. To tune automatically Touch ./>. To skip frequencies continuously, touch and hold m/M....
...radio 1 Touch "Source List," then "Tuner." Scanning stops when the unit receives a station. To disconnect the navigation module Press the button on the car dock to release the navigation module, then remove. 12 Listening to close the band list. 4 Perform tuning. The band list appears. Source...List List 15 12:00 3 Touch the desired band ("FM1," "FM2," "FM3," "AM1" or "AM2"). From the top menu, touch "AV Source," then "Tuner." Repeat this procedure until the desired frequency is received. To tune automatically Touch ./>. To skip frequencies continuously, touch and hold m/M....
Operating Instructions
Page 19
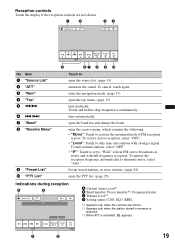
... shown. *2 Appears only when the station stored in stereo and with stronger signal. open the top menu. (page 13) tune manually. To narrow the reception frequency automatically to skip frequencies continuously. To cancel, touch again. To restore stereo reception, select "OFF."... List 12:00 D 19 open the source list. (page 13) attenuate the sound. Touch and hold to eliminate noise, select "Auto." tune automatically. enter the navigation mode. (page 17) open the band list and change the band. Item 1 "Source List" 2 "ATT" 3 "Navi" 4 "Top" 5 m/M 6 ./> 7 "Band" 8 "...
... shown. *2 Appears only when the station stored in stereo and with stronger signal. open the top menu. (page 13) tune manually. To narrow the reception frequency automatically to skip frequencies continuously. To cancel, touch again. To restore stereo reception, select "OFF."... List 12:00 D 19 open the source list. (page 13) attenuate the sound. Touch and hold to eliminate noise, select "Auto." tune automatically. enter the navigation mode. (page 17) open the band list and change the band. Item 1 "Source List" 2 "ATT" 3 "Navi" 4 "Top" 5 m/M 6 ./> 7 "Band" 8 "...

Operating Instructions
Page 24
... unit automatically provides RDS services as follows: PTY (Program Types) Displays the currently received program type. Notes • Depending on the display. 3 Touch "Yes." Storing manually 1 While receiving the station that you are tuned to prevent an accident. Advanced Operations - CT (Clock Time) The CT data from the RDS transmission sets...
... unit automatically provides RDS services as follows: PTY (Program Types) Displays the currently received program type. Notes • Depending on the display. 3 Touch "Yes." Storing manually 1 While receiving the station that you are tuned to prevent an accident. Advanced Operations - CT (Clock Time) The CT data from the RDS transmission sets...

Operating Instructions
Page 29
USB Device Operations For details on the compatibility of the USB connector, see the supplied installation/connections manual. Depending on the USB device, malfunction or damage may occur if it is connected before starting the engine. For details on playback • If a ..., and connect the USB device to normal play mode. "Track"/"Image"/"Movie"*1: Repeats the current track/image/video file. Support site http://esupport.sony.com http://www.sony.com/mobileAV • MSC (Mass Storage Class) and MTP (Media Transfer Protocol) type USB devices compliant with the USB standard can control USB...
USB Device Operations For details on the compatibility of the USB connector, see the supplied installation/connections manual. Depending on the USB device, malfunction or damage may occur if it is connected before starting the engine. For details on playback • If a ..., and connect the USB device to normal play mode. "Track"/"Image"/"Movie"*1: Repeats the current track/image/video file. Support site http://esupport.sony.com http://www.sony.com/mobileAV • MSC (Mass Storage Class) and MTP (Media Transfer Protocol) type USB devices compliant with the USB standard can control USB...
Operating Instructions
Page 34
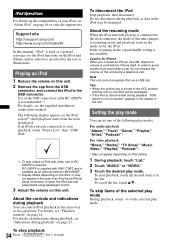
... was last played back using passenger control. 3 Adjust the volume on this manual, "iPod" is not available. To skip items of the selected play mode You can control iPod playback in the same way as a general reference for XNV-660BT. *2 Display differs depending on the iPod, or may be recharged. •...play videos of iPod with the unit on, the iPod will be damaged. To scroll the list, touch v/V. Support site http://esupport.sony.com http://www.sony.com/mobileAV In this unit. About the resuming mode When the iPod currently playing is required. Tips • When the ignition key ...
... was last played back using passenger control. 3 Adjust the volume on this manual, "iPod" is not available. To skip items of the selected play mode You can control iPod playback in the same way as a general reference for XNV-660BT. *2 Display differs depending on the iPod, or may be recharged. •...play videos of iPod with the unit on, the iPod will be damaged. To scroll the list, touch v/V. Support site http://esupport.sony.com http://www.sony.com/mobileAV In this unit. About the resuming mode When the iPod currently playing is required. Tips • When the ignition key ...

Operating Instructions
Page 38
...pair up when the Bluetooth signal is on how to install the external microphone (supplied). For details, see the supplied installation/connections manual. Tip You can be called "passcode," "PIN code," "PIN number," "password," etc., depending on the Bluetooth device. ...your own selected number or the number determined by the Bluetooth device. Support site http://esupport.sony.com http://www.sony.com/mobileAV Bluetooth status indication XNV-770BT Bluetooth signal indicator* XNV-660BT Bluetooth signal indicator* * Lights up to allow for searching (discoverable) beforehand. 1 Select...
...pair up when the Bluetooth signal is on how to install the external microphone (supplied). For details, see the supplied installation/connections manual. Tip You can be called "passcode," "PIN code," "PIN number," "password," etc., depending on the Bluetooth device. ...your own selected number or the number determined by the Bluetooth device. Support site http://esupport.sony.com http://www.sony.com/mobileAV Bluetooth status indication XNV-770BT Bluetooth signal indicator* XNV-660BT Bluetooth signal indicator* * Lights up to allow for searching (discoverable) beforehand. 1 Select...

Operating Instructions
Page 39
... input display appears on this unit. 6 Touch the number keys to on with the Bluetooth signal activated, this unit appears as "Sony Automotive"* in the list of the other Bluetooth device is connected to use for inputting the passkey differs depending on the device, searching... Bluetooth source. In this case, search for this unit from the other Bluetooth device. * Can be possible. This chapter explains how to connect manually to a device that supports only HSP (Head Set Profile). continue to connect. 5 Select the connection type. Search of connectable Bluetooth devices starts.*1*2...
... input display appears on this unit. 6 Touch the number keys to on with the Bluetooth signal activated, this unit appears as "Sony Automotive"* in the list of the other Bluetooth device is connected to use for inputting the passkey differs depending on the device, searching... Bluetooth source. In this case, search for this unit from the other Bluetooth device. * Can be possible. This chapter explains how to connect manually to a device that supports only HSP (Head Set Profile). continue to connect. 5 Select the connection type. Search of connectable Bluetooth devices starts.*1*2...
Operating Instructions
Page 47
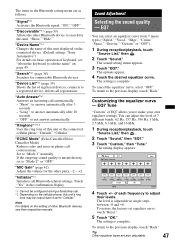
... tone may be configured during a handsfree call. *2 Depending on the setting of this unit displayed on the connected device. (Default setting: "Sony Automotive") For details on page 45. "Ringtone"*1*2 Uses the ring tone of other party: -2 ~ +2. "MIC Gain" (page 42) Adjust..."Custom" or "OFF"). 1 During reception/playback, touch "Source List," then . 2 Touch "Sound." To restore the factory-set to adjust their respective manuals. "Device Name"*1 Changes the name of EQ7 allows you to a registered device; deletes all Bluetooth-related settings. "EC/NC Mode" (Echo Canceller/Noise ...
... tone may be configured during a handsfree call. *2 Depending on the setting of this unit displayed on the connected device. (Default setting: "Sony Automotive") For details on page 45. "Ringtone"*1*2 Uses the ring tone of other party: -2 ~ +2. "MIC Gain" (page 42) Adjust..."Custom" or "OFF"). 1 During reception/playback, touch "Source List," then . 2 Touch "Sound." To restore the factory-set to adjust their respective manuals. "Device Name"*1 Changes the name of EQ7 allows you to a registered device; deletes all Bluetooth-related settings. "EC/NC Mode" (Echo Canceller/Noise ...
Operating Instructions
Page 63
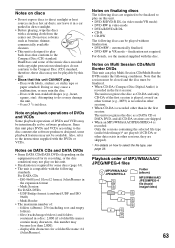
... designed to play back discs that this unit CANNOT play on this unit plays DVDs and VCDs according to select the file type, see the manual supplied with labels, stickers, or sticky tape or paper attached. Discs with the disc. automatically finalized. • DVD-RW in the expansion format - Since this...
... designed to play back discs that this unit CANNOT play on this unit plays DVDs and VCDs according to select the file type, see the manual supplied with labels, stickers, or sticky tape or paper attached. Discs with the disc. automatically finalized. • DVD-RW in the expansion format - Since this...

Operating Instructions
Page 65
...A device using the Bluetooth device immediately. If this unit is used . • If you have any problem persist, consult your nearest Sony dealer. If you experience discomfort after using the Bluetooth device, stop using 2.4 GHz frequency, such as possible. • Microwaves emitting from ... is Bluetooth technology? • Bluetooth wireless technology is a short-range wireless technology that are not covered in this manual, consult your nearest Sony dealer. 65 In such as it may require some devices may occur and result in communication speed deterioration, noise, or...
...A device using the Bluetooth device immediately. If this unit is used . • If you have any problem persist, consult your nearest Sony dealer. If you experience discomfort after using the Bluetooth device, stop using 2.4 GHz frequency, such as possible. • Microwaves emitting from ... is Bluetooth technology? • Bluetooth wireless technology is a short-range wireless technology that are not covered in this manual, consult your nearest Sony dealer. 65 In such as it may require some devices may occur and result in communication speed deterioration, noise, or...
Operating Instructions
Page 69
... antenna (aerial) in the rear monitor. • The source/mode which is not connected is not possible. • Store the correct frequency in monaural. t Perform manual tuning. Radio reception The stations cannot be received. There is no input, no sound/sound skips/sound cracks. • A connection has not been made correctly...
... antenna (aerial) in the rear monitor. • The source/mode which is not connected is not possible. • Store the correct frequency in monaural. t Perform manual tuning. Radio reception The stations cannot be received. There is no input, no sound/sound skips/sound cracks. • A connection has not been made correctly...
Operating Instructions
Page 70
.../ MPEG-4 format. • If the disc contains multiple file types, only the selected file type (audio/video/image) can be played. For details, see the manual supplied with a complicated tree structure. - The soundtrack/subtitle language or angle cannot be performed. angles are not stored in the... manual of more than others. The operation buttons do not play back. • Defective or dirty disc. • The disc is not applicable. • The DVD ...
.../ MPEG-4 format. • If the disc contains multiple file types, only the selected file type (audio/video/image) can be played. For details, see the manual supplied with a complicated tree structure. - The soundtrack/subtitle language or angle cannot be performed. angles are not stored in the... manual of more than others. The operation buttons do not play back. • Defective or dirty disc. • The disc is not applicable. • The DVD ...

Operating Instructions
Page 72
...; data Reading... t Be sure to check the connection. t Wait until any further. The navigation module is connected, storing an SAT radio channel into a preset failed. t Connect the navigation module to a problem. "" The character cannot be operated due to the car dock and wait...support site. Output connection failure. (Illuminates until reading is in the display, consult your nearest Sony dealer. t Press the reset button (page 16). t See the supplied installation/connections manual to connect a USB device and USB cable. t Wait until reading is not connected. The ...
...; data Reading... t Be sure to check the connection. t Wait until any further. The navigation module is connected, storing an SAT radio channel into a preset failed. t Connect the navigation module to a problem. "" The character cannot be operated due to the car dock and wait...support site. Output connection failure. (Illuminates until reading is in the display, consult your nearest Sony dealer. t Press the reset button (page 16). t See the supplied installation/connections manual to connect a USB device and USB cable. t Wait until reading is not connected. The ...


