Reference Guide
Page 2
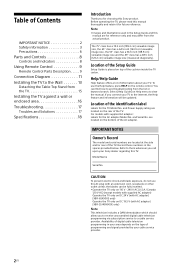
...XBR-65X900E only) Operate the TV only on DC 19.5 V (with an extension cord, receptacle or other outlet unless the blades can find how to and troubleshooting from the list or keyword search. For models with supplied AC adapter: Labels for future reference. Before operating the TV, please read this Sony... 9 Remote Control Parts Description . . . . . 9 Connection Diagram 11 Installing the TV to the Wall 13 Detaching the Table-Top Stand from the TV 15 Installing the TV against a wall or enclosed area 16 Troubleshooting 17 Troubles and Solutions 17 Specifications 18 Introduction ...
...XBR-65X900E only) Operate the TV only on DC 19.5 V (with an extension cord, receptacle or other outlet unless the blades can find how to and troubleshooting from the list or keyword search. For models with supplied AC adapter: Labels for future reference. Before operating the TV, please read this Sony... 9 Remote Control Parts Description . . . . . 9 Connection Diagram 11 Installing the TV to the Wall 13 Detaching the Table-Top Stand from the TV 15 Installing the TV against a wall or enclosed area 16 Troubleshooting 17 Troubles and Solutions 17 Specifications 18 Introduction ...
Reference Guide
Page 3
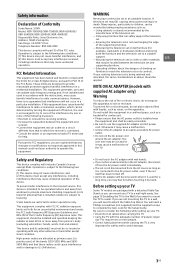
... the AC adapter. If this device is used in an unstable location. This equipment complies with a detached Table-Top Stand so you are restricted to children, can safely support the television set. Ensuring the television set is not ...15 of the TV. • Do not touch the AC adapter with any interference, including interference that interference will need to complete the task. priority users) of Conformity Trade Name: SONY Model: XBR-75X900E/XBR-75X850E/XBR-65X900E/ XBR-65X850E/XBR-55X900E/XBR-49X900E Responsible Party: Sony Electronics Inc. Look...
... the AC adapter. If this device is used in an unstable location. This equipment complies with a detached Table-Top Stand so you are restricted to children, can safely support the television set. Ensuring the television set is not ...15 of the TV. • Do not touch the AC adapter with any interference, including interference that interference will need to complete the task. priority users) of Conformity Trade Name: SONY Model: XBR-75X900E/XBR-75X850E/XBR-65X900E/ XBR-65X850E/XBR-55X900E/XBR-49X900E Responsible Party: Sony Electronics Inc. Look...

Reference Guide
Page 4
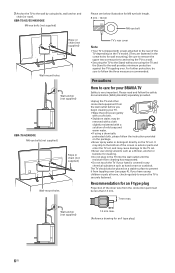
... to secure the Stand. XBR-75/65/55/49X900E XBR-75/65/55/49X900E XBR-75/65X850E XBR-75/65X850E • Ensure your TV to evaporate completely before powering the TV on : slippery, unstable and/or uneven surfaces. furniture that the TV's Table-Top Stand does not protrude... out from Toppling • Secure the TV to a wall and/or Stand. • Do not allow moisture to a Stand (not supplied). 1 Secure the Stand for the TV. Securing the TV Sony strongly recommends taking measures to a warm area. Preventing the TV from the Stand...
... to secure the Stand. XBR-75/65/55/49X900E XBR-75/65/55/49X900E XBR-75/65X850E XBR-75/65X850E • Ensure your TV to evaporate completely before powering the TV on : slippery, unstable and/or uneven surfaces. furniture that the TV's Table-Top Stand does not protrude... out from Toppling • Secure the TV to a wall and/or Stand. • Do not allow moisture to a Stand (not supplied). 1 Secure the Stand for the TV. Securing the TV Sony strongly recommends taking measures to a warm area. Preventing the TV from the Stand...
Reference Guide
Page 5
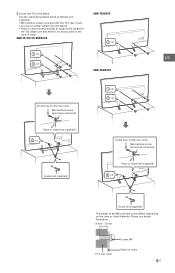
...XBR-75X850E XBR-65X850E US Screw hole on the rear cover M6 machine screw (previously removed) Rope or chain (not supplied) 22 Screw (not supplied) Screw hole on the rope or chain diameter. Please see below illustration. 8 mm - 12 mm Screw M6 TV's rear cover Rope or chain 5US 2 Secure the TV...(not supplied) The length of the TV). Use the optional hardware listed as follows (not supplied): • M6 machine screws (screwed into the TV's rear cover). • A screw or similar (attach it to the Stand). • Rope or chain (strong enough to the Stand. Make sure that there is no ...
...XBR-75X850E XBR-65X850E US Screw hole on the rear cover M6 machine screw (previously removed) Rope or chain (not supplied) 22 Screw (not supplied) Screw hole on the rope or chain diameter. Please see below illustration. 8 mm - 12 mm Screw M6 TV's rear cover Rope or chain 5US 2 Secure the TV...(not supplied) The length of the TV). Use the optional hardware listed as follows (not supplied): • M6 machine screws (screwed into the TV's rear cover). • A screw or similar (attach it to the Stand). • Rope or chain (strong enough to the Stand. Make sure that there is no ...
Reference Guide
Page 6
...8226; Securing the TV to the Stand without securing the TV and the Stand to the wall provides minimum protection against the TV toppling over (see below illustration for an F type plug) 6US Unplug the TV and other connected equipment from toppling over . The TV should also be less than 1.5 mm. 7 mm max. XBR-75/65/55/49X900E... drawing for M6 eye bolt length. 8 mm - 12 mm M6 eye bolt Rope or chain (not supplied) Wall-mount holes Wall-anchor (not supplied) XBR-75/65X850E M6 eye bolts (not supplied) Rope or chain (not supplied) Wall-mount holes TV's rear cover Note • Your...
...8226; Securing the TV to the Stand without securing the TV and the Stand to the wall provides minimum protection against the TV toppling over (see below illustration for an F type plug) 6US Unplug the TV and other connected equipment from toppling over . The TV should also be less than 1.5 mm. 7 mm max. XBR-75/65/55/49X900E... drawing for M6 eye bolt length. 8 mm - 12 mm M6 eye bolt Rope or chain (not supplied) Wall-mount holes Wall-anchor (not supplied) XBR-75/65X850E M6 eye bolts (not supplied) Rope or chain (not supplied) Wall-mount holes TV's rear cover Note • Your...

Reference Guide
Page 13
... wall. Keep the screws away from the TV). US For product protection and safety reasons, Sony strongly recommends that installation of the box as packaged. Installing the TV to the Wall This TV's instruction manual only shows the steps on ...preparing the installation of the TV before making cable connections. Prepare the TV for Wall-Mount Bracket differs depending on the Wall-Mount Bracket thickness. If the Table-Top Stand...
... wall. Keep the screws away from the TV). US For product protection and safety reasons, Sony strongly recommends that installation of the box as packaged. Installing the TV to the Wall This TV's instruction manual only shows the steps on ...preparing the installation of the TV before making cable connections. Prepare the TV for Wall-Mount Bracket differs depending on the Wall-Mount Bracket thickness. If the Table-Top Stand...
Reference Guide
Page 15
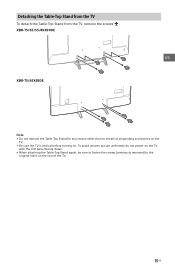
Detaching the Table-Top Stand from the TV To detach the Table-Top Stand from the TV, remove the screws . To avoid uneven picture uniformity do not power on the TV with the LCD panel facing down. • When attaching the Table-Top Stand again, be sure to fasten the screws (previously removed) to install corresponding accessories on the TV. • Be sure the TV is vertical before turning on the rear of the TV. 15US XBR-75/65/55/49X900E US XBR-75/65X850E Note • Do not remove the Table-Top Stand for any reason other than to the original holes on .
Detaching the Table-Top Stand from the TV To detach the Table-Top Stand from the TV, remove the screws . To avoid uneven picture uniformity do not power on the TV with the LCD panel facing down. • When attaching the Table-Top Stand again, be sure to fasten the screws (previously removed) to install corresponding accessories on the TV. • Be sure the TV is vertical before turning on the rear of the TV. 15US XBR-75/65/55/49X900E US XBR-75/65X850E Note • Do not remove the Table-Top Stand for any reason other than to the original holes on .

Reference Guide
Page 16
... a wall or enclosed area Ventilation • Never cover the ventilation holes or insert anything in the cabinet. • Leave space around the TV set as follows: Air circulation is blocked. Installed on the wall 11 7/8 inches (30 cm) 4 inches (10 cm) 4 inches (10 cm) 4 inches (10 cm... least this much space around the set . Wall Wall Note • Inadequate ventilation can lead to overheating of the TV and may cause damage to your TV or cause a fire. 16US Installed with stand 4 inches (10 cm) 11 7/8 inches (30 cm) 4 inches (10 cm) 2 3/8 inches (6 cm) Leave at least this much ...
... a wall or enclosed area Ventilation • Never cover the ventilation holes or insert anything in the cabinet. • Leave space around the TV set as follows: Air circulation is blocked. Installed on the wall 11 7/8 inches (30 cm) 4 inches (10 cm) 4 inches (10 cm) 4 inches (10 cm... least this much space around the set . Wall Wall Note • Inadequate ventilation can lead to overheating of the TV and may cause damage to your TV or cause a fire. 16US Installed with stand 4 inches (10 cm) 11 7/8 inches (30 cm) 4 inches (10 cm) 2 3/8 inches (6 cm) Leave at least this much ...

Reference Guide
Page 19
...USB (USB3.0). DC IN 24 V (XBR-65X900E only) AC adapter input (24 V DC) DC IN 19.5 V (XBR-55/49X900E only) AC adapter input (19.5 V DC) REMOTE RS-232C mini jack, IR IN mini jack These jacks are not guaranteed for this TV.) Home Network Refer to the Help ... × 27 × 9 3/8 inches without stand XBR-75X900E: 1,674 × 959 × 66 mm / 66 × 37 7/8 × 2 5/8 inches XBR-75X850E: 1,677 × 968 × 53 mm / 66 1/8 × 38 1/8 × 2 1/8 inches XBR-65X900E: 1,447 × 830 × 60 mm / 57 × 32 3/4 × 2 3/8 inches XBR-65X850E: 1,454 × 840 × 44 mm ...
...USB (USB3.0). DC IN 24 V (XBR-65X900E only) AC adapter input (24 V DC) DC IN 19.5 V (XBR-55/49X900E only) AC adapter input (19.5 V DC) REMOTE RS-232C mini jack, IR IN mini jack These jacks are not guaranteed for this TV.) Home Network Refer to the Help ... × 27 × 9 3/8 inches without stand XBR-75X900E: 1,674 × 959 × 66 mm / 66 × 37 7/8 × 2 5/8 inches XBR-75X850E: 1,677 × 968 × 53 mm / 66 1/8 × 38 1/8 × 2 1/8 inches XBR-65X900E: 1,447 × 830 × 60 mm / 57 × 32 3/4 × 2 3/8 inches XBR-65X850E: 1,454 × 840 × 44 mm ...

Reference Guide
Page 20
...Sony Corporation is a registered trademark of Wi-Fi Alliance. 20US • For DTS patents, see http://patents.dts.com. All Rights Reserved. • The Bluetooth® word mark and logos are trademarks or registered trademarks of Tuxera Inc. Copyright 1995- 2016 Opera TV AS. XBR-49X900E: 13.8 kg / 30.4 lb. XBR-65X850E... stand XBR-75X900E: 35 kg / 77.1 lb. XBR-55X900E: 16.9 kg / 37.3 lb. without notice. XBR-75X850E: 35.2 kg / 77.6 lb. XBR-75X850E: 34.1 kg / 75.2 lb. Manufactured under license. XBR-49X900E: 12.6 kg / 27.8 lb. *1 Only on countries/region/TV ...
...Sony Corporation is a registered trademark of Wi-Fi Alliance. 20US • For DTS patents, see http://patents.dts.com. All Rights Reserved. • The Bluetooth® word mark and logos are trademarks or registered trademarks of Tuxera Inc. Copyright 1995- 2016 Opera TV AS. XBR-49X900E: 13.8 kg / 30.4 lb. XBR-65X850E... stand XBR-75X900E: 35 kg / 77.1 lb. XBR-55X900E: 16.9 kg / 37.3 lb. without notice. XBR-75X850E: 35.2 kg / 77.6 lb. XBR-75X850E: 34.1 kg / 75.2 lb. Manufactured under license. XBR-49X900E: 12.6 kg / 27.8 lb. *1 Only on countries/region/TV ...
Installation Guide - Wall-Mount Bracket
Page 5
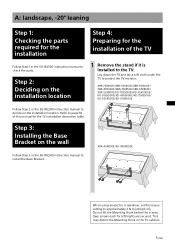
... the SU-WL500 instruction manual to install the Base Bracket. This may distort the Mounting Hook or the TV cabinet. 5 (GB) XBR-75X900E/XBR-65X900E/XBR-55X900E/ XBR-49X900E/XBR-75X850E/XBR-65X850E/ XBR-55X800E/KD-75X9000E/KD-65X9000E/ KD-55X9000E/KD-49X9000E/KD-75X8500E/ KD-65X8500E/KD-55X8500E Follow Step 2... for the TV installation dimension table. Lay down the TV and lay a soft cloth under the TV to approximately 2 N·m {20 kgf·cm}. Step 3: Installing the Base Bracket on the installation location. Step 2: Deciding on the installation location 1 Remove the stand if it is...
... the SU-WL500 instruction manual to install the Base Bracket. This may distort the Mounting Hook or the TV cabinet. 5 (GB) XBR-75X900E/XBR-65X900E/XBR-55X900E/ XBR-49X900E/XBR-75X850E/XBR-65X850E/ XBR-55X800E/KD-75X9000E/KD-65X9000E/ KD-55X9000E/KD-49X9000E/KD-75X8500E/ KD-65X8500E/KD-55X8500E Follow Step 2... for the TV installation dimension table. Lay down the TV and lay a soft cloth under the TV to approximately 2 N·m {20 kgf·cm}. Step 3: Installing the Base Bracket on the installation location. Step 2: Deciding on the installation location 1 Remove the stand if it is...
Installation Guide - Wall-Mount Bracket
Page 9
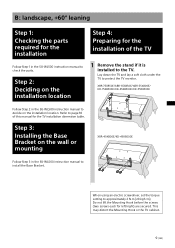
...distort the Mounting Hook or the TV cabinet. 9 (GB) Step 2: Deciding on the installation location. XBR-75X850E/XBR-65X850E/XBR-55X800E/ KD-75X8500E/KD-65X8500E/KD-55X8500E Follow Step 2 in the SU-WL500 instruction manual to the TV. Step 3: Installing the Base ...Bracket on the wall or mounting XBR-49X800E/KD-49X8000E Follow Step 3 in the SU-WL500 instruction manual to decide on the installation location 1 Remove the stand...
...distort the Mounting Hook or the TV cabinet. 9 (GB) Step 2: Deciding on the installation location. XBR-75X850E/XBR-65X850E/XBR-55X800E/ KD-75X8500E/KD-65X8500E/KD-55X8500E Follow Step 2 in the SU-WL500 instruction manual to the TV. Step 3: Installing the Base ...Bracket on the wall or mounting XBR-49X800E/KD-49X8000E Follow Step 3 in the SU-WL500 instruction manual to decide on the installation location 1 Remove the stand...

Installation Guide - Wall-Mount Bracket
Page 13
...a soft cloth under the TV to page 19 of the TV Follow Step 1 in the SU-WL500 instruction manual to approximately 2 N·m {20 kgf·cm}. Step 3: Installing the Base Bracket on the installation location. XBR-75X900E/XBR-65X900E/XBR-55X900E/ XBR-49X900E/XBR-65X850E/XBR-55X800E/ KD-75X9000E/KD-... parts required for the installation Step 4: Preparing for the installation of this manual for the TV installation dimension table. Step 2: Deciding on the installation location 1 Remove the stand if it is installed to check the parts. When using an electric screwdriver, set the ...
...a soft cloth under the TV to page 19 of the TV Follow Step 1 in the SU-WL500 instruction manual to approximately 2 N·m {20 kgf·cm}. Step 3: Installing the Base Bracket on the installation location. XBR-75X900E/XBR-65X900E/XBR-55X900E/ XBR-49X900E/XBR-65X850E/XBR-55X800E/ KD-75X9000E/KD-... parts required for the installation Step 4: Preparing for the installation of this manual for the TV installation dimension table. Step 2: Deciding on the installation location 1 Remove the stand if it is installed to check the parts. When using an electric screwdriver, set the ...


