
Operating Instructions
Page 1
IT 2-514-544-12 (1) 7819900878 Video Recordable DVD Drive Operating Instructions JP FR DE ES IT CS VRD-VC20 © 2004 Sony Corporation
IT 2-514-544-12 (1) 7819900878 Video Recordable DVD Drive Operating Instructions JP FR DE ES IT CS VRD-VC20 © 2004 Sony Corporation

Operating Instructions
Page 4
... chapter interval ..... 25 Creating titles manually .......... 25 Selecting automatic playback mode 26 Finalizing a Disc 27 Erasing a Disc 28 Stop timer recording 29 Auto source selection 30 Using the Drive as an External DVD Drive Connecting the drive to a computer 32 Installing the USB driver... 31 Connecting the drive to a computer 31 Procedure for using the drive as a DVD Recorder Creating DVDs 12 Discs that can be used 12 Recording procedure 12 Recording mode 13 Recording methods 13 About titles and chapters on using other software with the drive 39 Maximizing performance...
... chapter interval ..... 25 Creating titles manually .......... 25 Selecting automatic playback mode 26 Finalizing a Disc 27 Erasing a Disc 28 Stop timer recording 29 Auto source selection 30 Using the Drive as an External DVD Drive Connecting the drive to a computer 32 Installing the USB driver... 31 Connecting the drive to a computer 31 Procedure for using the drive as a DVD Recorder Creating DVDs 12 Discs that can be used 12 Recording procedure 12 Recording mode 13 Recording methods 13 About titles and chapters on using other software with the drive 39 Maximizing performance...

Operating Instructions
Page 6
...U.S. Copyrights • Television programs, films, video tapes, discs, and other intellectual property rights. • is a trademark of Sony Corporation. • Pentium is a registered trademark of Intel Corporation. • Microsoft and Windows are registered trademarks of Microsoft Corporation.... allow you are not violating copyright laws. Reverse engineering or disassembly is intended for details. Unauthorized recording of the copyright laws. Please Record Responsibly Before copying anything onto a disc, please be contrary to this product with the documentation, ...
...U.S. Copyrights • Television programs, films, video tapes, discs, and other intellectual property rights. • is a trademark of Sony Corporation. • Pentium is a registered trademark of Intel Corporation. • Microsoft and Windows are registered trademarks of Microsoft Corporation.... allow you are not violating copyright laws. Reverse engineering or disassembly is intended for details. Unauthorized recording of the copyright laws. Please Record Responsibly Before copying anything onto a disc, please be contrary to this product with the documentation, ...

Operating Instructions
Page 7
... drive with the operations carried out on this drive. • AV connection allows the drive to record videos automatically, synchronized with Hi-Speed USB (USB 2.0-compliant) interfaces for computers, DV and analog audio/video input terminals for.... Stand-alone operation You can use this drive as a stand-alone DVD recorder to record videos on Recordable/ Rewritable DVDs directly from connected video cameras and AV devices. ❑ Synchronized recording allows the drive to record videos automatically. • DV connection allows the digital camera operates automatically, synchronized...
... drive with the operations carried out on this drive. • AV connection allows the drive to record videos automatically, synchronized with Hi-Speed USB (USB 2.0-compliant) interfaces for computers, DV and analog audio/video input terminals for.... Stand-alone operation You can use this drive as a stand-alone DVD recorder to record videos on Recordable/ Rewritable DVDs directly from connected video cameras and AV devices. ❑ Synchronized recording allows the drive to record videos automatically. • DV connection allows the digital camera operates automatically, synchronized...

Operating Instructions
Page 9
...operation, however, it is pressed in the computer-controlled operation. G REC MODE button Selects a recording mode. Continued 9 Introduction H SELECT button Selects the mode of the function. K REC (record) button Starts recording videos. . I Busy indicator Indicates the drive status. Parts and controls Front Panel A Disc tray... Insert discs here, label side to be recorded. When using the drive horizontally, make sure that it remains off . Lit (green) • The power is on ...
...operation, however, it is pressed in the computer-controlled operation. G REC MODE button Selects a recording mode. Continued 9 Introduction H SELECT button Selects the mode of the function. K REC (record) button Starts recording videos. . I Busy indicator Indicates the drive status. Parts and controls Front Panel A Disc tray... Insert discs here, label side to be recorded. When using the drive horizontally, make sure that it remains off . Lit (green) • The power is on ...

Operating Instructions
Page 10
...L/R connectors Connect audio plugs of AV cable (not supplied) when connecting the drive to a video device such as a video camera or VCR. L PAUSE button Pauses recording. B USB connector Connect a USB cable when connecting the drive to the drive. * For DV/Digital8 camcorder input only. C DV IN connector (4-pin) Connect an...VCR. D S VIDEO IN connector Connect an S VIDEO cable (not supplied) when connecting the drive to a video device such as the stand-alone DVD recorder (p. 12), and indicates the following: Rear Panel A Input signal ( p. 15, 18, 22) B Video signal indicator ( p. 15, 18, 22...
...L/R connectors Connect audio plugs of AV cable (not supplied) when connecting the drive to a video device such as a video camera or VCR. L PAUSE button Pauses recording. B USB connector Connect a USB cable when connecting the drive to the drive. * For DV/Digital8 camcorder input only. C DV IN connector (4-pin) Connect an...VCR. D S VIDEO IN connector Connect an S VIDEO cable (not supplied) when connecting the drive to a video device such as the stand-alone DVD recorder (p. 12), and indicates the following: Rear Panel A Input signal ( p. 15, 18, 22) B Video signal indicator ( p. 15, 18, 22...

Operating Instructions
Page 12
..., you can use this drive as VCRs. m Start recording. 12 Discs that have been created using the following procedure. m Turn on and set up the connected device. Using the Drive as a DVD Recorder Creating DVDs You can record videos from a connected video cameras or video devices such ...as a stand-alone DVD recorder to record videos on . Recording procedure You can use only DVD+R (single layer disc), DVD+R DL (double layer...
..., you can use this drive as VCRs. m Start recording. 12 Discs that have been created using the following procedure. m Turn on and set up the connected device. Using the Drive as a DVD Recorder Creating DVDs You can record videos from a connected video cameras or video devices such ...as a stand-alone DVD recorder to record videos on . Recording procedure You can use only DVD+R (single layer disc), DVD+R DL (double layer...

Operating Instructions
Page 13
... operations carried out on the drive. picture quality or recording duration ( page 25). Using the Drive as a DVD Recorder Recording methods The drive features synchronized recording mode and manual recording mode. You can start /stop recording manually by operating the drive and the connected device respectively. Recording mode Three recording modes are available. Mode HQ (default) SP SLP...
... operations carried out on the drive. picture quality or recording duration ( page 25). Using the Drive as a DVD Recorder Recording methods The drive features synchronized recording mode and manual recording mode. You can start /stop recording manually by operating the drive and the connected device respectively. Recording mode Three recording modes are available. Mode HQ (default) SP SLP...

Operating Instructions
Page 14
About titles and chapters on which 49 titles have already been recorded. 14 Start Rec. Recording will not be created after title 49. Title 2 Chapters Chapters Chapter marks Chapter marks Maximum number of sections, called titles, and smaller sub-sections,... called chapters. On this drive, a title is created between the points where you start and stop a recording. Chapters are titles and chapters? Title 1 Stop/Start Stop Rec. DVD contents consist of titles on a disc No additional titles can be initiated on a ...
About titles and chapters on which 49 titles have already been recorded. 14 Start Rec. Recording will not be created after title 49. Title 2 Chapters Chapters Chapter marks Chapter marks Maximum number of sections, called titles, and smaller sub-sections,... called chapters. On this drive, a title is created between the points where you start and stop a recording. Chapters are titles and chapters? Title 1 Stop/Start Stop Rec. DVD contents consist of titles on a disc No additional titles can be initiated on a ...

Operating Instructions
Page 15
Make sure "SYNC" is displayed on your digital video camera*. i.LINK (DV) cable connection You can record pictures on Recordable/Rewritable DVDs while playing them back on the display window. MICROMV camcorder not supported. 1 Connect the digital video camera. i.LINK cable Signal flow 2 Turn on ... lights up the digital video camera. 3 Turn on the drive. * DV/Digital8 camcorder input only. Refer also to be connected. Using the Drive as a DVD Recorder Synchronized recording - Continued 15
Make sure "SYNC" is displayed on your digital video camera*. i.LINK (DV) cable connection You can record pictures on Recordable/Rewritable DVDs while playing them back on the display window. MICROMV camcorder not supported. 1 Connect the digital video camera. i.LINK cable Signal flow 2 Turn on ... lights up the digital video camera. 3 Turn on the drive. * DV/Digital8 camcorder input only. Refer also to be connected. Using the Drive as a DVD Recorder Synchronized recording - Continued 15

Operating Instructions
Page 16
...on the display window, and the REC button lights up during recording. [SIG] on the display window changes to "DV" automatically. Eject button Recording side 5 Press REC to stop recording. [STOP] appears on the display window before recording, or display "DV" by pressing INPUT SELECT manually. 4 ...Press the eject button, and insert a disc. REC Hint Recording stops automatically when playback of the digital video camera ends. 6 Press STOP to start recording. Make sure "DV" is receiving signals from the digital video camera. Once you play back...
...on the display window, and the REC button lights up during recording. [SIG] on the display window changes to "DV" automatically. Eject button Recording side 5 Press REC to stop recording. [STOP] appears on the display window before recording, or display "DV" by pressing INPUT SELECT manually. 4 ...Press the eject button, and insert a disc. REC Hint Recording stops automatically when playback of the digital video camera ends. 6 Press STOP to start recording. Make sure "DV" is receiving signals from the digital video camera. Once you play back...

Operating Instructions
Page 17
...; Fast forward • Rewind • Pause • Stop (If you need to eject the disc. To play these discs on the display window. To pause recording Press PAUSE. [Pause] appears on DVD devices, you do not operate the digital video camera for about 10 minutes... title or the time remaining within the disc appears in turn. To check the time passed or remaining Press TIME. Stand-alone Operation - To resume recording, press REC or PAUSE again. Each time you press the following message appears. The digital video camera pauses playback automatically. Using the Drive as a DVD...
...; Fast forward • Rewind • Pause • Stop (If you need to eject the disc. To play these discs on the display window. To pause recording Press PAUSE. [Pause] appears on DVD devices, you do not operate the digital video camera for about 10 minutes... title or the time remaining within the disc appears in turn. To check the time passed or remaining Press TIME. Stand-alone Operation - To resume recording, press REC or PAUSE again. Each time you press the following message appears. The digital video camera pauses playback automatically. Using the Drive as a DVD...
Operating Instructions
Page 18
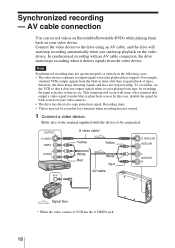
... drive keeps detecting signals and does not stop playback on the video device. Note Synchronized recording may not be connected. To avoid this case, disable the signal for a moment when recording has just started. 1 Connect a video device. Refer also to the manual supplied with... properly or entirely in , etc. AV cable connection You can record videos on Recordable/Rewritable DVDs while playing them back on your video device. This symptom will start/stop recording automatically when you start/stop recording. Synchronized recording - In this , set the VCR so that output a video...
... drive keeps detecting signals and does not stop playback on the video device. Note Synchronized recording may not be connected. To avoid this case, disable the signal for a moment when recording has just started. 1 Connect a video device. Refer also to the manual supplied with... properly or entirely in , etc. AV cable connection You can record videos on Recordable/Rewritable DVDs while playing them back on your video device. This symptom will start/stop recording automatically when you start/stop recording. Synchronized recording - In this , set the VCR so that output a video...

Operating Instructions
Page 19
The busy indicator lights up in green. Eject button Recording side . Busy indicator Hint The drive switches the input automatically when detecting the video signal (Auto Source Selection function page 30). Continued 19 Wait until [... changes to "VIDEO"* automatically. A new blank disc is output), for example, to search a scene to be recorded, the drive switches the input to [Ready]. Using the Drive as a DVD Recorder 2 Turn on the display window before recording, or display "VIDEO"* by pressing INPUT SELECT manually. * "S-VIDEO" when S-Video cable used 3 Press the eject...
The busy indicator lights up in green. Eject button Recording side . Busy indicator Hint The drive switches the input automatically when detecting the video signal (Auto Source Selection function page 30). Continued 19 Wait until [... changes to "VIDEO"* automatically. A new blank disc is output), for example, to search a scene to be recorded, the drive switches the input to [Ready]. Using the Drive as a DVD Recorder 2 Turn on the display window before recording, or display "VIDEO"* by pressing INPUT SELECT manually. * "S-VIDEO" when S-Video cable used 3 Press the eject...

Operating Instructions
Page 20
...] appears on the drive. When the video signal is receiving signals from the video device. If the drive detects no video signals after recording ( page 27). 20 To play these discs on the display window indicates that the drive is interrupted, the drive pauses. REC 5 Start playback ...on the video device. [Recording] appears on the display window and the REC button lights up during recording. [SIG] on DVD devices, you need to finalize the disc after 2 minutes, it stops. 6 Press STOP to...
...] appears on the drive. When the video signal is receiving signals from the video device. If the drive detects no video signals after recording ( page 27). 20 To play these discs on the display window indicates that the drive is interrupted, the drive pauses. REC 5 Start playback ...on the video device. [Recording] appears on the display window and the REC button lights up during recording. [SIG] on DVD devices, you need to finalize the disc after 2 minutes, it stops. 6 Press STOP to...

Operating Instructions
Page 21
Recording pauses also when you press TIME, the time passed within the current title or the time remaining within the disc appears in turn. 21 To resume recording, restart playback. Using the Drive as a DVD Recorder To pause recording Press PAUSE. [Pause] appears on the video device. Stand-alone Operation - To check the time passed or remaining Press TIME. Each time you stop playback on the display window. To resume recording, press REC or PAUSE again.
Recording pauses also when you press TIME, the time passed within the current title or the time remaining within the disc appears in turn. 21 To resume recording, restart playback. Using the Drive as a DVD Recorder To pause recording Press PAUSE. [Pause] appears on the video device. Stand-alone Operation - To check the time passed or remaining Press TIME. Each time you stop playback on the display window. To resume recording, press REC or PAUSE again.

Operating Instructions
Page 22
AV cable connection" on page 18. 2 Turn on the display window changes to [Ready]. Manual recording You can start/pause/stop recording manually by operating the drive and the connected device respectively. 1 Connect a video device. A new blank disc is formatted automatically. Busy indicator 3 Press the eject button, and insert a disc. The busy indicator lights up in green. Wait until [Format] on the drive. See "Synchronized recording - i.LINK (DV) cable connection" on page 15 or "Synchronized recording - Eject button Recording side 22
AV cable connection" on page 18. 2 Turn on the display window changes to [Ready]. Manual recording You can start/pause/stop recording manually by operating the drive and the connected device respectively. 1 Connect a video device. A new blank disc is formatted automatically. Busy indicator 3 Press the eject button, and insert a disc. The busy indicator lights up in green. Wait until [Format] on the drive. See "Synchronized recording - i.LINK (DV) cable connection" on page 15 or "Synchronized recording - Eject button Recording side 22

Operating Instructions
Page 23
Stand-alone Operation - Using the Drive as a DVD Recorder 4 Select the recording conditions. Display a desired signal by pressing SYNC. SYNC INPUT SELECT To select a recording mode, see "Selecting a recording mode" on page 25. To select how to record and set it in sequence. If you have connected an i.LINK cable...in the playback pause mode. 6 Press REC on the drive, and start playback on the connected device. [Recording] appears on the display window and the REC button lights up during recording. [SIG] on page 26. 5 On the video device, search the start playback, see "Selecting a ...
Stand-alone Operation - Using the Drive as a DVD Recorder 4 Select the recording conditions. Display a desired signal by pressing SYNC. SYNC INPUT SELECT To select a recording mode, see "Selecting a recording mode" on page 25. To select how to record and set it in sequence. If you have connected an i.LINK cable...in the playback pause mode. 6 Press REC on the drive, and start playback on the connected device. [Recording] appears on the display window and the REC button lights up during recording. [SIG] on page 26. 5 On the video device, search the start playback, see "Selecting a ...

Operating Instructions
Page 24
... time remaining within the disc appears in turn. 24 Each time you need to finalize the disc after recording ( page 27). Wait for a moment until [Ready] appears. 8 Press the eject button to stop recording. [STOP] appears on the display window, and stop playback on the video device. 7 Press STOP to eject the... disc. To resume recording, press REC or PAUSE again. Note When using DVD+R, DVD-R, or DVD-RW disc and ejecting the disc, the following message appears. To check the ...
... time remaining within the disc appears in turn. 24 Each time you need to finalize the disc after recording ( page 27). Wait for a moment until [Ready] appears. 8 Press the eject button to stop recording. [STOP] appears on the display window, and stop playback on the video device. 7 Press STOP to eject the... disc. To resume recording, press REC or PAUSE again. Note When using DVD+R, DVD-R, or DVD-RW disc and ejecting the disc, the following message appears. To check the ...

Operating Instructions
Page 25
.../ENTER. Each time you press the button, [5 minutes], [10 minutes], [15 minutes], or [None] appears in sequence. Pressing REC during recording. The videos are recorded as one title until you press the button, [Finalize?], [Erase All?], [Auto Play?], [Auto Chp], or [Stop Timer] appears in sequence...FUNCTION/ ENTER to preset. See page 13 for details on the recording mode. Each time you pause recording. Using the Drive as one chapter until you stop recording. 25 Note You cannot do this operation during recording also writes a chapter mark. Note You cannot do this operation ...
.../ENTER. Each time you press the button, [5 minutes], [10 minutes], [15 minutes], or [None] appears in sequence. Pressing REC during recording. The videos are recorded as one title until you press the button, [Finalize?], [Erase All?], [Auto Play?], [Auto Chp], or [Stop Timer] appears in sequence...FUNCTION/ ENTER to preset. See page 13 for details on the recording mode. Each time you pause recording. Using the Drive as one chapter until you stop recording. 25 Note You cannot do this operation during recording also writes a chapter mark. Note You cannot do this operation ...


