
Operating Instructions
Page 1
IT 2-514-544-12 (1) 7819900878 Video Recordable DVD Drive Operating Instructions JP FR DE ES IT CS VRD-VC20 © 2004 Sony Corporation
IT 2-514-544-12 (1) 7819900878 Video Recordable DVD Drive Operating Instructions JP FR DE ES IT CS VRD-VC20 © 2004 Sony Corporation

Operating Instructions
Page 7
... operation ❑ A video recordable DVD drive with the operations carried out on the connected video device. ❑ You can create titles or chapters either automatically or manually. Stand-alone operation You can use this drive as a stand-alone DVD recorder to record videos on Recordable/ Rewritable DVDs directly from connected video cameras and AV devices. ❑ Synchronized recording allows the drive to record videos automatically. • DV...
... operation ❑ A video recordable DVD drive with the operations carried out on the connected video device. ❑ You can create titles or chapters either automatically or manually. Stand-alone operation You can use this drive as a stand-alone DVD recorder to record videos on Recordable/ Rewritable DVDs directly from connected video cameras and AV devices. ❑ Synchronized recording allows the drive to record videos automatically. • DV...

Operating Instructions
Page 10
...not supplied) when connecting a digital video camera* to a video device such as a video camera or VCR. F AUDIO IN L/R connectors Connect audio plugs of AV cable (not supplied) when connecting the drive to a video device such as the stand-alone DVD recorder (p. 12), and indicates the following:... Rear Panel A Input signal ( p. 15, 18, 22) B Video signal indicator ( p. 15, 18, 22) C Recording mode ( p. 25) D Time display (time passed ...
...not supplied) when connecting a digital video camera* to a video device such as a video camera or VCR. F AUDIO IN L/R connectors Connect audio plugs of AV cable (not supplied) when connecting the drive to a video device such as the stand-alone DVD recorder (p. 12), and indicates the following:... Rear Panel A Input signal ( p. 15, 18, 22) B Video signal indicator ( p. 15, 18, 22) C Recording mode ( p. 25) D Time display (time passed ...

Operating Instructions
Page 12
.... Note Stand-alone operation of the drive is not available when the drive is turned on Recordable/Rewritable DVDs directly from video cameras or VCRs to record videos on . Recording procedure You can record videos from a connected video cameras or video devices such as a DVD Recorder Creating DVDs You can use this drive as a stand-alone DVD recorder to a DVD using computers or other DVD recorders by the stand-alone operation...
.... Note Stand-alone operation of the drive is not available when the drive is turned on Recordable/Rewritable DVDs directly from video cameras or VCRs to record videos on . Recording procedure You can record videos from a connected video cameras or video devices such as a DVD Recorder Creating DVDs You can use this drive as a stand-alone DVD recorder to a DVD using computers or other DVD recorders by the stand-alone operation...

Operating Instructions
Page 13
...;AV cable connection page 18 Manual recording page 22 Operation The digital video camera will start /stop playback automatically, synchronized with the operations carried out on the drive. Using the Drive as a DVD Recorder Recording methods The drive features synchronized recording mode and manual recording mode. The drive will start /stop recording manually by operating the drive and the connected device respectively. You...
...;AV cable connection page 18 Manual recording page 22 Operation The digital video camera will start /stop playback automatically, synchronized with the operations carried out on the drive. Using the Drive as a DVD Recorder Recording methods The drive features synchronized recording mode and manual recording mode. The drive will start /stop recording manually by operating the drive and the connected device respectively. You...

Operating Instructions
Page 15
...on the digital video camera and that on the drive. MICROMV camcorder not supported. 1 Connect the digital video camera. The busy indicator lights up the digital video camera. 3 Turn on the drive using an i.LINK cable (not supplied), and the digital video camera will ... Busy indicator . i.LINK cable Signal flow 2 Turn on the drive. * DV/Digital8 camcorder input only. Using the Drive as a DVD Recorder Synchronized recording - i.LINK (DV) cable connection You can record pictures on Recordable/Rewritable DVDs while playing them back on the display window. Continued 15 Make ...
...on the digital video camera and that on the drive. MICROMV camcorder not supported. 1 Connect the digital video camera. The busy indicator lights up the digital video camera. 3 Turn on the drive using an i.LINK cable (not supplied), and the digital video camera will ... Busy indicator . i.LINK cable Signal flow 2 Turn on the drive. * DV/Digital8 camcorder input only. Using the Drive as a DVD Recorder Synchronized recording - i.LINK (DV) cable connection You can record pictures on Recordable/Rewritable DVDs while playing them back on the display window. Continued 15 Make ...

Operating Instructions
Page 17
... pauses playback automatically. To pause recording Press PAUSE. [Pause] appears on DVD devices, you do not operate the digital video camera for about 10 minutes, recording will stop.) To resume recording, press the Play button on the digital video camera. 17 To play these discs on the display window. Using the Drive as a DVD Recorder 7 Press the eject button...
... pauses playback automatically. To pause recording Press PAUSE. [Pause] appears on DVD devices, you do not operate the digital video camera for about 10 minutes, recording will stop.) To resume recording, press the Play button on the digital video camera. 17 To play these discs on the display window. Using the Drive as a DVD Recorder 7 Press the eject button...
Operating Instructions
Page 18
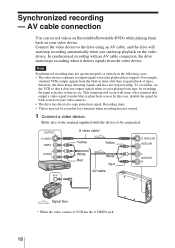
...not stop playback on your video cameras. • The drive has detected a copy protection signal. Connect the video device to the drive using an AV cable, and the drive will occur with an AV cable connection, the drive starts/stops recording when it is not playing ... When the video camera or VCR has the S VIDEO jack. 18 Synchronized recording - For example, standard VCRs output signals from the video device. AV cable connection You can record videos on Recordable/Rewritable DVDs while playing them back on the video device. In synchronized recording with some video cameras that ...
...not stop playback on your video cameras. • The drive has detected a copy protection signal. Connect the video device to the drive using an AV cable, and the drive will occur with an AV cable connection, the drive starts/stops recording when it is not playing ... When the video camera or VCR has the S VIDEO jack. 18 Synchronized recording - For example, standard VCRs output signals from the video device. AV cable connection You can record videos on Recordable/Rewritable DVDs while playing them back on the video device. In synchronized recording with some video cameras that ...

Operating Instructions
Page 19
... eject button, and insert a disc. Make sure "SYNC" is formatted automatically. The busy indicator lights up in green. Make sure "VIDEO"* is output), for example, to search a scene to be recorded, the drive switches the input to [Ready]. Wait until [Format] on the drive. Using the Drive as a DVD Recorder 2 Turn on the display window changes to...
... eject button, and insert a disc. Make sure "SYNC" is formatted automatically. The busy indicator lights up in green. Make sure "VIDEO"* is output), for example, to search a scene to be recorded, the drive switches the input to [Ready]. Wait until [Format] on the drive. Using the Drive as a DVD Recorder 2 Turn on the display window changes to...

Operating Instructions
Page 20
... stops. 6 Press STOP to eject the disc. Wait for recording. The drive comes in standby for a moment until [Ready] appears. 7 Press the eject button to stop recording. [STOP] appears on the drive. When the video signal is receiving signals from the video device. Note When using DVD+R, DVD-R, or DVD-RW disc and ejecting the disc, the following message...
... stops. 6 Press STOP to eject the disc. Wait for recording. The drive comes in standby for a moment until [Ready] appears. 7 Press the eject button to stop recording. [STOP] appears on the drive. When the video signal is receiving signals from the video device. Note When using DVD+R, DVD-R, or DVD-RW disc and ejecting the disc, the following message...

Operating Instructions
Page 21
Stand-alone Operation - To check the time passed or remaining Press TIME. Each time you stop playback on the display window. To resume recording, press REC or PAUSE again. Recording pauses also when you press TIME, the time passed within the current title or the time remaining within the disc appears in turn. 21 To resume recording, restart playback. Using the Drive as a DVD Recorder To pause recording Press PAUSE. [Pause] appears on the video device.
Stand-alone Operation - To check the time passed or remaining Press TIME. Each time you stop playback on the display window. To resume recording, press REC or PAUSE again. Recording pauses also when you press TIME, the time passed within the current title or the time remaining within the disc appears in turn. 21 To resume recording, restart playback. Using the Drive as a DVD Recorder To pause recording Press PAUSE. [Pause] appears on the video device.

Operating Instructions
Page 23
...playback mode" on page 26. 5 On the video device, search the start point you press the button, [VIDEO], [S-VIDEO], or [DV] appears in the playback pause mode. 6 Press REC on the drive, and start playback on the connected device. [Recording] appears on the display window and the REC... up during recording. [SIG] on the display window indicates that the drive is receiving signals from the connected device. Turn off [SYNC] by pressing INPUT SELECT. To select how to record and set it in sequence. REC . Using the Drive as a DVD Recorder 4 Select the recording conditions. Continued...
...playback mode" on page 26. 5 On the video device, search the start point you press the button, [VIDEO], [S-VIDEO], or [DV] appears in the playback pause mode. 6 Press REC on the drive, and start playback on the connected device. [Recording] appears on the display window and the REC... up during recording. [SIG] on the display window indicates that the drive is receiving signals from the connected device. Turn off [SYNC] by pressing INPUT SELECT. To select how to record and set it in sequence. REC . Using the Drive as a DVD Recorder 4 Select the recording conditions. Continued...

Operating Instructions
Page 25
... Creating titles manually Stop recording. Note You cannot do this operation during recording. Each time you pause recording. Pressing REC during recording also writes a chapter mark. The videos are recorded as a DVD Recorder Additional operations Selecting a recording mode Press REC MODE. Selecting a chapter interval See page 14 for [Auto Chp]. Stand-alone Operation - Using the Drive as one title until...
... Creating titles manually Stop recording. Note You cannot do this operation during recording. Each time you pause recording. Pressing REC during recording also writes a chapter mark. The videos are recorded as a DVD Recorder Additional operations Selecting a recording mode Press REC MODE. Selecting a chapter interval See page 14 for [Auto Chp]. Stand-alone Operation - Using the Drive as one title until...
Operating Instructions
Page 27
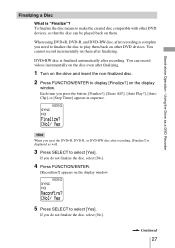
...finalize the disc to make the created disc compatible with other DVD devices. You can record videos incrementally on the disc even after finalizing. 1 Turn on other DVD devices, so that the disc can be played back on them back on the drive and insert the non-finalized disc. 2 Press FUNCTION/ENTER ...to select [Yes]. Continued 27 DVD+RW disc is complete you do not...
...finalize the disc to make the created disc compatible with other DVD devices. You can record videos incrementally on the disc even after finalizing. 1 Turn on other DVD devices, so that the disc can be played back on them back on the drive and insert the non-finalized disc. 2 Press FUNCTION/ENTER ...to select [Yes]. Continued 27 DVD+RW disc is complete you do not...

Operating Instructions
Page 46
... logical format selected when it is recorded (written). DVD+R DL/DVD+R/DVD-R discs Data can be supported. About playback/reading compatibility in quality and characteristics between various DVD-ROM drive, DVD player, DVD+R DL disc, DVD+R disc, DVD+RW disc, DVD-R disc, and DVD-RW disc manufacturers, playback may not be rewritten about 1,000 times. Also, DVD-Video discs created with writing software. However...
... logical format selected when it is recorded (written). DVD+R DL/DVD+R/DVD-R discs Data can be supported. About playback/reading compatibility in quality and characteristics between various DVD-ROM drive, DVD player, DVD+R DL disc, DVD+R disc, DVD+RW disc, DVD-R disc, and DVD-RW disc manufacturers, playback may not be rewritten about 1,000 times. Also, DVD-Video discs created with writing software. However...

Operating Instructions
Page 51
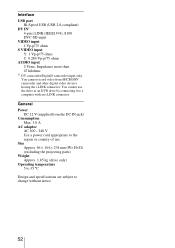
... format MEPG-2 Audio encoding format Dolby Digital 2 ch Recordable disc DVD+R, DVD+R DL, DVD-R, DVD+RW, DVD-RW DVD recording format - You must use the speed acceleration function to achieve 48× speed. 2) With 8 cm discs, you must place the drive horizontally. Continued 51 DVD-Video format (DVD-R, DVD-RW) DVD/CD drive Writing systems DVD: Random write Sequential write CD: Track-at-once Disc-at...
... format MEPG-2 Audio encoding format Dolby Digital 2 ch Recordable disc DVD+R, DVD+R DL, DVD-R, DVD+RW, DVD-RW DVD recording format - You must use the speed acceleration function to achieve 48× speed. 2) With 8 cm discs, you must place the drive horizontally. Continued 51 DVD-Video format (DVD-R, DVD-RW) DVD/CD drive Writing systems DVD: Random write Sequential write CD: Track-at-once Disc-at...
Operating Instructions
Page 52
... temperature 5 to 35 ºC Design and specifications are subject to the region or country of use the drive as an DVD drive by connecting it to a computer with an i.LINK connector. You cannot use . You cannot record video from the DC IN jack) Consumption Max. 3.0 A AC adaptor AC 100 - 240 V Use a power cord appropriate to...
... temperature 5 to 35 ºC Design and specifications are subject to the region or country of use the drive as an DVD drive by connecting it to a computer with an i.LINK connector. You cannot use . You cannot record video from the DC IN jack) Consumption Max. 3.0 A AC adaptor AC 100 - 240 V Use a power cord appropriate to...

Operating Instructions
Page 54
...DVD±RW disc may have been recorded on the digital video camera again. c Video input signal is correctly selected. c Check if input is not detected. c This will appear also when you want to full and recording stopped. - 54 recordable device. other recordable device that is disconnected during recording, the drive... Tray has no longer detect the signal from the video camera depending on - If you insert a finalized DVD±R or DVD-RW disc. Try with this drive. Check if the - c When connecting a digital video camera using an i.LINK cable and the i.LINK ...
...DVD±RW disc may have been recorded on the digital video camera again. c Video input signal is correctly selected. c Check if input is not detected. c This will appear also when you want to full and recording stopped. - 54 recordable device. other recordable device that is disconnected during recording, the drive... Tray has no longer detect the signal from the video camera depending on - If you insert a finalized DVD±R or DVD-RW disc. Try with this drive. Check if the - c When connecting a digital video camera using an i.LINK cable and the i.LINK ...

Quick Start Guide
Page 1
... start recording. Make sure "VIDEO" is displayed before recording, or display "VIDEO" by pressing [INPUT SELECT]. 4 If "Finalize?" Recording is "Finalize"? on the drive and insert a disc. DV (i.LINK) Cable Connection 1 2 3 Connect a digital video camera with an AV cable. AV Cable Connection The drive will play/stop recording. Easy As 1...2...3 2004 Sony Corporation Printed in China Let's make a DVD using DVD...
... start recording. Make sure "VIDEO" is displayed before recording, or display "VIDEO" by pressing [INPUT SELECT]. 4 If "Finalize?" Recording is "Finalize"? on the drive and insert a disc. DV (i.LINK) Cable Connection 1 2 3 Connect a digital video camera with an AV cable. AV Cable Connection The drive will play/stop recording. Easy As 1...2...3 2004 Sony Corporation Printed in China Let's make a DVD using DVD...

Quick Start Guide
Page 2
... and press [FUNCTION/ENTER]. * DVD+R, DVD-R, DVD-RW discs • To record more information. When signal is "Finalize"? . c F c S to select [Yes] c F See What is connected to select [Yes] c F DVD+RW and DVD-RW. If the connected device has an S VIDEO or DV jack, use an S video or i.LINK cable. c S...[STOP] to a DVD c F player. Select [Yes] or [No] and continue. Press [INPUT SELECT] to standby for more on the disc, select [No]. • You cannot play back the disc on the drive and insert a disc. Press "STOP" Press "REC" to display "VIDEO." Press "REC"...
... and press [FUNCTION/ENTER]. * DVD+R, DVD-R, DVD-RW discs • To record more information. When signal is "Finalize"? . c F c S to select [Yes] c F See What is connected to select [Yes] c F DVD+RW and DVD-RW. If the connected device has an S VIDEO or DV jack, use an S video or i.LINK cable. c S...[STOP] to a DVD c F player. Select [Yes] or [No] and continue. Press [INPUT SELECT] to standby for more on the disc, select [No]. • You cannot play back the disc on the drive and insert a disc. Press "STOP" Press "REC" to display "VIDEO." Press "REC"...


