Specification Sheet (VPL-DX122_Spec Sheet)
Page 1
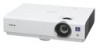
... LCD Panel Panel Display Resolution Contrast Ratio XGA (1024x768 dots) 3,000:1 (Full white/full black)*1 Light Source Ultra high‐pressure mercury lamp 210 W type Recommended Lamp Replacement Time*2 3000H (Lamp mode: High) 5000H (Lamp mode: Standard) 10000H (Lamp mode: Low) Filter Cleaning Cycle*2 Max. 1000H Projection Lens Zoom / Focus Throw Ratio Approx. 1.2x Manual Zoom / Manual Focus 1.47:1 to 1.77:1 Screen Size 30" to 300" Interface Computer and Video Input/Output INPUT A INPUT B VIDEO IN Mini D‐sub 15‐pin (RGB/Y Pb Pr) Audio: Stereo mini jack HDMI...
... LCD Panel Panel Display Resolution Contrast Ratio XGA (1024x768 dots) 3,000:1 (Full white/full black)*1 Light Source Ultra high‐pressure mercury lamp 210 W type Recommended Lamp Replacement Time*2 3000H (Lamp mode: High) 5000H (Lamp mode: Standard) 10000H (Lamp mode: Low) Filter Cleaning Cycle*2 Max. 1000H Projection Lens Zoom / Focus Throw Ratio Approx. 1.2x Manual Zoom / Manual Focus 1.47:1 to 1.77:1 Screen Size 30" to 300" Interface Computer and Video Input/Output INPUT A INPUT B VIDEO IN Mini D‐sub 15‐pin (RGB/Y Pb Pr) Audio: Stereo mini jack HDMI...

Product Manual (d100ops)
Page 2
...Overview Location and Function of Controls .... 3 Main Unit 3 Connector Panel 4 Remote Commander and Control Panel Keys 5 Preparation Connecting the Projector 7 Connecting a Computer 7 Connecting a Video equipment .... 8 Others Indicators 25 Messages List 26 Troubleshooting 27 Replacing the Lamp 29 Cleaning the Air Filter 31 Specifications 32 Projection Distance 37 Dimensions 42 Index 45 Projecting/Adjusting an Image Projecting an Image 9 Adjusting the Projected image ... 10 Turning Off the Power 13 Adjustments and Settings Using a Menu Using a MENU 14 The Picture Menu 15...
...Overview Location and Function of Controls .... 3 Main Unit 3 Connector Panel 4 Remote Commander and Control Panel Keys 5 Preparation Connecting the Projector 7 Connecting a Computer 7 Connecting a Video equipment .... 8 Others Indicators 25 Messages List 26 Troubleshooting 27 Replacing the Lamp 29 Cleaning the Air Filter 31 Specifications 32 Projection Distance 37 Dimensions 42 Index 45 Projecting/Adjusting an Image Projecting an Image 9 Adjusting the Projected image ... 10 Turning Off the Power 13 Adjustments and Settings Using a Menu Using a MENU 14 The Picture Menu 15...

Product Manual (d100ops)
Page 6
... signal. Lamp Mode: Low With No Input: Standby With Static Signal: Lamp Dimming User: Sets each mode to the optimum energy-saving value. key Adjusts the volume output. ECO: Sets each item of Controls ECO Mode Menu ECO Mode ECO User :Sel RETURN : B a ck 2 Press the V/v key or ECO MODE key to restore the previous volume. The screen returns to restore the image. Others g Infrared transmitter About remote commander operation • Direct the remote commander...
... signal. Lamp Mode: Low With No Input: Standby With Static Signal: Lamp Dimming User: Sets each mode to the optimum energy-saving value. key Adjusts the volume output. ECO: Sets each item of Controls ECO Mode Menu ECO Mode ECO User :Sel RETURN : B a ck 2 Press the V/v key or ECO MODE key to restore the previous volume. The screen returns to restore the image. Others g Infrared transmitter About remote commander operation • Direct the remote commander...

Product Manual (d100ops)
Page 9
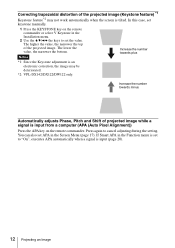
... connected equipment. 5 Select the input source. For details on the type of computer. (Example) + 7 Adjust the focus, size and position of a projected image depends on the screen. Projecting an Image 9 Input Video Input-A Input-B Sel 35 Projecting/Adjusting an Image Projector 4 2 Video equipment 1 Wall outlet 6 1 Plug the AC power cord into the wall outlet. 2 Connect all equipment to the projector (page 7). 3 Press the ?/1 key to display the menu for switching input signal on the distance between the projector and screen. Press the INPUT...
... connected equipment. 5 Select the input source. For details on the type of computer. (Example) + 7 Adjust the focus, size and position of a projected image depends on the screen. Projecting an Image 9 Input Video Input-A Input-B Sel 35 Projecting/Adjusting an Image Projector 4 2 Video equipment 1 Wall outlet 6 1 Plug the AC power cord into the wall outlet. 2 Connect all equipment to the projector (page 7). 3 Press the ?/1 key to display the menu for switching input signal on the distance between the projector and screen. Press the INPUT...
Product Manual (d100ops)
Page 12
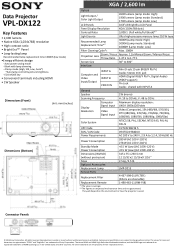
Correcting trapezoidal distortion of projected image while a signal is input from a computer (APA (Auto Pixel Alignment)) Press the APA key on the remote commander or select V Keystone in the Installation menu. 2 Use the V/v/B/b the keys to cancel adjusting during the setting. You can also set keystone manually. 1 Press the KEYSTONE key on the remote commander. If Smart APA in the Screen Menu (page 17). The lower the value, the narrower the bottom...
Correcting trapezoidal distortion of projected image while a signal is input from a computer (APA (Auto Pixel Alignment)) Press the APA key on the remote commander or select V Keystone in the Installation menu. 2 Use the V/v/B/b the keys to cancel adjusting during the setting. You can also set keystone manually. 1 Press the KEYSTONE key on the remote commander. If Smart APA in the Screen Menu (page 17). The lower the value, the narrower the bottom...

Product Manual (d100ops)
Page 13
... the unit or the remote commander. It may cause a malfunction of the message being displayed, shutdown is shut down. The projector starts shutdown and turns off the projector soon after the lamp lights. To turn off . If you press the ?/1 key within 10 seconds of the lamp (does not light ,etc.). 2 Unplug the AC power cord from the wall outlet. The number of displayed icons varies according to...
... the unit or the remote commander. It may cause a malfunction of the message being displayed, shutdown is shut down. The projector starts shutdown and turns off the projector soon after the lamp lights. To turn off . If you press the ?/1 key within 10 seconds of the lamp (does not light ,etc.). 2 Unplug the AC power cord from the wall outlet. The number of displayed icons varies according to...

Product Manual (d100ops)
Page 14
... screen is performed. 14 Using a MENU B Adjustments and Settings Using a Menu Using a MENU Note The menu displays used for the selected item. Use the V/v key to register the setting. Setting items Picture Picture Mode Reset Contrast Brightness Color Hue Color Temp. The previous screen is displayed, select the item according to the Adjust Back 5 Press the MENU key to display the menu. 2 Select the setting menu. The setting method varies, depending on the model you press the ENTER key. If the next menu window...
... screen is performed. 14 Using a MENU B Adjustments and Settings Using a Menu Using a MENU Note The menu displays used for the selected item. Use the V/v key to register the setting. Setting items Picture Picture Mode Reset Contrast Brightness Color Hue Color Temp. The previous screen is displayed, select the item according to the Adjust Back 5 Press the MENU key to display the menu. 2 Select the setting menu. The setting method varies, depending on the model you press the ENTER key. If the next menu window...

Product Manual (d100ops)
Page 18
... "Zoom." 16:9 16:9*4 Video signal 18 The Screen Menu In this case, select "16:9." 4:3 4:3*3 *4: Depending on the input signal, the projected image may be projected as illustrated below . Aspect VPL-DX142/DX122/DX102 Input signal 4:3 Recommended setting value and projected image Full1*1 *1: If you select "Normal," the image is projected in the same resolution as the input signal without changing the aspect ratio of the original image. *2: If you select "4:3," the image is projected to...
... "Zoom." 16:9 16:9*4 Video signal 18 The Screen Menu In this case, select "16:9." 4:3 4:3*3 *4: Depending on the input signal, the projected image may be projected as illustrated below . Aspect VPL-DX142/DX122/DX102 Input signal 4:3 Recommended setting value and projected image Full1*1 *1: If you select "Normal," the image is projected in the same resolution as the input signal without changing the aspect ratio of the original image. *2: If you select "4:3," the image is projected to...

Product Manual (d100ops)
Page 19
... case, select "Zoom." Video signal Adjustments and Settings Using a Menu The Screen Menu 19 In this case, select "16:9." *5: Depending on the input signal, the projected image may be projected as illustrated below . VPL-DW122 Input signal 4:3 Recommended setting value and projected image Full1*1 *2 *3 *1: If you select "Normal," the image is projected in the same resolution as the input signal without changing the aspect ratio of the original image. *2: If you adjust the projected image position using an image with 16:9 aspect...
... case, select "Zoom." Video signal Adjustments and Settings Using a Menu The Screen Menu 19 In this case, select "16:9." *5: Depending on the input signal, the projected image may be projected as illustrated below . VPL-DW122 Input signal 4:3 Recommended setting value and projected image Full1*1 *2 *3 *1: If you select "Normal," the image is projected in the same resolution as the input signal without changing the aspect ratio of the original image. *2: If you adjust the projected image position using an image with 16:9 aspect...

Product Manual (d100ops)
Page 20
... menu is powered on the screen when the projector is used for setting various functions of the projector. CC1/CC2/CC3/CC4/Text1/Text2/Text3/Text4: Select the closed caption service (captions or text). On/Off: When set to "On," the Start Up Image is displayed on . Items Volume Smart APA CC Display Lamp Timer Reset Start Up Image Item descriptions The higher the value, the louder an audio...
... menu is powered on the screen when the projector is used for setting various functions of the projector. CC1/CC2/CC3/CC4/Text1/Text2/Text3/Text4: Select the closed caption service (captions or text). On/Off: When set to "On," the Start Up Image is displayed on . Items Volume Smart APA CC Display Lamp Timer Reset Start Up Image Item descriptions The higher the value, the louder an audio...

Product Manual (d100ops)
Page 21
... the power again. c "Control Key Lock" is "ENTER, ENTER, ENTER, ENTER.") 3 Input a new password with the password. Adjustments and Settings Using a Menu The Operation Menu 21 Note *1: You will be able to "Off" and enables operation of all the control panel keys of the projector to confirm. However, you turn on the projector. Items Language Status Security Lock*1 Control Key Lock Item descriptions Selects the language used for setting for menus, warning messages and messages from the message list...
... the power again. c "Control Key Lock" is "ENTER, ENTER, ENTER, ENTER.") 3 Input a new password with the password. Adjustments and Settings Using a Menu The Operation Menu 21 Note *1: You will be able to "Off" and enables operation of all the control panel keys of the projector to confirm. However, you turn on the projector. Items Language Status Security Lock*1 Control Key Lock Item descriptions Selects the language used for setting for menus, warning messages and messages from the message list...

Product Manual (d100ops)
Page 22
... can turn the power on the input signal. however, the image will start to a wall outlet. With the projector turned off automatically and power consumption is not a malfunction. Automatically the lamp slowly darkens to Standby mode, regardless of its brightness is restored after the lamp lights. In this is reduced if no change in signal may not be darker. A change in signal is detected, or an operation (remote control or control panel) is...
... can turn the power on the input signal. however, the image will start to a wall outlet. With the projector turned off automatically and power consumption is not a malfunction. Automatically the lamp slowly darkens to Standby mode, regardless of its brightness is restored after the lamp lights. In this is reduced if no change in signal may not be darker. A change in signal is detected, or an operation (remote control or control panel) is...
Product Manual (d100ops)
Page 25
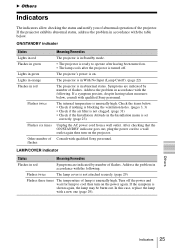
... of flashes. After checking that the ON/STANDBY indicator goes out, plug the power cord to a wall outlet again then turn on the projector. LAMP/COVER indicator Status Meaning/Remedies Flashes in abnormal status. Address the problem in accordance with the following . B Others Indicators The indicators allow checking the status and notify you of abnormal operation of flashes. ON/STANDBY indicator Status Lights in red Flashes in green Lights in green Lights in orange Flashes in red Flashes twice Flashes six times Other number of lamp is unusually high. Consult with a new...
... of flashes. After checking that the ON/STANDBY indicator goes out, plug the power cord to a wall outlet again then turn on the projector. LAMP/COVER indicator Status Meaning/Remedies Flashes in abnormal status. Address the problem in accordance with the following . B Others Indicators The indicators allow checking the status and notify you of abnormal operation of flashes. ON/STANDBY indicator Status Lights in red Flashes in green Lights in green Lights in orange Flashes in red Flashes twice Flashes six times Other number of lamp is unusually high. Consult with a new...
Product Manual (d100ops)
Page 26
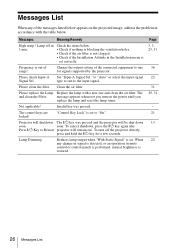
... on the projected image, address the problem in accordance with a new one for a few seconds. To cancel shutdown, press the ?/1 key again (the Press ?/1 Key to one and clean the air filter. Invalid key was pressed and the projector will remain on the power until you replace the lamp and reset the lamp timer. Messages List When any change in signal is detected, or an operation (remote control or control panel) is performed...
... on the projected image, address the problem in accordance with a new one for a few seconds. To cancel shutdown, press the ?/1 key again (the Press ?/1 Key to one and clean the air filter. Invalid key was pressed and the projector will remain on the power until you replace the lamp and reset the lamp timer. Messages List When any change in signal is detected, or an operation (remote control or control panel) is performed...

Product Manual (d100ops)
Page 27
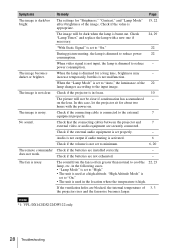
... image. Operation menu is set to diagnose the problem, following the instructions below. Set "V Keystone" to "Auto"*1 or "Manual" to both the computer's display and an external monitor, the external monitor image may not work automatically. on . Check the computer signal is set to only an external monitor. In this case, you cannot turn 21 on the projector using a Keystone feature. In this case, set manually. 5, 12, 23 When the projector is connected to "Manual...
... image. Operation menu is set to diagnose the problem, following the instructions below. Set "V Keystone" to "Auto"*1 or "Manual" to both the computer's display and an external monitor, the external monitor image may not work automatically. on . Check the computer signal is set to only an external monitor. In this case, you cannot turn 21 on the projector using a Keystone feature. In this case, set manually. 5, 12, 23 When the projector is connected to "Manual...
Product Manual (d100ops)
Page 28
... image. Check that the connecting cables between the projector and 7 external video or audio equipment are blocked, the internal temperature of the 22 lamp changes according to "On." • The unit is dimmed to reduce power 22 consumption. Check if the batteries are installed correctly. - When video signal is not input, the lamp is used at a high altitude. increase temporarily, but this case, let the projector sit for about two hours...
... image. Check that the connecting cables between the projector and 7 external video or audio equipment are blocked, the internal temperature of the 22 lamp changes according to "On." • The unit is dimmed to reduce power 22 consumption. Check if the batteries are installed correctly. - When video signal is not input, the lamp is used at a high altitude. increase temporarily, but this case, let the projector sit for about two hours...

Product Manual (d100ops)
Page 29
... your hands into the lamp replacement slot after the projector is tilted, the pieces may scatter if the lamp breaks any other than the designated location, you may cause injury. 1 Turn off the projector, and disconnect the AC power cord from a wall outlet. 2 When the lamp has cooled sufficiently, open the lamp cover by loosening one if a message displayed on the lamp unit (1). If you touch...
... your hands into the lamp replacement slot after the projector is tilted, the pieces may scatter if the lamp breaks any other than the designated location, you may cause injury. 1 Turn off the projector, and disconnect the AC power cord from a wall outlet. 2 When the lamp has cooled sufficiently, open the lamp cover by loosening one if a message displayed on the lamp unit (1). If you touch...

Product Manual (d100ops)
Page 30
... fire. 4 Insert the new lamp all the way in until it is not secured properly. 5 Close the lamp cover and tighten the 1 screw. 30 Replacing the Lamp Fold down the handle. 1 3 2 2 6 Connect the AC power cord to a wall outlet and turn on if the lamp is securely in this product contains mercury. When a message appears, select "Yes" to reset the lamp timer (page 20). Caution Do...
... fire. 4 Insert the new lamp all the way in until it is not secured properly. 5 Close the lamp cover and tighten the 1 screw. 30 Replacing the Lamp Fold down the handle. 1 3 2 2 6 Connect the AC power cord to a wall outlet and turn on if the lamp is securely in this product contains mercury. When a message appears, select "Yes" to reset the lamp timer (page 20). Caution Do...
Product Manual (d100ops)
Page 34
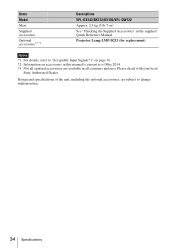
... 2014. *3: Not all countries and area. Items Model Mass Supplied accessories Optional accessories*2 *3 Descriptions VPL-DX142/DX122/DX102/VPL-DW122 Approx. 2.5 kg (5 lb 7 oz) See "Checking the Supplied Accessories" in all optional accessories are available in the supplied Quick Reference Manual. Please check with your local Sony Authorized Dealer. Projector Lamp LMP-D213 (for replacement) Notes *1: For details, refer to change without notice. 34 Specifications
... 2014. *3: Not all countries and area. Items Model Mass Supplied accessories Optional accessories*2 *3 Descriptions VPL-DX142/DX122/DX102/VPL-DW122 Approx. 2.5 kg (5 lb 7 oz) See "Checking the Supplied Accessories" in all optional accessories are available in the supplied Quick Reference Manual. Please check with your local Sony Authorized Dealer. Projector Lamp LMP-D213 (for replacement) Notes *1: For details, refer to change without notice. 34 Specifications

Product Manual (d100ops)
Page 45
... AC IN 4 Acceptable input signal 36 Adjust Signal 17 Air filter 31 Air filter cover/Ventilation holes (intake 3 APA 5 Aspect 5, 16, 18 Audio muting 6 B Brightness 15 C CC Display 20 Color 15 Color Temp 15 Connecting a computer 7 Connecting a Video equipment 8 Connector panel 3, 4 Contrast 15 Control Key Lock 21 Control Panel Keys 5 Correcting trapezoidal distortion of the projected image (Keystone feature 5, 12 D Digital Zoom 5 E ECO MODE (Energy-saving mode) .........6 F fH 24 Focus 10 Focus ring 3 Foot adjust button 3, 11 Freeze 6 Front foot (adjustable 3, 11 fV 24...
... AC IN 4 Acceptable input signal 36 Adjust Signal 17 Air filter 31 Air filter cover/Ventilation holes (intake 3 APA 5 Aspect 5, 16, 18 Audio muting 6 B Brightness 15 C CC Display 20 Color 15 Color Temp 15 Connecting a computer 7 Connecting a Video equipment 8 Connector panel 3, 4 Contrast 15 Control Key Lock 21 Control Panel Keys 5 Correcting trapezoidal distortion of the projected image (Keystone feature 5, 12 D Digital Zoom 5 E ECO MODE (Energy-saving mode) .........6 F fH 24 Focus 10 Focus ring 3 Foot adjust button 3, 11 Freeze 6 Front foot (adjustable 3, 11 fV 24...


