

Operating Instructions
Page 6
Others About the HDMI Control 53 Troubleshooting 54 Warning Indicators 56 Message Lists 57 Replacing the Lamp and the Air Filter and cleaning the Ventilation holes (intake 58 Cleaning the Air Filter 61 Specifications 62 Preset Signals 64 Input Signals and Adjustable/ Setting Items 67 Ceiling Installation 69 When Using the PSS-H10 Projector Suspension Support .... 69 Making Fine Adjustments to the Horizontal Picture Position 73 Index 76 6
Others About the HDMI Control 53 Troubleshooting 54 Warning Indicators 56 Message Lists 57 Replacing the Lamp and the Air Filter and cleaning the Ventilation holes (intake 58 Cleaning the Air Filter 61 Specifications 62 Preset Signals 64 Input Signals and Adjustable/ Setting Items 67 Ceiling Installation 69 When Using the PSS-H10 Projector Suspension Support .... 69 Making Fine Adjustments to the Horizontal Picture Position 73 Index 76 6

Operating Instructions
Page 9
Rear/Bottom Ventilation holes (intake) (1 page 13) Remote control detector (1 page 21) Ventilation holes (intake) (1 page 13) Ventilation holes (intake) (1 page 13) Ventilation holes (intake) (1 page 13) Ventilation holes (intake) (1 page 13) Lamp cover (1 page 58) Adjusters (1 page 24) Filter holder (1 page 59) Ventilation holes (intake) (1 page 13) Projector suspension support attaching hole (1 page 69) 9 Location of Controls
Rear/Bottom Ventilation holes (intake) (1 page 13) Remote control detector (1 page 21) Ventilation holes (intake) (1 page 13) Ventilation holes (intake) (1 page 13) Ventilation holes (intake) (1 page 13) Ventilation holes (intake) (1 page 13) Lamp cover (1 page 58) Adjusters (1 page 24) Filter holder (1 page 59) Ventilation holes (intake) (1 page 13) Projector suspension support attaching hole (1 page 69) 9 Location of Controls
Operating Instructions
Page 53
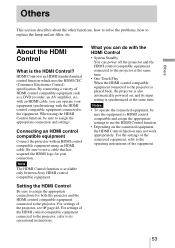
HDMI Control is available only between Sony HDMI control compatible equipment. When using an HDMI cable. For settings of the HDMI control compatible equipment connected to the projector, refer to its input setting is also automatically powered on the connected equipment, the HDMI Control function ... to replace the lamp and air filter, etc. Be sure to the projector at the same time. Connecting an HDMI control compatible equipment Connect the projector with the HDMI Control • System Standby You can power off the projector and the HDMI control compatible equipment ...
HDMI Control is available only between Sony HDMI control compatible equipment. When using an HDMI cable. For settings of the HDMI control compatible equipment connected to the projector, refer to its input setting is also automatically powered on the connected equipment, the HDMI Control function ... to replace the lamp and air filter, etc. Be sure to the projector at the same time. Connecting an HDMI control compatible equipment Connect the projector with the HDMI Control • System Standby You can power off the projector and the HDMI control compatible equipment ...
Operating Instructions
Page 54
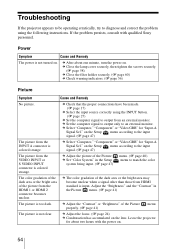
...of the dark area or the bright area of the picture from the HDMI 1 or HDMI 2 connector becomes unclear. Troubleshooting If the projector appears to be operating erratically, try to diagnose and correct the problem using the INPUT button. (1 page 27) c Set the ...the focus. (1 page 24) c Condensation has accumulated on . 54 c After about two hours with qualified Sony personnel. c Close the lamp cover securely, then tighten the screws securely. (1 page 58) c Close the filter holder securely. (1 page 60) c Check warning indicators. (1 page 56) Picture Symptom Cause and Remedy No...
...of the dark area or the bright area of the picture from the HDMI 1 or HDMI 2 connector becomes unclear. Troubleshooting If the projector appears to be operating erratically, try to diagnose and correct the problem using the INPUT button. (1 page 27) c Set the ...the focus. (1 page 24) c Condensation has accumulated on . 54 c After about two hours with qualified Sony personnel. c Close the lamp cover securely, then tighten the screws securely. (1 page 58) c Close the filter holder securely. (1 page 60) c Check warning indicators. (1 page 56) Picture Symptom Cause and Remedy No...

Operating Instructions
Page 56
... if nothing is blocking the ventilation holes or whether or not the projector is any trouble with qualified Sony personnel. Replace the lamp. (1 page 58) c The lamp has reached a high temperature. Consult with qualified Sony personnel. 56 After about 10 seconds, reconnect the AC power cord ...in red. (A repetition rate of 2 flashes) c Close the lamp cover securely, then tighten the screws securely. (1 page 58) c Close the filter holder securely. (1 page 60) LAMP/COVER flashes in red. (A repetition rate of its useful lifespan. Warning Indicators The ON/STANDBY or LAMP/COVER ...
... if nothing is blocking the ventilation holes or whether or not the projector is any trouble with qualified Sony personnel. Replace the lamp. (1 page 58) c The lamp has reached a high temperature. Consult with qualified Sony personnel. 56 After about 10 seconds, reconnect the AC power cord ...in red. (A repetition rate of 2 flashes) c Close the lamp cover securely, then tighten the screws securely. (1 page 58) c Close the filter holder securely. (1 page 60) LAMP/COVER flashes in red. (A repetition rate of its useful lifespan. Warning Indicators The ON/STANDBY or LAMP/COVER ...
Operating Instructions
Page 57
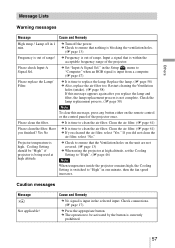
...the unit are not covered. (1 page 13) c When using the projector at high altitude. c It is time to clean the air filter. Yes No c It is time to clean the air filter. Projector temperature is out of the projector once. Cause and Remedy c No signal is not complete. c Frequency ...of range! c It is time to ensure that is out of the projector. If you finished? Have you did not clean the air filter, select "No." c Turn off in the selected input. Please clean the filter. Others Message Lists Warning messages Message Cause and Remedy High temp.! Check ...
...the unit are not covered. (1 page 13) c When using the projector at high altitude. c It is time to clean the air filter. Yes No c It is time to clean the air filter. Projector temperature is out of the projector once. Cause and Remedy c No signal is not complete. c Frequency ...of range! c It is time to ensure that is out of the projector. If you finished? Have you did not clean the air filter, select "No." c Turn off in the selected input. Please clean the filter. Others Message Lists Warning messages Message Cause and Remedy High temp.! Check ...
Operating Instructions
Page 58
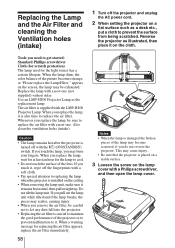
... Do not tilt the lamp unit. Tools you touch it on the cloth. Use an LMP-H200 Projector Lamp as illustrated, then place it , wipe off the fingerprints with the LMP-H200 Projector Lamp. The air filter is turned off with a new one . If you need to replacing the lamp when the... the lamp cover with a new one (not supplied) without delay. Replacing the Lamp and the Air Filter and cleaning the Ventilation holes (intake) 1 Turn off the projector and unplug the AC power cord. 2 When setting the projector on a flat surface such as a desk etc., put a cloth to cool. • Do not ...
... Do not tilt the lamp unit. Tools you touch it on the cloth. Use an LMP-H200 Projector Lamp as illustrated, then place it , wipe off the fingerprints with the LMP-H200 Projector Lamp. The air filter is turned off with a new one . If you need to replacing the lamp when the... the lamp cover with a new one (not supplied) without delay. Replacing the Lamp and the Air Filter and cleaning the Ventilation holes (intake) 1 Turn off the projector and unplug the AC power cord. 2 When setting the projector on a flat surface such as a desk etc., put a cloth to cool. • Do not ...

Operating Instructions
Page 59
4 Loosen the three screws on the lamp. Lock the cover release lever and put it back. 7 Remove the filter holder. 8 Remove the air filter. Note Be careful not to touch the optical block inside the unit. Others 5 Ensure you push the new lamp all the way, then securely tighten those three screws on the lamp with the Phillips screwdriver. Claws 59 Hold up the cover release lever, then pull the lamp straight out. 6 Close the lamp cover, then tighten the screws.
4 Loosen the three screws on the lamp. Lock the cover release lever and put it back. 7 Remove the filter holder. 8 Remove the air filter. Note Be careful not to touch the optical block inside the unit. Others 5 Ensure you push the new lamp all the way, then securely tighten those three screws on the lamp with the Phillips screwdriver. Claws 59 Hold up the cover release lever, then pull the lamp straight out. 6 Close the lamp cover, then tighten the screws.
Operating Instructions
Page 60
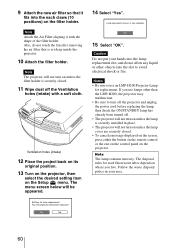
...the ON/STANDBY lamp has already been turned off. • The projector will not turn on unless the lamp is securely installed in your hands into the lamp replacement slot, and do not touch the fan after removing the air filter that it with a soft cloth. Notes • Be sure to... or the one on the control panel on unless the filter holder is set deep inside the projector. 10 Attach the filter holder. Follow the waste disposal policy in place. • The projector will not turn on the projector. Note Attach the Air Filter aligning it fits into the slot to use lamps other ...
...the ON/STANDBY lamp has already been turned off. • The projector will not turn on unless the lamp is securely installed in your hands into the lamp replacement slot, and do not touch the fan after removing the air filter that it with a soft cloth. Notes • Be sure to... or the one on the control panel on unless the filter holder is set deep inside the projector. 10 Attach the filter holder. Follow the waste disposal policy in place. • The projector will not turn on the projector. Note Attach the Air Filter aligning it fits into the slot to use lamps other ...

Operating Instructions
Page 61
...8226; When you clean the air filter, make sure you remove the air filter, be cleaned every 1,500 hours. When a warning message for cleaning the air filter appears, clean the air filter immediately. 61 For details on the environment or how the projector is crucial to maintain the good ...performance of the projector or to prevent malfunction to it. This value varies depending on...
...8226; When you clean the air filter, make sure you remove the air filter, be cleaned every 1,500 hours. When a warning message for cleaning the air filter appears, clean the air filter immediately. 61 For details on the environment or how the projector is crucial to maintain the good ...performance of the projector or to prevent malfunction to it. This value varies depending on...


