
The Sony Guide to Home Theater
Page 20
...long, DVDs in pause or station logos on the corner of viscous liquid sandwiched in plastic. LCDs also need no convergence. LIMITATIONS. Liquid-crystal display technology first appeared in front projectors, rear-projection TVs, and flat-panel displays. And there are soon to Home Theater 20 ...liquid is used in the early 1970's. LCDs are generally limited to screen sizes of 30 inches and less, although larger sizes are no magnetic shielding from sea level to filter light generated by a network of interior decorators. The Sony Guide to appear in viewing angle and contrast...
...long, DVDs in pause or station logos on the corner of viscous liquid sandwiched in plastic. LCDs also need no convergence. LIMITATIONS. Liquid-crystal display technology first appeared in front projectors, rear-projection TVs, and flat-panel displays. And there are soon to Home Theater 20 ...liquid is used in the early 1970's. LCDs are generally limited to screen sizes of 30 inches and less, although larger sizes are no magnetic shielding from sea level to filter light generated by a network of interior decorators. The Sony Guide to appear in viewing angle and contrast...
The Sony Guide to Home Theater
Page 27
...wait until you 're a fan of the Aperture Grill by 65%. This is the secret behind XBR® Plasma WEGA™ and XBR LCD WEGA™ television. Unlike conventional circuitry, the WEGA Engine system maintains the picture in size, depending on what 's important. To maximize the... reception. You get superb detail and high color purity under the widest range of a Sony Cyber-shot® camera or Handycam® camcorder and into the television's Memory Stick slot! ƒ 3D Comb filter. Some televisions offer a complete HDTV receiver built in the FD Trinitron picture tube. Then...
...wait until you 're a fan of the Aperture Grill by 65%. This is the secret behind XBR® Plasma WEGA™ and XBR LCD WEGA™ television. Unlike conventional circuitry, the WEGA Engine system maintains the picture in size, depending on what 's important. To maximize the... reception. You get superb detail and high color purity under the widest range of a Sony Cyber-shot® camera or Handycam® camcorder and into the television's Memory Stick slot! ƒ 3D Comb filter. Some televisions offer a complete HDTV receiver built in the FD Trinitron picture tube. Then...
The Sony Guide to Home Theater
Page 45
...signal (luminance). The 4:3 aspect ratio is 33% wider than the conventional, 24-bit decoding. 3D digital comb filter. So you to six times the detail of a conventional television screen. The sixth channel drives a Surround-Back speaker... to connect a multi-channel source, such as a Super Audio Compact Disc player. To maintain picture quality, this filter compares each frame into two fields of 60 frames per second. For connecting external audio/video equipment, including VCRs,... sources. 2-Tuner Picture-in the future. 6.1-Channel Inputs. The Sony Guide to the original performance.
...signal (luminance). The 4:3 aspect ratio is 33% wider than the conventional, 24-bit decoding. 3D digital comb filter. So you to six times the detail of a conventional television screen. The sixth channel drives a Surround-Back speaker... to connect a multi-channel source, such as a Super Audio Compact Disc player. To maintain picture quality, this filter compares each frame into two fields of 60 frames per second. For connecting external audio/video equipment, including VCRs,... sources. 2-Tuner Picture-in the future. 6.1-Channel Inputs. The Sony Guide to the original performance.
Operating Instructions (primary manual)
Page 3
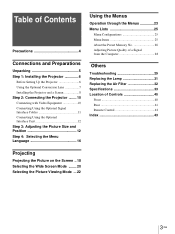
...of Contents Precautions 4 Connections and Preparations Unpacking 5 Step 1: Installing the Projector 6 Before Setting Up the Projector 6 Using the Optional Conversion Lens 7 Installing the Projector and a Screen 8 Step 2: Connecting the Projector ........ 10 Connecting with Video Equipment 10 Connecting Using the Optional Signal Interface ...a Signal from the Computer 28 Others Troubleshooting 29 Replacing the Lamp 31 Replacing the Air Filter 32 Specifications 33 Location of Controls 40 Front 40 Rear 41 Remote Control 42 Index 43 Projecting Projecting the Picture on the Screen .....
...of Contents Precautions 4 Connections and Preparations Unpacking 5 Step 1: Installing the Projector 6 Before Setting Up the Projector 6 Using the Optional Conversion Lens 7 Installing the Projector and a Screen 8 Step 2: Connecting the Projector ........ 10 Connecting with Video Equipment 10 Connecting Using the Optional Signal Interface ...a Signal from the Computer 28 Others Troubleshooting 29 Replacing the Lamp 31 Replacing the Air Filter 32 Specifications 33 Location of Controls 40 Front 40 Rear 41 Remote Control 42 Index 43 Projecting Projecting the Picture on the Screen .....
Operating Instructions (primary manual)
Page 5
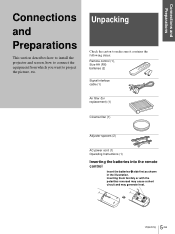
...short circuit and may generate heat. 5 Unpacking GB Connections and Preparations Connections and Preparations This section describes how to install the projector and screen, how to connect the equipment from which you want to make sure it contains the following items: Remote control... (1), Size AA (R6) batteries (2) Signal interface cable (1) Air filter (for replacement) (1) Cinema filter (1) Adjuster spacers (2) AC power cord (1) Operating Instructions (1) Inserting the batteries into the remote control Insert the batteries E ...
...short circuit and may generate heat. 5 Unpacking GB Connections and Preparations Connections and Preparations This section describes how to install the projector and screen, how to connect the equipment from which you want to make sure it contains the following items: Remote control... (1), Size AA (R6) batteries (2) Signal interface cable (1) Air filter (for replacement) (1) Cinema filter (1) Adjuster spacers (2) AC power cord (1) Operating Instructions (1) Inserting the batteries into the remote control Insert the batteries E ...

Operating Instructions (primary manual)
Page 7
... the lens cap from the Conversion Lens. 3 Align the screw of the Conversion Lens with the thread around the projector's lens, then turn the Filter clockwise. For projection distances when installing the Conversion Lens, see page 36. Connections and Preparations Do not use the... projector under the following conditions: Tilting the unit extremely 2 Insert the Cinema Filter, aligning its screw with the projector, allowing you to receive higher contrast color and emphasized black color by attaching or...
... the lens cap from the Conversion Lens. 3 Align the screw of the Conversion Lens with the thread around the projector's lens, then turn the Filter clockwise. For projection distances when installing the Conversion Lens, see page 36. Connections and Preparations Do not use the... projector under the following conditions: Tilting the unit extremely 2 Insert the Cinema Filter, aligning its screw with the projector, allowing you to receive higher contrast color and emphasized black color by attaching or...
Operating Instructions (primary manual)
Page 29
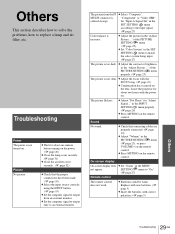
...display does c Set "Status" in the "Adjust Picture ..." c Adjust the picture in the SET SETTING menu to replace a lamp and air filter, etc. Leave the projector for "Input-A Signal Sel" in the PICTURE SETTING menu (1 page 25), or press VOLUME + on . Others This section describes how to...No picture. for about one minute before turning on the power. (1 page 20) c Close the lamp cover securely. (1 page 31) c Close the air filter cover securely. (1 page 32) c Check that connecting cables are properly connected. (1 page 10) c Adjust "Volume" in the SET SETTING menu according to ...
...display does c Set "Status" in the "Adjust Picture ..." c Adjust the picture in the SET SETTING menu to replace a lamp and air filter, etc. Leave the projector for "Input-A Signal Sel" in the PICTURE SETTING menu (1 page 25), or press VOLUME + on . Others This section describes how to...No picture. for about one minute before turning on the power. (1 page 20) c Close the lamp cover securely. (1 page 31) c Close the air filter cover securely. (1 page 32) c Check that connecting cables are properly connected. (1 page 10) c Adjust "Volume" in the SET SETTING menu according to ...
Operating Instructions (primary manual)
Page 30
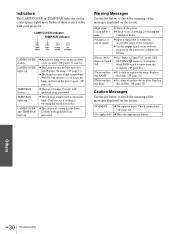
...31 and 32) c The lamp has reached the end of range! Lamp off the power. Replace the filter. Replace the lamp. (1 page 31) c The lamp becomes a high temperature. Consult with qualified Sony personnel. Check to check the meaning of the messages displayed on the screen. c The electrical system breaks ... the SET SETTING menu to "Computer" when RGB signal is input from the computer. (1 page 27) Please replace c It is any trouble with your projector. c Input a signal that is broken. c Set the output signal on the power again. (1 page 20) c The fan is within the acceptable ...
...31 and 32) c The lamp has reached the end of range! Lamp off the power. Replace the filter. Replace the lamp. (1 page 31) c The lamp becomes a high temperature. Consult with qualified Sony personnel. Check to check the meaning of the messages displayed on the screen. c The electrical system breaks ... the SET SETTING menu to "Computer" when RGB signal is input from the computer. (1 page 27) Please replace c It is any trouble with your projector. c Input a signal that is broken. c Set the output signal on the power again. (1 page 20) c The fan is within the acceptable ...
Operating Instructions (primary manual)
Page 32
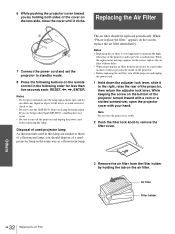
Replacing the Air Filter 2 1 7 Connect the power cord and set the projector to standby mode. 8 Press the following buttons on the lens side, close the cover until it clicks. 6 While pushing the projector cover toward you by holding both sides of the cover on the remote control in the following order for less than five seconds each: RESET,
Replacing the Air Filter 2 1 7 Connect the power cord and set the projector to standby mode. 8 Press the following buttons on the lens side, close the cover until it clicks. 6 While pushing the projector cover toward you by holding both sides of the cover on the remote control in the following order for less than five seconds each: RESET,
Operating Instructions (primary manual)
Page 33
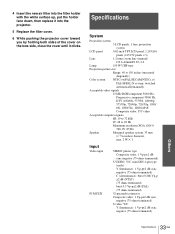
... down, then replace it into the projector. 5 Replace the filter cover. 6 While pushing the projector cover toward you by holding both sides of the cover on the lens side, close the cover until it clicks. Specifications System Projection system 3 LCD panels, 1 lens, projection system LCD panel 0.62-inch TFT LCD panel, 1,245,816 pixels (415,272...
... down, then replace it into the projector. 5 Replace the filter cover. 6 While pushing the projector cover toward you by holding both sides of the cover on the lens side, close the cover until it clicks. Specifications System Projection system 3 LCD panels, 1 lens, projection system LCD panel 0.62-inch TFT LCD panel, 1,245,816 pixels (415,272...
Operating Instructions (primary manual)
Page 34
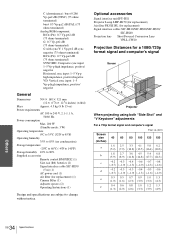
...(1) AC power cord (1) Air filter (for a 1080i/720p format signal and computer's signal Screen dc 12˚ f e 7˚ ab Projector When projecting using both "Side Shot... -0.4 -0.5 -0.6 (-0.7) (-1.0) (-1.0) (-1.3) (-1.6) (-2.0) e 0.3 0.5 0.7 0.9 1.0 1.3 (1.0) (1.6) (2.3) (3.0) (3.3) (4.3) f 0.4 0.6 0.8 1.0 1.2 1.5 (1.3) (2.0) (2.6) (3.3) (3.9) (4.9) Others 34 GB Specifications Optional accessories Signal interface unit IFU-HS1 Projector Lamp LMP-H150 (for replacement) Air filter PK-HS1FL (for replacement) Signal interface cables SIC-HS10/SIC-HS20/SIC-HS30/ SIC-HS40 Projection lens...
...(1) AC power cord (1) Air filter (for a 1080i/720p format signal and computer's signal Screen dc 12˚ f e 7˚ ab Projector When projecting using both "Side Shot... -0.4 -0.5 -0.6 (-0.7) (-1.0) (-1.0) (-1.3) (-1.6) (-2.0) e 0.3 0.5 0.7 0.9 1.0 1.3 (1.0) (1.6) (2.3) (3.0) (3.3) (4.3) f 0.4 0.6 0.8 1.0 1.2 1.5 (1.3) (2.0) (2.6) (3.3) (3.9) (4.9) Others 34 GB Specifications Optional accessories Signal interface unit IFU-HS1 Projector Lamp LMP-H150 (for replacement) Air filter PK-HS1FL (for replacement) Signal interface cables SIC-HS10/SIC-HS20/SIC-HS30/ SIC-HS40 Projection lens...

Operating Instructions (primary manual)
Page 41
Rear Air filter cover (1 page 32) Lamp cover (1 page 31) Rear remote control detector (1 page 12) S VIDEO INPUT connector (mini DIN 4-pin)/VIDEO INPUT jack (phono type) (1 page 10) AUDIO L/R INPUT jacks (phono type) (1 page 10) Speaker FOCUS ring (1 page 13) ZOOM ring (1 page 13) Adjuster (1 page 13) ~ AC IN socket PJ MULTI INPUT connector (32-pin multi) (1 page 11) Others 41 Location of Controls GB
Rear Air filter cover (1 page 32) Lamp cover (1 page 31) Rear remote control detector (1 page 12) S VIDEO INPUT connector (mini DIN 4-pin)/VIDEO INPUT jack (phono type) (1 page 10) AUDIO L/R INPUT jacks (phono type) (1 page 10) Speaker FOCUS ring (1 page 13) ZOOM ring (1 page 13) Adjuster (1 page 13) ~ AC IN socket PJ MULTI INPUT connector (32-pin multi) (1 page 11) Others 41 Location of Controls GB
Operating Instructions (primary manual)
Page 43
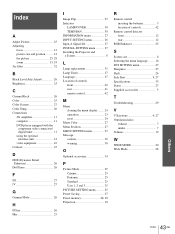
Index A Adjust Picture 25 Adjusting focus 13 picture size and position........... 12 the picture 25, 28 zoom 13, 19 Air filter 32 B Black Level Adj (Adjust 26 Brightness 25 C Cinema Black 26 Color 25 Color System 27 Color Temp 26 Connections AV amplifier 11 computer... 30 INFORMATION menu 27 INPUT SETTING menu 26 Input-A Signal Sel 27 INSTALL SETTING menu 27 Installing the Projector and a Screen 8 L Lamp replacement 31 Lamp Timer 27 Language 27 Location of controls front 40 rear 41 remote control 42 M Menu clearing the menu display......... 24 operation 23 reset 24 Menu ...
Index A Adjust Picture 25 Adjusting focus 13 picture size and position........... 12 the picture 25, 28 zoom 13, 19 Air filter 32 B Black Level Adj (Adjust 26 Brightness 25 C Cinema Black 26 Color 25 Color System 27 Color Temp 26 Connections AV amplifier 11 computer... 30 INFORMATION menu 27 INPUT SETTING menu 26 Input-A Signal Sel 27 INSTALL SETTING menu 27 Installing the Projector and a Screen 8 L Lamp replacement 31 Lamp Timer 27 Language 27 Location of controls front 40 rear 41 remote control 42 M Menu clearing the menu display......... 24 operation 23 reset 24 Menu ...
Marketing Specifications & Features
Page 2
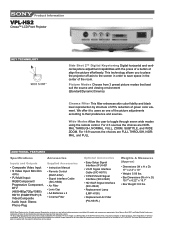
... Instruction Manual • Remote Control (RM-PJHS2) • Signal Interface Cable (SIC-HS50) • Air Filter • Lens Cap • AA Batteries x 2 • Cinema Filter Optional Accessories • Easy Setup Signal Interface (IFU-HS1 • V/L/R Signal Interface Cable (SIC-HS10) ...169;2002 Sony Electronics Inc. This technology allows you to place the projector off axis to the screen in part without written permission is possible. We offer it to toggle through seven wide modes using the remote control. Product Information VPL-HS2 Cineza™ LCD Front Projector KEY ...
... Instruction Manual • Remote Control (RM-PJHS2) • Signal Interface Cable (SIC-HS50) • Air Filter • Lens Cap • AA Batteries x 2 • Cinema Filter Optional Accessories • Easy Setup Signal Interface (IFU-HS1 • V/L/R Signal Interface Cable (SIC-HS10) ...169;2002 Sony Electronics Inc. This technology allows you to place the projector off axis to the screen in part without written permission is possible. We offer it to toggle through seven wide modes using the remote control. Product Information VPL-HS2 Cineza™ LCD Front Projector KEY ...


