

Home Entertainment Brochure
Page 1
HS1 SPECIFICATIONS OPTICAL Projection system: LCD panels: Projection lens: Lamp: Screen coverage: 3 LCD panels, 1 lens, projection system 0.7-inch p-Si TFT SVGA (800 x 600) LCD panels; 1,440,000 pixels (480,000 pixels per panel x 3 panels) 1.2x zoom lens; Y/C Video, ...Optional Accessories • IFU-HS1 Signal Interface Unit for replacement • PK-HS1FL Projector Air Filter >THE ENTIRE HOME ENTERTAINMENT REVOLUTION COMES DOWN TO THIS Sony Electronics Inc. 1 Sony Drive Park Ridge, NY 07656 © 2001 Sony Electronics Inc. Sony, Cineza, the Cineza Logo, Handycam, Memory Stick,...
HS1 SPECIFICATIONS OPTICAL Projection system: LCD panels: Projection lens: Lamp: Screen coverage: 3 LCD panels, 1 lens, projection system 0.7-inch p-Si TFT SVGA (800 x 600) LCD panels; 1,440,000 pixels (480,000 pixels per panel x 3 panels) 1.2x zoom lens; Y/C Video, ...Optional Accessories • IFU-HS1 Signal Interface Unit for replacement • PK-HS1FL Projector Air Filter >THE ENTIRE HOME ENTERTAINMENT REVOLUTION COMES DOWN TO THIS Sony Electronics Inc. 1 Sony Drive Park Ridge, NY 07656 © 2001 Sony Electronics Inc. Sony, Cineza, the Cineza Logo, Handycam, Memory Stick,...

Home Entertainment Brochure
Page 2
..., like you're in JPEG format with the Sony Cineza Projector, you input your audience sits front and center. And you'll have input capability... games, a bedroom for "keystone" effect. The Cineza Projector is capable of the Sony Cineza™: the VPL-HS1 Digital Home Entertainment LCD Projector. On-screen menus guide you when it easy. ...Cineza Projector experience can place your projector at an angle to your screen, rather than most exciting *Viewable area, measured diagonally. Digital satellite broadcasts, DVD movies, and next- C I N E Z A H S 1 150" VPL-HS1 Projected...
..., like you're in JPEG format with the Sony Cineza Projector, you input your audience sits front and center. And you'll have input capability... games, a bedroom for "keystone" effect. The Cineza Projector is capable of the Sony Cineza™: the VPL-HS1 Digital Home Entertainment LCD Projector. On-screen menus guide you when it easy. ...Cineza Projector experience can place your projector at an angle to your screen, rather than most exciting *Viewable area, measured diagonally. Digital satellite broadcasts, DVD movies, and next- C I N E Z A H S 1 150" VPL-HS1 Projected...
Operating Instructions
Page 3
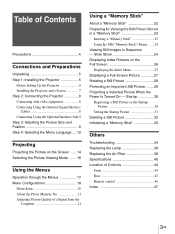
... the Air Filter 39 Specifications 40 Location of Controls 44 Front 44 Rear 45 Remote control 46 Index 47 3GB Table of Contents Precautions 4 Connections and Preparations Unpacking 5 Step 1: Installing the Projector 5 Before Setting Up the Projector 6 Installing the Projector and a Screen 7 Step 2: Connecting the Projector 8 Connecting with video equipment 8 Connecting Using the Optional Signal...
... the Air Filter 39 Specifications 40 Location of Controls 44 Front 44 Rear 45 Remote control 46 Index 47 3GB Table of Contents Precautions 4 Connections and Preparations Unpacking 5 Step 1: Installing the Projector 5 Before Setting Up the Projector 6 Installing the Projector and a Screen 7 Step 2: Connecting the Projector 8 Connecting with video equipment 8 Connecting Using the Optional Signal...

Operating Instructions
Page 5
...can obtain good picture quality even when you project the picture from the side of the screen ("SIDE SHOT") (1 page 7). Connections and Preparations Connections and Preparations This section describes how to install the projector and screen, how to connect the equipment from... the following items: Remote control (1), Size AA (R6) batteries (2) You can enjoy home entertainment with this projector in the illustration. 5 Unpacking / Step 1: Installing the Projector GB Enjoying home theater Signal interface cable (1) Air filter (for replacement) (1) Enjoying video games on a large...
...can obtain good picture quality even when you project the picture from the side of the screen ("SIDE SHOT") (1 page 7). Connections and Preparations Connections and Preparations This section describes how to install the projector and screen, how to connect the equipment from... the following items: Remote control (1), Size AA (R6) batteries (2) You can enjoy home entertainment with this projector in the illustration. 5 Unpacking / Step 1: Installing the Projector GB Enjoying home theater Signal interface cable (1) Air filter (for replacement) (1) Enjoying video games on a large...

Operating Instructions
Page 7
... format signal, computer's signal and data stored in the "Memory Stick" are shown on page 41. 2 Project an image on the size of the screen. 1 Determine the installation position of the projector with the lens end come within the area in the illustration, by using the values a, b, c and...as a guide. Align the bottom of the adjuster of the projector and screen. d: Minimum projection distance between the screen and the center of the projector's lens when you use the horizontal distance b, or when you place the projector with the center of the screen and the center of the lens...
... format signal, computer's signal and data stored in the "Memory Stick" are shown on page 41. 2 Project an image on the size of the screen. 1 Determine the installation position of the projector with the lens end come within the area in the illustration, by using the values a, b, c and...as a guide. Align the bottom of the adjuster of the projector and screen. d: Minimum projection distance between the screen and the center of the projector's lens when you use the horizontal distance b, or when you place the projector with the center of the screen and the center of the lens...

Operating Instructions
Page 10
...green. 3 Turn on the equipment connected to project the picture on the projector. Each time you press the button, the input indication changes. (1 page 15) VIDEO 1 INPUT 6 Adjust the size and position of the connected equipment. 4 Press INPUT to the projector. Move the zoom lever to adjust the picture...green. Zoom lever Use the adjuster to adjust the picture size. Adjuster stopper You can move the projector, then replace the stopper. The ON/STANDBY indicator lights in red and the projector goes into a wall outlet. Refer to the operating instructions of the picture to 2° each...
...green. 3 Turn on the equipment connected to project the picture on the projector. Each time you press the button, the input indication changes. (1 page 15) VIDEO 1 INPUT 6 Adjust the size and position of the connected equipment. 4 Press INPUT to the projector. Move the zoom lever to adjust the picture...green. Zoom lever Use the adjuster to adjust the picture size. Adjuster stopper You can move the projector, then replace the stopper. The ON/STANDBY indicator lights in red and the projector goes into a wall outlet. Refer to the operating instructions of the picture to 2° each...

Operating Instructions
Page 11
... that the right side of the picture fits the right side of the screen. Connections and Preparations When projecting from the side Picture Screen When projecting from the center Corrects the vertical distortion. For the projector positioned on the left side of the screen, adjust so that the top edge of the picture...
... that the right side of the picture fits the right side of the screen. Connections and Preparations When projecting from the side Picture Screen When projecting from the center Corrects the vertical distortion. For the projector positioned on the left side of the screen, adjust so that the top edge of the picture...

Operating Instructions
Page 14
... INPUT repeatedly to the projector. Projecting the Picture on the projector. Refer to the operating instructions of the picture to turn on the Screen 1 Plug the AC power cord into standby mode. Projecting Projecting This section describes how to operate the projector to view the picture ...from the video equipment connected to the projector. ON/ STANDBY Lights in red and the projector goes into a wall outlet. The ON/STANDBY indicator ...
... INPUT repeatedly to the projector. Projecting the Picture on the projector. Refer to the operating instructions of the picture to turn on the Screen 1 Plug the AC power cord into standby mode. Projecting Projecting This section describes how to operate the projector to view the picture ...from the video equipment connected to the projector. ON/ STANDBY Lights in red and the projector goes into a wall outlet. The ON/STANDBY indicator ...

Operating Instructions
Page 15
... running and the ON/STANDBY indicator lights in green and the fan continues to run to reduce the internal heat. You can turn off the projector by holding the [/1 (on/ standby) switch for about one second, instead of the picture. Adjust to adjust the volume. appears on /standby...) switch. Zoom lever 6 Move the focus lever to adjust the focus. Projecting To view the picture from Press INPUT to display Sound is heard from the equipment connected to Video equipment VIDEO 1 connected to VIDEO INPUT on...
... running and the ON/STANDBY indicator lights in green and the fan continues to run to reduce the internal heat. You can turn off the projector by holding the [/1 (on/ standby) switch for about one second, instead of the picture. Adjust to adjust the volume. appears on /standby...) switch. Zoom lever 6 Move the focus lever to adjust the focus. Projecting To view the picture from Press INPUT to display Sound is heard from the equipment connected to Video equipment VIDEO 1 connected to VIDEO INPUT on...

Operating Instructions
Page 16
...MS SLIDE - The settings are stored, and you can view the picture with the adjusted picture quality by using the VIDEO MEMORY button on the projector. Press one of the USER 1, 2 and 3 buttons, then adjust the picture by pressing the button. (1 page 20) OFF Select for...selected memory of the button selects the above item. Each press of the projector. DYNAMIC Select for normal viewing condition in each input signal. STANDARD Recommended for enhanced picture contrast and sharpness. Projecting Selecting the Picture Viewing Mode You can select the picture viewing mode using ...
...MS SLIDE - The settings are stored, and you can view the picture with the adjusted picture quality by using the VIDEO MEMORY button on the projector. Press one of the USER 1, 2 and 3 buttons, then adjust the picture by pressing the button. (1 page 20) OFF Select for...selected memory of the button selects the above item. Each press of the projector. DYNAMIC Select for normal viewing condition in each input signal. STANDARD Recommended for enhanced picture contrast and sharpness. Projecting Selecting the Picture Viewing Mode You can select the picture viewing mode using ...

Operating Instructions
Page 20
...can select picture viewing mode that can be stored are stored, you can view the picture with the adjusted picture quality by the projection angle. STANDARD: Recommended for 10 minutes, and the lamp goes out and the cooling fan keeps running. Use this item after ...English, French, German, Italian, Spanish, Japanese, Chinese, Portuguese and Korean. Selects the language used in the menus. The data is retrieved when the projector power is a holizontal trapezoid ( ), select H, then correct the distortion with DIGIT KEYSTONE. When the picture is turned on -screen displays except for ...
...can select picture viewing mode that can be stored are stored, you can view the picture with the adjusted picture quality by the projection angle. STANDARD: Recommended for 10 minutes, and the lamp goes out and the cooling fan keeps running. Use this item after ...English, French, German, Italian, Spanish, Japanese, Chinese, Portuguese and Korean. Selects the language used in the menus. The data is retrieved when the projector power is a holizontal trapezoid ( ), select H, then correct the distortion with DIGIT KEYSTONE. When the picture is turned on -screen displays except for ...
Operating Instructions
Page 21
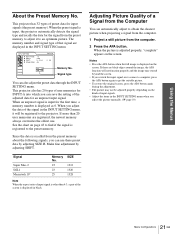
... first time, a memory number is displayed on page 43 to find if the signal is registered to obtain the clearest picture when projecting a signal from the computer. 1 Project a still picture from the preset memory about the following signals, you switch the input signal or re-connect a computer, press the.... • To restore the original screen, press the APA button again during the adjustment. • The picture may not be registered to the projector. When an unpreset signal is input for an unpreset input signal. Signal Super Mac-2 SGI-1 Macintosh 19" Memory No. 23 23 25 SIZE 1312...
... first time, a memory number is displayed on page 43 to find if the signal is registered to obtain the clearest picture when projecting a signal from the computer. 1 Project a still picture from the preset memory about the following signals, you switch the input signal or re-connect a computer, press the.... • To restore the original screen, press the APA button again during the adjustment. • The picture may not be registered to the projector. When an unpreset signal is input for an unpreset input signal. Signal Super Mac-2 SGI-1 Macintosh 19" Memory No. 23 23 25 SIZE 1312...

Operating Instructions
Page 27
... with the index screen Press M, m, < or , to the MS home Select "Return" and press ENTER. Indicates when a picture is displayed. With this menu you can project one of the selected contents are displayed.
... with the index screen Press M, m, < or , to the MS home Select "Return" and press ENTER. Indicates when a picture is displayed. With this menu you can project one of the selected contents are displayed.

Operating Instructions
Page 28
... File: SPORTS Date:7/29/2001 14:22 Full Screen Close Return Protect Rotate Startup Delete 4 Press M or m to fit the screen. The selected picture is projected to select "Full Screen," and press ENTER. The index pictures of the selected contents are displayed. MENU ENTER RESET 2-5 1 Perform steps 1 through 5 in "Viewing Still...
... File: SPORTS Date:7/29/2001 14:22 Full Screen Close Return Protect Rotate Startup Delete 4 Press M or m to fit the screen. The selected picture is projected to select "Full Screen," and press ENTER. The index pictures of the selected contents are displayed. MENU ENTER RESET 2-5 1 Perform steps 1 through 5 in "Viewing Still...

Operating Instructions
Page 30
... You can change this still picture to the one minute, even if no signal is protected. Using a "Memory Stick" 30 GB Projecting a Selected Picture When the Power Is Turned On - The index pictures of the selected contents are protected. Startup 3 Press M, m,... in the Index menu for all the pictures in step 5. On: A picture selected on , the specific still picture stored in the projector is projected automatically for the selected picture. Startup When the projector is turned on the Index screen is input. Reciipe flour - - - - 2 sugar - - - 1/2 salt - - - - -1/2...
... You can change this still picture to the one minute, even if no signal is protected. Using a "Memory Stick" 30 GB Projecting a Selected Picture When the Power Is Turned On - The index pictures of the selected contents are protected. Startup 3 Press M, m,... in the Index menu for all the pictures in step 5. On: A picture selected on , the specific still picture stored in the projector is projected automatically for the selected picture. Startup When the projector is turned on the Index screen is input. Reciipe flour - - - - 2 sugar - - - 1/2 salt - - - - -1/2...

Operating Instructions
Page 31
... appears. You can register one picture used for the startup picture, per one "Memory Stick." SETTING Startup: Original Original Custom Off Using a "Memory Stick" 31 Projecting a Selected Picture When the Power Is Turned On - The startup mark is displayed in the Index menu. Setting the Startup Picture SIDE SHOT + - VOLUME + INPUT...
... appears. You can register one picture used for the startup picture, per one "Memory Stick." SETTING Startup: Original Original Custom Off Using a "Memory Stick" 31 Projecting a Selected Picture When the Power Is Turned On - The startup mark is displayed in the Index menu. Setting the Startup Picture SIDE SHOT + - VOLUME + INPUT...
Operating Instructions
Page 36
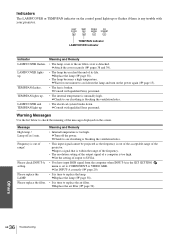
... lamp and turn on the power again (1 page 15). • The fan is any trouble with your projector. c Replace the lamp (1 page 38). • It is too high. c Consult with qualified Sony personnel. Warning Messages Use the list below to replace the air filter. Message High temp.! c Replace the... VIDEO GBR. TEMP/FAN lights up . c Check to see if nothing is blocking the ventilation holes. • This input signal cannot be projected as the frequency is set to cool down . Please check INPUT-A setting. Indicators The LAMP/COVER or TEMP/FAN indicator on the control panel ...
... lamp and turn on the power again (1 page 15). • The fan is any trouble with your projector. c Replace the lamp (1 page 38). • It is too high. c Consult with qualified Sony personnel. Warning Messages Use the list below to replace the air filter. Message High temp.! c Replace the... VIDEO GBR. TEMP/FAN lights up . c Check to see if nothing is blocking the ventilation holes. • This input signal cannot be projected as the frequency is set to cool down . Please check INPUT-A setting. Indicators The LAMP/COVER or TEMP/FAN indicator on the control panel ...

Operating Instructions
Page 40
Others 40 GB Specifications Specifications System Projection system 3 LCD panels, 1 lens, projection system LCD panel 0.7-inch TFT LCD panel, 1,440,000 pixels (480,000 pixels × 3) Lens 1.3 times zoom lens (manual) Lamp 120 W UHP type Projection picture size Range: 40 to 150 inches (measured diagonally) Color system NTSC3.58/PAL/SECAM/NTSC4.43/ PAL-M/PAL-N system, switched...
Others 40 GB Specifications Specifications System Projection system 3 LCD panels, 1 lens, projection system LCD panel 0.7-inch TFT LCD panel, 1,440,000 pixels (480,000 pixels × 3) Lens 1.3 times zoom lens (manual) Lamp 120 W UHP type Projection picture size Range: 40 to 150 inches (measured diagonally) Color system NTSC3.58/PAL/SECAM/NTSC4.43/ PAL-M/PAL-N system, switched...
Operating Instructions
Page 41
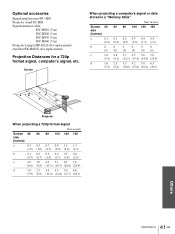
...HS1 Projector stand SU-HS1 Signal interface cable SIC-HS10 (5 m) SIC-HS20 (5 m) SIC-HS30 (5 m) SIC-HS40 (5 m) Projector Lamp LMP-H120 (for replacement) Air filter PK-HS1FL (for replacement) Projection Distances for a 720p format signal, computer's signal, etc. Screen When projecting... (9.2) (12.1) (15.4) (18.4) (23.0) d 1.6 2.5 3.3 4.2 5.0 6.3 (5.2) (8.2) (10.8) (13.8) (16.4) (20.7) c ab 10° d 10° Projector When projecting a 720p format signal Unit: m (feet) Screen 40 60 80 100 120 150 size (inches) a 0.3 0.5 0.7 0.9 1.1 1.3 (1.0) (1.6) (2.3) (3.0) (3.6) (4.3) b 0.1 ...
...HS1 Projector stand SU-HS1 Signal interface cable SIC-HS10 (5 m) SIC-HS20 (5 m) SIC-HS30 (5 m) SIC-HS40 (5 m) Projector Lamp LMP-H120 (for replacement) Air filter PK-HS1FL (for replacement) Projection Distances for a 720p format signal, computer's signal, etc. Screen When projecting... (9.2) (12.1) (15.4) (18.4) (23.0) d 1.6 2.5 3.3 4.2 5.0 6.3 (5.2) (8.2) (10.8) (13.8) (16.4) (20.7) c ab 10° d 10° Projector When projecting a 720p format signal Unit: m (feet) Screen 40 60 80 100 120 150 size (inches) a 0.3 0.5 0.7 0.9 1.1 1.3 (1.0) (1.6) (2.3) (3.0) (3.6) (4.3) b 0.1 ...

Operating Instructions
Page 47
...menu 18, 19 INPUT-A 20 INSTALL SETTING menu ...... 18, 20 Installing the Projector and a Screen 7 K KEYSTONE DIR 20 KEYSTONE MEM 20 L Lamp replacement 38 LAMP TIMER 20 LANGUAGE 20 Location of controls front 44 rear 45 remote control 46 M "Memory Stick" delete a still picture 32...36 O Optional accesories 41 P PICTURE CTRL menu 18, 19 POWER SAVING 20 Preset memory 21, 43 Projection 14 R Remote control inserting the batteries 5 location of controls 46 Remote control detector front 9 rear 9 RGB ENHANCER 19 S SCAN CONV 19 Screen size 7 Selecting the menu language .......... 12...
...menu 18, 19 INPUT-A 20 INSTALL SETTING menu ...... 18, 20 Installing the Projector and a Screen 7 K KEYSTONE DIR 20 KEYSTONE MEM 20 L Lamp replacement 38 LAMP TIMER 20 LANGUAGE 20 Location of controls front 44 rear 45 remote control 46 M "Memory Stick" delete a still picture 32...36 O Optional accesories 41 P PICTURE CTRL menu 18, 19 POWER SAVING 20 Preset memory 21, 43 Projection 14 R Remote control inserting the batteries 5 location of controls 46 Remote control detector front 9 rear 9 RGB ENHANCER 19 S SCAN CONV 19 Screen size 7 Selecting the menu language .......... 12...


