Operating Instructions
Page 2
...product's enclosure that may cause harmful interference to constitute a risk of important operating and maintenance (servicing) instructions in a particular installation. For the customers in accordance with the instructions, may cause undesired operation. This equipment generates, uses, and can be ...Oradell, NJ 07649 U.S.A. This equipment has been tested and found to Part 15 of Conformity Trade Name: SONY Model No.: VPL-CS6/VPL-CX6/VPL-EX1 Responsible Party: Sony Electronics Inc. Consult the dealer or an experienced radio/ TV technician for a Class B digital device, pursuant...
...product's enclosure that may cause harmful interference to constitute a risk of important operating and maintenance (servicing) instructions in a particular installation. For the customers in accordance with the instructions, may cause undesired operation. This equipment generates, uses, and can be ...Oradell, NJ 07649 U.S.A. This equipment has been tested and found to Part 15 of Conformity Trade Name: SONY Model No.: VPL-CS6/VPL-CX6/VPL-EX1 Responsible Party: Sony Electronics Inc. Consult the dealer or an experienced radio/ TV technician for a Class B digital device, pursuant...

Operating Instructions
Page 3
Voor de klanten in Nederland Gooi de batterij niet weg maar lever deze in Canada This Class B digital apparatus complies with Canadian ICES-003. The socket-outlet should be installed near the equipment and be easily accessible. 3 GB For the customers in als klein chemisch afval (KCA).
Voor de klanten in Nederland Gooi de batterij niet weg maar lever deze in Canada This Class B digital apparatus complies with Canadian ICES-003. The socket-outlet should be installed near the equipment and be easily accessible. 3 GB For the customers in als klein chemisch afval (KCA).

Operating Instructions
Page 5
.../Left Side 10 Rear/Right Side/Bottom 10 Control Panel 12 Connector Panel 12 Remote Commander 13 Setting Up and Projecting Installing the Projector 17 Connecting the Projector 18 Connecting with a Computer ......18 Connecting with a VCR or 15k RGB/Component Equipment 20 Selecting the Menu Language ... PICTURE SETTING Menu ..... 34 The INPUT SETTING Menu .......... 35 The SET SETTING Menu 37 The MENU SETTING Menu .......... 38 The INSTALL SETTING Menu ..... 39 The INFORMATION Menu 40 Maintenance GB Maintenance 41 Replacing the Lamp 41 Cleaning the Air Filter 42 Troubleshooting 44 ...
.../Left Side 10 Rear/Right Side/Bottom 10 Control Panel 12 Connector Panel 12 Remote Commander 13 Setting Up and Projecting Installing the Projector 17 Connecting the Projector 18 Connecting with a Computer ......18 Connecting with a VCR or 15k RGB/Component Equipment 20 Selecting the Menu Language ... PICTURE SETTING Menu ..... 34 The INPUT SETTING Menu .......... 35 The SET SETTING Menu 37 The MENU SETTING Menu .......... 38 The INSTALL SETTING Menu ..... 39 The INFORMATION Menu 40 Maintenance GB Maintenance 41 Replacing the Lamp 41 Cleaning the Air Filter 42 Troubleshooting 44 ...

Operating Instructions
Page 6
...it is recommended that the carpet and wall paper be removed with a cloth lightly dampened with a mild detergent solution. On LCD data projector • The LCD data projector is completed. • Do not spread a cloth or paper under the unit. On illumination • To obtain the ...qualified personnel before operating it further. • Unplug the unit from the wall outlet while the cooling fan is desirable to install the projector in operation. Adjust the powered tilt adjuster carefully after its automatic operation is manufactured using high-precision technology. Never use a ...
...it is recommended that the carpet and wall paper be removed with a cloth lightly dampened with a mild detergent solution. On LCD data projector • The LCD data projector is completed. • Do not spread a cloth or paper under the unit. On illumination • To obtain the ...qualified personnel before operating it further. • Unplug the unit from the wall outlet while the cooling fan is desirable to install the projector in operation. Adjust the powered tilt adjuster carefully after its automatic operation is manufactured using high-precision technology. Never use a ...

Operating Instructions
Page 7
...ventilation holes. otherwise, the air filter will be obstructed. Do not place the unit on Installation GB Overview Notes on Installation Unsuitable Installation Do not install the projector in the following conditions. Lamp off automatically after one minute. • Leave space of dust...off in 1 min." Highly heated and humid Unsuitable Conditions Do not use the projector under the following situations. These installations may rise rapidly. Poorly ventilated Very dusty Avoid installing the unit in a location where the temperature may cause malfunction or damage to...
...ventilation holes. otherwise, the air filter will be obstructed. Do not place the unit on Installation GB Overview Notes on Installation Unsuitable Installation Do not install the projector in the following conditions. Lamp off automatically after one minute. • Leave space of dust...off in 1 min." Highly heated and humid Unsuitable Conditions Do not use the projector under the following situations. These installations may rise rapidly. Poorly ventilated Very dusty Avoid installing the unit in a location where the temperature may cause malfunction or damage to...

Operating Instructions
Page 8
...installation may build up. soft case. ... 1) The SXGA and SXGA+ signals are allocated on the top of the projector. For easier operations, the keys that converts the input signal within 1024 × 768 dots (VPL-CX6/EX1) or 800 × 600 dots (VPL-CS6) . • Compatible input signals Notes This projector accepts video... signals of • The unit is not a malfunction of the projector. otherwise, the internal heat may cause...
...installation may build up. soft case. ... 1) The SXGA and SXGA+ signals are allocated on the top of the projector. For easier operations, the keys that converts the input signal within 1024 × 768 dots (VPL-CX6/EX1) or 800 × 600 dots (VPL-CS6) . • Compatible input signals Notes This projector accepts video... signals of • The unit is not a malfunction of the projector. otherwise, the internal heat may cause...

Operating Instructions
Page 13
... be installed in the SET SETTING menu is lit. 6 Video input connector Connect to this connector. 3 Memory Stick slot (VPL-CX6 only) The Memory Stick can be inserted. Do not remove the Memory Stick while the access lamp is set to "On." Never insert an object other than the Memory Stick. For VPL-CS6/VPL-CX6...
... be installed in the SET SETTING menu is lit. 6 Video input connector Connect to this connector. 3 Memory Stick slot (VPL-CX6 only) The Memory Stick can be inserted. Do not remove the Memory Stick while the access lamp is set to "On." Never insert an object other than the Memory Stick. For VPL-CS6/VPL-CX6...

Operating Instructions
Page 15
For VPL-EX1 1 I / 1 (on/standby) key 2 ENTER/arrow key (M/m/ Be sure to open the lid, then install the two size AA (R6) batteries (supplied) with the correct polarity. While pressing the lid, slide it. Overview To install batteries 1 Push and slide to install the battery from the # side. 2 Replace the lid.
For VPL-EX1 1 I / 1 (on/standby) key 2 ENTER/arrow key (M/m/ Be sure to open the lid, then install the two size AA (R6) batteries (supplied) with the correct polarity. While pressing the lid, slide it. Overview To install batteries 1 Push and slide to install the battery from the # side. 2 Replace the lid.

Operating Instructions
Page 16
...front or rear remote control detector. • The operation range is , the wider the angle within which the commander can control the projector becomes. 2 Install the lithium battery. + side facing upward 16 GB Location and Function of the lithium battery holder by picking it, and pull out... Keep the lithium battery out of the reach of children. • Should the battery be swallowed, immediately consult a doctor. Notes on the projector. Before using the Remote Commander Pull out the clear film from the Remote Commander. 3 Put the lithium battery holder back into the Remote Commander...
...front or rear remote control detector. • The operation range is , the wider the angle within which the commander can control the projector becomes. 2 Install the lithium battery. + side facing upward 16 GB Location and Function of the lithium battery holder by picking it, and pull out... Keep the lithium battery out of the reach of children. • Should the battery be swallowed, immediately consult a doctor. Notes on the projector. Before using the Remote Commander Pull out the clear film from the Remote Commander. 3 Put the lithium battery holder back into the Remote Commander...

Operating Instructions
Page 17
... value shown in the table above . Note When using the projector by suspending it from the ceilling, consult with qualified Sony personel. (fee charged) 17 Installing the Projector GB The distance between the lens and the screen varies depending on the size of the lens VPL-CS6/VPL-CX6 Unit: m (feet) Screen size 40 60 80 100...
... value shown in the table above . Note When using the projector by suspending it from the ceilling, consult with qualified Sony personel. (fee charged) 17 Installing the Projector GB The distance between the lens and the screen varies depending on the size of the lens VPL-CS6/VPL-CX6 Unit: m (feet) Screen size 40 60 80 100...
Operating Instructions
Page 26
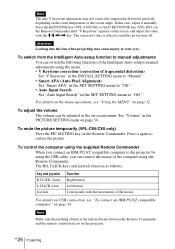
Note The auto V keystone adjustment may not correct the trapezoidal distortion perfectly, depending on the screen, and adjust the value with the M/m/ Press the KEYSTONE key (VPL-CS6/CX6) or the D KEYSTONE key (VPL-EX1) on the Remote Commander until "V Keystone" appears on the room temperature or the screen angle. In this case, adjust it manually.
Note The auto V keystone adjustment may not correct the trapezoidal distortion perfectly, depending on the screen, and adjust the value with the M/m/ Press the KEYSTONE key (VPL-CS6/CX6) or the D KEYSTONE key (VPL-EX1) on the Remote Commander until "V Keystone" appears on the room temperature or the screen angle. In this case, adjust it manually.
Operating Instructions
Page 27
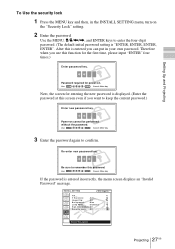
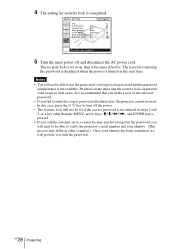
Use the MENU, M/m/ Setting Up and Projecting To Use the security lock 1 Press the MENU key and then, in the INSTALL SETTING menu, turn on the "Security Lock" setting. 2 Enter the password.
Use the MENU, M/m/ Setting Up and Projecting To Use the security lock 1 Press the MENU key and then, in the INSTALL SETTING menu, turn on the "Security Lock" setting. 2 Enter the password.
Operating Instructions
Page 28
... security lock will not be able to on the next time. V Keystone: Auto... INSTALL SETTING X Tilt... In this case, press the I / 1 key to enter the correct password after three tries, the projector cannot be set to use the projector if you fail to turn off and disconnect the AC power cord. Be please...
... security lock will not be able to on the next time. V Keystone: Auto... INSTALL SETTING X Tilt... In this case, press the I / 1 key to enter the correct password after three tries, the projector cannot be set to use the projector if you fail to turn off and disconnect the AC power cord. Be please...

Operating Instructions
Page 39
... the bottom : Sets a higher value. Adjustments and Settings Using the Menu The INSTALL SETTING Menu The INSTALL SETTING menu is used for manual correction using the projector at normal altitudes. INSTALL SETTING Tilt... Pressing the F on the TILT adjustment key or m/< key on ... Note The auto V Keystone adjustment may not correct the trapezoidal distortion perfectly, depending on page 27. 39 The INSTALL SETTING Menu GB Normally set to the projector. On: Turns on the screen horizontally and/or vertically. V Keystone: Auto Image Flip: Off Background: Blue Lamp...
... the bottom : Sets a higher value. Adjustments and Settings Using the Menu The INSTALL SETTING Menu The INSTALL SETTING menu is used for manual correction using the projector at normal altitudes. INSTALL SETTING Tilt... Pressing the F on the TILT adjustment key or m/< key on ... Note The auto V Keystone adjustment may not correct the trapezoidal distortion perfectly, depending on page 27. 39 The INSTALL SETTING Menu GB Normally set to the projector. On: Turns on the screen horizontally and/or vertically. V Keystone: Auto Image Flip: Off Background: Blue Lamp...
Operating Instructions
Page 54
... Hue 34 I Illumination 38 Image Flip 39 INPUT A connector .......12 pin assignment 51 Input-A Signal Sel. .........38 Installation examples ..... 17 notes 7 unsuitable conditions .... 7 unsuitable installation .. 7 L Lamp Mode 39 Lamp replacement .......... 41 Lamp Timer 40 Language 38 selecting the menu language 22 Lens protector... Commander .. 13 top/front/left side ........ 10 M Menu clearing the menu display 33 INFORMATION Menu 40 INPUT SETTING menu 35 INSTALL SETTING menu 39 MENU SETTING menu 38 PICTURE SETTING menu 34 SET SETTING menu . 37 using the menu 32 Menu Color 38...
... Hue 34 I Illumination 38 Image Flip 39 INPUT A connector .......12 pin assignment 51 Input-A Signal Sel. .........38 Installation examples ..... 17 notes 7 unsuitable conditions .... 7 unsuitable installation .. 7 L Lamp Mode 39 Lamp replacement .......... 41 Lamp Timer 40 Language 38 selecting the menu language 22 Lens protector... Commander .. 13 top/front/left side ........ 10 M Menu clearing the menu display 33 INFORMATION Menu 40 INPUT SETTING menu 35 INSTALL SETTING menu 39 MENU SETTING menu 38 PICTURE SETTING menu 34 SET SETTING menu . 37 using the menu 32 Menu Color 38...
