Operating Instructions
Page 5
... on Installation 7 Unsuitable Installation 7 Unsuitable Conditions 7 Features 8 Location and Function of Controls .10 Top/Front/Left Side 10 Rear/Right Side/Bottom 10 Control Panel 12 Connector Panel 12 Remote Commander 13 Setting Up and Projecting Installing the Projector 16 Connecting the Projector 17 Connecting with a Computer ......17 Connecting with a VCR or 15k RGB/Component...
... on Installation 7 Unsuitable Installation 7 Unsuitable Conditions 7 Features 8 Location and Function of Controls .10 Top/Front/Left Side 10 Rear/Right Side/Bottom 10 Control Panel 12 Connector Panel 12 Remote Commander 13 Setting Up and Projecting Installing the Projector 16 Connecting the Projector 17 Connecting with a Computer ......17 Connecting with a VCR or 15k RGB/Component...
Operating Instructions
Page 8
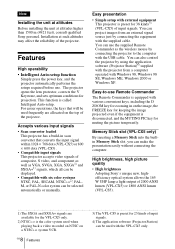
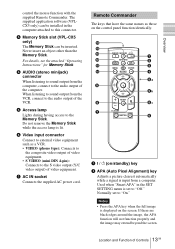
... use Remote Commander The Remote Commander is disconnected, and the MUTING PIC key for the VPL-CX5 only. Accepts various input signals • Scan converter loaded This projector has a build-in on the top of 2000 ANSI lumen (VPL-CX5) or 1800 ANSI lumen (VPL-CS5). ......cable. You can also control the projector by using the application software (Projector Station)4) supplied with the projector from an external signal source just by connecting the projector to -use . Installation at altitudes higher than 1500 m (4921 feet), consult qualified Sony personel. High brightness, ...
... use Remote Commander The Remote Commander is disconnected, and the MUTING PIC key for the VPL-CX5 only. Accepts various input signals • Scan converter loaded This projector has a build-in on the top of 2000 ANSI lumen (VPL-CX5) or 1800 ANSI lumen (VPL-CS5). ......cable. You can also control the projector by using the application software (Projector Station)4) supplied with the projector from an external signal source just by connecting the projector to -use . Installation at altitudes higher than 1500 m (4921 feet), consult qualified Sony personel. High brightness, ...
Operating Instructions
Page 11
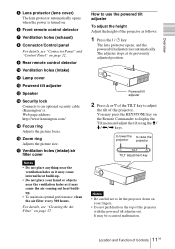
... "Connector Panel" and "Control Panel" on page 12. 9 Rear remote control detector 0 Ventilation holes (intake) qa Lamp cover qs Powered tilt adjuster qd Speaker qf Security lock Connects to use the powered tilt adjuster To adjust the height Adjust the height of the projector. Powered tilt adjuster 2... automatically opens when the power is turned on. 6 Front remote control detector 7 Ventilation holes (exhaust) 8 Connector/Control panel For details, see "Cleaning the Air Filter" on the Remote Commander to adjust the tilt of the projector as it may press the KEYSTONE key on page 37. ...
... "Connector Panel" and "Control Panel" on page 12. 9 Rear remote control detector 0 Ventilation holes (intake) qa Lamp cover qs Powered tilt adjuster qd Speaker qf Security lock Connects to use the powered tilt adjuster To adjust the height Adjust the height of the projector. Powered tilt adjuster 2... automatically opens when the power is turned on. 6 Front remote control detector 7 Ventilation holes (exhaust) 8 Connector/Control panel For details, see "Cleaning the Air Filter" on the Remote Commander to adjust the tilt of the projector as it may press the KEYSTONE key on page 37. ...
Operating Instructions
Page 13
... mouse function with the supplied Remote Commander. The supplied application software (VPLCX5 only) can be installed in the SET SETTING menu is displayed on the control panel function identically. Used when "Smart APA" in the computer attached to the audio output of video equipment. 7 AC...for Memory Stick. 4 AUDIO (stereo minijack) connector When listening to sound output from the computer, connect to this connector. 3 Memory Stick slot (VPL-CX5 only) The Memory Stick can be inserted. Normally set to "Off." Never insert an object other than the Memory Stick. Notes •...
... mouse function with the supplied Remote Commander. The supplied application software (VPLCX5 only) can be installed in the SET SETTING menu is displayed on the control panel function identically. Used when "Smart APA" in the computer attached to the audio output of video equipment. 7 AC...for Memory Stick. 4 AUDIO (stereo minijack) connector When listening to sound output from the computer, connect to this connector. 3 Memory Stick slot (VPL-CX5 only) The Memory Stick can be inserted. Normally set to "Off." Never insert an object other than the Memory Stick. Notes •...
Operating Instructions
Page 14
...to the computer using the supplied Remote Commander" on page 25. 6 FUNCTION 1, 2 keys (VPL-CX5 only) When you connect the projector with a computer, you can.... For details, see the README file and the HELP file supplied with the projector. key Enlarges the image at a desired location on a mouse. Use an arrow... file to the FUNCTION key by using the USB cable to the projector using the supplied application software. • You can open a file ... like a mouse of a computer only when the projector is displayed on the screen. 8 D ZOOM (Digital Zoom) +/- Press again to mute...
...to the computer using the supplied Remote Commander" on page 25. 6 FUNCTION 1, 2 keys (VPL-CX5 only) When you connect the projector with a computer, you can.... For details, see the README file and the HELP file supplied with the projector. key Enlarges the image at a desired location on a mouse. Use an arrow... file to the FUNCTION key by using the USB cable to the projector using the supplied application software. • You can open a file ... like a mouse of a computer only when the projector is displayed on the screen. 8 D ZOOM (Digital Zoom) +/- Press again to mute...
Operating Instructions
Page 15
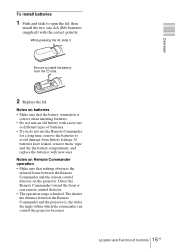
While pressing the lid, slide it. The shorter the distance between the Remote Commander and the remote control detector on the projector. If batteries have leaked, remove them, wipe and dry the battery compartment, and replace the batteries with the correct polarity. ...Notes on batteries • Make sure that nothing obstructs the infrared beam between the Remote Commander and the projector is limited. Direct the Remote Commander toward the front or rear remote control detector. • The operation range is , the wider the angle within which the commander can...
While pressing the lid, slide it. The shorter the distance between the Remote Commander and the remote control detector on the projector. If batteries have leaked, remove them, wipe and dry the battery compartment, and replace the batteries with the correct polarity. ...Notes on batteries • Make sure that nothing obstructs the infrared beam between the Remote Commander and the projector is limited. Direct the Remote Commander toward the front or rear remote control detector. • The operation range is , the wider the angle within which the commander can...
Operating Instructions
Page 21
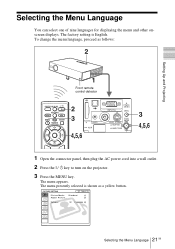
... select one of nine languages for displaying the menu and other onscreen displays. The factory setting is shown as follows: Setting Up and Projecting Front remote control detector FREEZE MS SLIDE I / 1 KEYSTONE INPUT APA MENU PIC ENTER MUTING ACCESS AUDIO INPUT A POWER SAVING MENU VIDEO S VIDEO TEMP/FAN PUSH ENTER LAMP/...COVER 1 Open the connector panel, then plug the AC power cord into a wall outlet. 2 Press the I / 1 key to turn on the projector. 3 Press the MENU key. Input A Vo l u m e : 30 21 Selecting the Menu Language GB The menu appears.
... select one of nine languages for displaying the menu and other onscreen displays. The factory setting is shown as follows: Setting Up and Projecting Front remote control detector FREEZE MS SLIDE I / 1 KEYSTONE INPUT APA MENU PIC ENTER MUTING ACCESS AUDIO INPUT A POWER SAVING MENU VIDEO S VIDEO TEMP/FAN PUSH ENTER LAMP/...COVER 1 Open the connector panel, then plug the AC power cord into a wall outlet. 2 Press the I / 1 key to turn on the projector. 3 Press the MENU key. Input A Vo l u m e : 30 21 Selecting the Menu Language GB The menu appears.
Operating Instructions
Page 23
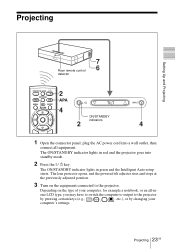
...the AC power cord into a wall outlet, then connect all -inone LCD type, you may have to switch the computer to output to the projector. Projecting 23 GB Projecting Setting Up and Projecting 7 Rear remote control 6 detector FREEZE MS SLIDE I / 1 key. Depending on the ...equipment connected to the projector by pressing certain keys (e.g., / LCD VGA , / , etc.), or by changing your...
...the AC power cord into a wall outlet, then connect all -inone LCD type, you may have to switch the computer to output to the projector. Projecting 23 GB Projecting Setting Up and Projecting 7 Rear remote control 6 detector FREEZE MS SLIDE I / 1 key. Depending on the ...equipment connected to the projector by pressing certain keys (e.g., / LCD VGA , / , etc.), or by changing your...
Operating Instructions
Page 25
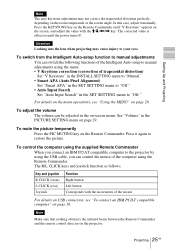
In this case, adjust it manually. Setting Up and Projecting Note The auto keystone adjustment may not correct the trapezoidal distortion perfectly, depending on the screen, and adjust the value with the M/m/ Press the KEYSTONE key on the Remote Commander until "V Keystone" appears on the room temperature or the screen angle.
In this case, adjust it manually. Setting Up and Projecting Note The auto keystone adjustment may not correct the trapezoidal distortion perfectly, depending on the screen, and adjust the value with the M/m/ Press the KEYSTONE key on the Remote Commander until "V Keystone" appears on the room temperature or the screen angle.
Operating Instructions
Page 48
...replacement .......... 36 Lamp Timer 35 Language 33 selecting the menu language 21 Location and function of controls connector panel .......... 12 control panel 12 rear/right side/bottom . 10 Remote Commander .. 13 top/front/left side ........ 10 M Menu clearing the menu display 29 INFORMATION... assignment 44 Power turn on 23 Power Saving 12, 33 Powered tilt adjuster ...... 11 Precautions 6 R Remote Commander ...... 13 location and function of controls 13 Remote control detector front 11 Reset resettable items 29 resetting the item ........ 29 RGB Enhancer 30 S Scan Converter 31...
...replacement .......... 36 Lamp Timer 35 Language 33 selecting the menu language 21 Location and function of controls connector panel .......... 12 control panel 12 rear/right side/bottom . 10 Remote Commander .. 13 top/front/left side ........ 10 M Menu clearing the menu display 29 INFORMATION... assignment 44 Power turn on 23 Power Saving 12, 33 Powered tilt adjuster ...... 11 Precautions 6 R Remote Commander ...... 13 location and function of controls 13 Remote control detector front 11 Reset resettable items 29 resetting the item ........ 29 RGB Enhancer 30 S Scan Converter 31...

