Operating Instructions
Page 8
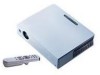
...Commander The Remote Commander is disconnected, and the MUTING PIC key for the VPL-CX5 only. You can be selected automatically or manually. Accepts various input signals • Scan converter loaded This projector has a build-in on the image, the FREEZE key for keeping the...brightness Adopting Sony's unique new, highefficiency optical system allows the 165 W UHP lamp a light output of 2000 ANSI lumen (VPL-CX5) or 1800 ANSI lumen (VPL-CS5). ... 1) The SXGA and SXGA+ signals are allocated on can project images from a computer operated with the VPL-CX5 only. The projector opens the...
...Commander The Remote Commander is disconnected, and the MUTING PIC key for the VPL-CX5 only. You can be selected automatically or manually. Accepts various input signals • Scan converter loaded This projector has a build-in on the image, the FREEZE key for keeping the...brightness Adopting Sony's unique new, highefficiency optical system allows the 165 W UHP lamp a light output of 2000 ANSI lumen (VPL-CX5) or 1800 ANSI lumen (VPL-CS5). ... 1) The SXGA and SXGA+ signals are allocated on can project images from a computer operated with the VPL-CX5 only. The projector opens the...
Operating Instructions
Page 14
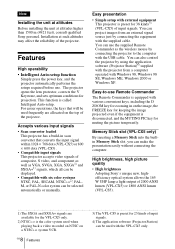
...you want to its original size. b) Joystick c) R Click key: Functions as the left button on a mouse. Note Connect a computer to the projector using the USB cable to the FUNCTION key by using the supplied application software. key Enlarges the image at a desired location on the screen. +: ... on a mouse. This icon indicates the point you adjust the picture manually. 3 PIC MUTING key Used to the computer using the supplied Remote Commander" on page 25. 6 FUNCTION 1, 2 keys (VPL-CX5 only) When you connect the projector with a computer, you can cancel the adjustment by pressing the APA ...
...you want to its original size. b) Joystick c) R Click key: Functions as the left button on a mouse. Note Connect a computer to the projector using the USB cable to the FUNCTION key by using the supplied application software. key Enlarges the image at a desired location on the screen. +: ... on a mouse. This icon indicates the point you adjust the picture manually. 3 PIC MUTING key Used to the computer using the supplied Remote Commander" on page 25. 6 FUNCTION 1, 2 keys (VPL-CX5 only) When you connect the projector with a computer, you can cancel the adjustment by pressing the APA ...
Operating Instructions
Page 17
...projector, make sure to the computer's instruction manual. For details, refer to the computer's operating instructions supplied with your computer. • This projector is compatible with a DDC, turn the projector on according to the following procedures. 1 Connect the projector...To connect the projector, refer to the illustrations on . 3 Start the computer. 17 Connecting the Projector GB Notes • The projector accepts VGA, SVGA, XGA, SXGA (VPL-CX5 only) and SXGA+ (VPL-CX5 only) ... XGA mode (VPL-CX5) or SVGA mode (VPL-CS5) for each connection. • Insert the cable plugs firmly;
...projector, make sure to the computer's instruction manual. For details, refer to the computer's operating instructions supplied with your computer. • This projector is compatible with a DDC, turn the projector on according to the following procedures. 1 Connect the projector...To connect the projector, refer to the illustrations on . 3 Start the computer. 17 Connecting the Projector GB Notes • The projector accepts VGA, SVGA, XGA, SXGA (VPL-CX5 only) and SXGA+ (VPL-CX5 only) ... XGA mode (VPL-CX5) or SVGA mode (VPL-CS5) for each connection. • Insert the cable plugs firmly;
Operating Instructions
Page 19
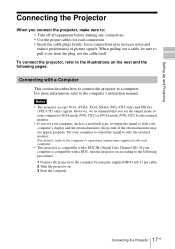
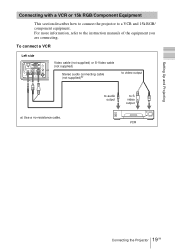
... and 15k RGB/ component equipment. Setting Up and Projecting Connecting with a VCR or 15k RGB/Component Equipment This section describes how to connect the projector to the instruction manuals of the equipment you are connecting. to audio output to video output a) Use a no-resistance cable. To connect a VCR Left side ACCESS AUDIO... ENTER LAMP/COVER Video cable (not supplied) or S-Video cable (not supplied) Stereo audio connecting cable (not supplied)a) to S video output VCR 19 Connecting the Projector GB
... and 15k RGB/ component equipment. Setting Up and Projecting Connecting with a VCR or 15k RGB/Component Equipment This section describes how to connect the projector to the instruction manuals of the equipment you are connecting. to audio output to video output a) Use a no-resistance cable. To connect a VCR Left side ACCESS AUDIO... ENTER LAMP/COVER Video cable (not supplied) or S-Video cable (not supplied) Stereo audio connecting cable (not supplied)a) to S video output VCR 19 Connecting the Projector GB
Operating Instructions
Page 24
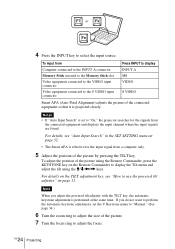
... from a computer only. 5 Adjust the position of the picture by pressing the TILT key. F7 or Fx Fn 4 Press the INPUT key to "On," the projector searches for the input signal from the connected equipment and displays the input channel where the input signals are found.
... from a computer only. 5 Adjust the position of the picture by pressing the TILT key. F7 or Fx Fn 4 Press the INPUT key to "On," the projector searches for the input signal from the connected equipment and displays the input channel where the input signals are found.
Operating Instructions
Page 25
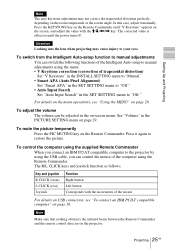
In this case, adjust it manually. Setting Up and Projecting Note The auto keystone adjustment may not correct the trapezoidal distortion perfectly, depending on the screen, and adjust the value with the M/m/ Press the KEYSTONE key on the Remote Commander until "V Keystone" appears on the room temperature or the screen angle.
In this case, adjust it manually. Setting Up and Projecting Note The auto keystone adjustment may not correct the trapezoidal distortion perfectly, depending on the screen, and adjust the value with the M/m/ Press the KEYSTONE key on the Remote Commander until "V Keystone" appears on the room temperature or the screen angle.
Operating Instructions
Page 34
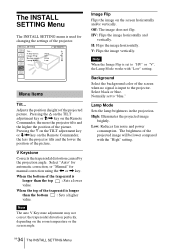
...distortion caused by the projection angle. Note When the Image Flip is input to the projector. Normally set to "blue." The brightness of the projected picture. Select "Auto" for automatic correction, or "Manual" for changing the settings of the screen when no signal is set to "HV... and power consumption. Background Select the background color of the projector. V Keystone: Image Flip: Background: Lamp Mode: Auto Off Blue Low Input A Menu Items Tilt... The INSTALL SETTING Menu The INSTALL SETTING menu is used for manual correction using the < or , key. HV: Flips the...
...distortion caused by the projection angle. Note When the Image Flip is input to the projector. Normally set to "blue." The brightness of the projected picture. Select "Auto" for automatic correction, or "Manual" for changing the settings of the screen when no signal is set to "HV... and power consumption. Background Select the background color of the projector. V Keystone: Image Flip: Background: Lamp Mode: Auto Off Blue Low Input A Menu Items Tilt... The INSTALL SETTING Menu The INSTALL SETTING menu is used for manual correction using the < or , key. HV: Flips the...
Operating Instructions
Page 43
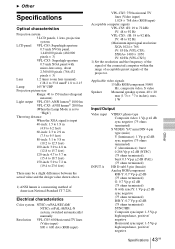
... When the XGA signal is a measuring method of the projector. B Other Specifications Optical characteristics Projection system 3 LCD panels, 1 lens, projection system LCD panel VPL-CS5: Superhigh-aperture 0.7-inch SVGA panel, 1,440,000 pixels (480,000 pixels × 3) VPL-CX5: Superhigh-aperture 0.7-inch XGA panel with sync/Y: 1...Color system NTSC3.58/PAL/SECAM/ NTSC4.43/PAL-M/PAL-N system, switched automatically/ manually Resolution VPL-CS5: 600 horizontal TV lines (Video input) 800 × 600 dots (RGB input) VPL-CX5: 750 horizontal TV lines (Video input) 1,024 × 768 dots (...
... When the XGA signal is a measuring method of the projector. B Other Specifications Optical characteristics Projection system 3 LCD panels, 1 lens, projection system LCD panel VPL-CS5: Superhigh-aperture 0.7-inch SVGA panel, 1,440,000 pixels (480,000 pixels × 3) VPL-CX5: Superhigh-aperture 0.7-inch XGA panel with sync/Y: 1...Color system NTSC3.58/PAL/SECAM/ NTSC4.43/PAL-M/PAL-N system, switched automatically/ manually Resolution VPL-CS5: 600 horizontal TV lines (Video input) 800 × 600 dots (RGB input) VPL-CX5: 750 horizontal TV lines (Video input) 1,024 × 768 dots (...


