
User Guide
Page 3
... a Port Replicator ...71 Connecting External Speakers ...75 Connecting an External Display ...76 Selecting Display Modes...79 Using the Multiple Monitors Function ...80 Connecting an External Microphone ...82 Connecting a Universal Serial Bus (USB) Device...83 Connecting a Printer ...86 Connecting an i.LINK Device ...87 Connecting to a Network (LAN) ...89 Customizing Your VAIO Computer ...90 Setting the Password ...91 Using Fingerprint Authentication ...102 Using Trusted Platform Module (TPM)...127 Setting Up Your Computer with VAIO Central ...134 Using the Power Saving Modes ...135 Managing...
... a Port Replicator ...71 Connecting External Speakers ...75 Connecting an External Display ...76 Selecting Display Modes...79 Using the Multiple Monitors Function ...80 Connecting an External Microphone ...82 Connecting a Universal Serial Bus (USB) Device...83 Connecting a Printer ...86 Connecting an i.LINK Device ...87 Connecting to a Network (LAN) ...89 Customizing Your VAIO Computer ...90 Setting the Password ...91 Using Fingerprint Authentication ...102 Using Trusted Platform Module (TPM)...127 Setting Up Your Computer with VAIO Central ...134 Using the Power Saving Modes ...135 Managing...

User Guide
Page 7
... online Specifications: 1 Connect to the Internet. 2 Go to use Instant Mode. Printed Documentation ❑ Welcome mat - Non-printed Documentation ❑ User Guide (this manual) - The online Specifications describe the hardware and software configuration of connections, setting up information, etc. ❑ Safety Information - It also includes information about the software programs included with your VAIO computer. Contains an overview of your computer. Contains safety guidelines and owner information...
... online Specifications: 1 Connect to the Internet. 2 Go to use Instant Mode. Printed Documentation ❑ Welcome mat - Non-printed Documentation ❑ User Guide (this manual) - The online Specifications describe the hardware and software configuration of connections, setting up information, etc. ❑ Safety Information - It also includes information about the software programs included with your VAIO computer. Contains an overview of your computer. Contains safety guidelines and owner information...
User Guide
Page 8
...software drivers, and drive partition(s) or your entire hard disk drive to the original factory installed settings. n8 N Before Use ❑ VAIO Recovery Guide - To access this on -screen guide: 1 Click Start and Help and Support. 2 Click Manuals & Specifications. 3 Click SmartWi Connection Utility Guide. To access this on -screen guide: 1 Click Start and Help and Support. 2 Click Manuals & Specifications. 3 Click VAIO Recovery Guide. ❑ SmartWi™ Connection Utility Guide (Selected models only) - Provides information about setting up Bluetooth, wireless LAN, and wireless...
...software drivers, and drive partition(s) or your entire hard disk drive to the original factory installed settings. n8 N Before Use ❑ VAIO Recovery Guide - To access this on -screen guide: 1 Click Start and Help and Support. 2 Click Manuals & Specifications. 3 Click SmartWi Connection Utility Guide. To access this on -screen guide: 1 Click Start and Help and Support. 2 Click Manuals & Specifications. 3 Click VAIO Recovery Guide. ❑ SmartWi™ Connection Utility Guide (Selected models only) - Provides information about setting up Bluetooth, wireless LAN, and wireless...

User Guide
Page 9
... on -screen User Guide, warranty information, other Internet sites you need. n9 N Before Use Help and Support Help and Support is easy to find the answers you might find the on how to back up and restore your operating system, system software, and your personal data. ❑ Wireless & Network Learn about wireless connections including Bluetooth Wireless technology and Wireless LAN. To access Help and Support, click Start and Help and Support. ❑ Manuals & Specifications Here...
... on -screen User Guide, warranty information, other Internet sites you need. n9 N Before Use Help and Support Help and Support is easy to find the answers you might find the on how to back up and restore your operating system, system software, and your personal data. ❑ Wireless & Network Learn about wireless connections including Bluetooth Wireless technology and Wireless LAN. To access Help and Support, click Start and Help and Support. ❑ Manuals & Specifications Here...

User Guide
Page 20
... key while the indicator is on , blinks when the computer is in Sleep mode, and turns off . Indicator Power 1 Battery e Media Access Optical disc drive Muting % Hard disk drive Num lock Caps lock Scroll lock Bluetooth technology Functions Illuminates when the power of power, and double-blinks when the battery pack is charging. The Scr Lk key functions differently depending on . Illuminates when the computer is using and does not work with the following indicator lights. The numeric keypad is not active when the indicator...
... key while the indicator is on , blinks when the computer is in Sleep mode, and turns off . Indicator Power 1 Battery e Media Access Optical disc drive Muting % Hard disk drive Num lock Caps lock Scroll lock Bluetooth technology Functions Illuminates when the power of power, and double-blinks when the battery pack is charging. The Scr Lk key functions differently depending on . Illuminates when the computer is using and does not work with the following indicator lights. The numeric keypad is not active when the indicator...

User Guide
Page 36
Use non-cartridge discs or discs with removable cartridge. *4 Writing data to single-sided DVD-RAM discs (2.6 GB) compliant with DVD-RW Version 1.1/1.2. *3 The DVD±RW/RAM disc drive on your optical disc drive supports. Use the table below to DVD-R discs compliant with DVD-R for the type of media your model. DVD-ROM P P P P P P P P P P P - *1 Supports writing data to see which types of optical disc drive installed on your computer does not support the DVD-RAM cartridge. Video RW RW DL DL RAM DVD±RW...
Use non-cartridge discs or discs with removable cartridge. *4 Writing data to single-sided DVD-RAM discs (2.6 GB) compliant with DVD-RW Version 1.1/1.2. *3 The DVD±RW/RAM disc drive on your optical disc drive supports. Use the table below to DVD-R discs compliant with DVD-R for the type of media your model. DVD-ROM P P P P P P P P P P P - *1 Supports writing data to see which types of optical disc drive installed on your computer does not support the DVD-RAM cartridge. Video RW RW DL DL RAM DVD±RW...

User Guide
Page 60
... model supports the Bluetooth functionality and/or the IEEE 802.11a/b/g standard. The Wireless LAN indicator lights up a connection or network on the taskbar to see whether your desired wireless option(s) and click OK. 2 Click Start and Control Panel. 3 Click View network status and tasks under Network and Internet. 4 Click Set up . You cannot select the 5 GHz bandwidth, which is used for the IEEE 802.11a standard, on ad-hoc networks. 1 Turn on -screen instructions...
... model supports the Bluetooth functionality and/or the IEEE 802.11a/b/g standard. The Wireless LAN indicator lights up a connection or network on the taskbar to see whether your desired wireless option(s) and click OK. 2 Click Start and Control Panel. 3 Click View network status and tasks under Network and Internet. 4 Click Set up . You cannot select the 5 GHz bandwidth, which is used for the IEEE 802.11a standard, on ad-hoc networks. 1 Turn on -screen instructions...

User Guide
Page 62
... desired wireless option(s) and click OK. 3 Click Start and Control Panel. 4 Click View network status and tasks under Network and Internet. 5 Click Manage wireless networks. 6 Click Add. 7 Follow the on the taskbar to 64 alphanumeric characters long. See the manual that support the Bluetooth functionality* and/or the IEEE 802.11a/b/g standard*, double-click ( / ) on -screen instructions. * See the online Specifications to a wireless network 1 Make sure an access point is set up . The Wireless LAN indicator lights...
... desired wireless option(s) and click OK. 3 Click Start and Control Panel. 4 Click View network status and tasks under Network and Internet. 5 Click Manage wireless networks. 6 Click Add. 7 Follow the on the taskbar to 64 alphanumeric characters long. See the manual that support the Bluetooth functionality* and/or the IEEE 802.11a/b/g standard*, double-click ( / ) on -screen instructions. * See the online Specifications to a wireless network 1 Make sure an access point is set up . The Wireless LAN indicator lights...
User Guide
Page 63
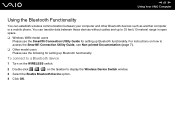
... the taskbar to display the Wireless Device Switch window. 3 Select the Enable Bluetooth Device option. 4 Click OK. To connect to a Bluetooth device 1 Turn on the WIRELESS switch. 2 Double-click ( / ) on how to access the SmartWi Connection Utility Guide, see Non-printed Documentation (page 7). ❑ Other model users Please see the SmartWi Connection Utility Guide for setting up Bluetooth functionality. n 63 N Using Your VAIO Computer Using the Bluetooth Functionality You can transfer data between your computer and other Bluetooth devices such as another computer or...
... the taskbar to display the Wireless Device Switch window. 3 Select the Enable Bluetooth Device option. 4 Click OK. To connect to a Bluetooth device 1 Turn on the WIRELESS switch. 2 Double-click ( / ) on how to access the SmartWi Connection Utility Guide, see Non-printed Documentation (page 7). ❑ Other model users Please see the SmartWi Connection Utility Guide for setting up Bluetooth functionality. n 63 N Using Your VAIO Computer Using the Bluetooth Functionality You can transfer data between your computer and other Bluetooth devices such as another computer or...

User Guide
Page 70
... using the various ports on the computer. ❑ Connecting a Port Replicator (page 71) ❑ Connecting External Speakers (page 75) ❑ Connecting an External Display (page 76) ❑ Selecting Display Modes (page 79) ❑ Using the Multiple Monitors Function (page 80) ❑ Connecting an External Microphone (page 82) ❑ Connecting a Universal Serial Bus (USB) Device (page 83) ❑ Connecting a Printer (page 86) ❑ Connecting an i.LINK Device (page 87) ❑ Connecting to a Network (LAN) (page 89) n 70 N Using Peripheral Devices
... using the various ports on the computer. ❑ Connecting a Port Replicator (page 71) ❑ Connecting External Speakers (page 75) ❑ Connecting an External Display (page 76) ❑ Selecting Display Modes (page 79) ❑ Using the Multiple Monitors Function (page 80) ❑ Connecting an External Microphone (page 82) ❑ Connecting a Universal Serial Bus (USB) Device (page 83) ❑ Connecting a Printer (page 86) ❑ Connecting an i.LINK Device (page 87) ❑ Connecting to a Network (LAN) (page 89) n 70 N Using Peripheral Devices

User Guide
Page 89
... the network (LAN) connector on the computer or the (optional) port replicator and the other end to 100BASE-TX/10BASE-T-type networks with the default settings. ! Telephone lines cannot be connected to the network with an Ethernet network cable. n 89 N Using Peripheral Devices Connecting to a Network (LAN) You can be connected to the connector may cause damage, overheating, or fire. - For detailed settings and devices needed to connect to the network, ask your network...
... the network (LAN) connector on the computer or the (optional) port replicator and the other end to 100BASE-TX/10BASE-T-type networks with the default settings. ! Telephone lines cannot be connected to the network with an Ethernet network cable. n 89 N Using Peripheral Devices Connecting to a Network (LAN) You can be connected to the connector may cause damage, overheating, or fire. - For detailed settings and devices needed to connect to the network, ask your network...

User Guide
Page 91
... two types of passwords to protect your computer: power-on the BIOS setup screen, as well as starting the computer. For more information, see Using Fingerprint Authentication (page 102). Once you will allow for other users will be charged, and your computer from unauthorized access. To set the power-on password will have set the user password, you can use BIOS functions to protect your computer may need assistance to reset it safe...
... two types of passwords to protect your computer: power-on the BIOS setup screen, as well as starting the computer. For more information, see Using Fingerprint Authentication (page 102). Once you will allow for other users will be charged, and your computer from unauthorized access. To set the power-on password will have set the user password, you can use BIOS functions to protect your computer may need assistance to reset it safe...

User Guide
Page 95
... the F2 key when the VAIO logo appears. To remove the password, leave the Enter New Password and Confirm New Password fields blank and press the Enter key. 6 Press the < or , key to display the Security tab, select Set User Password, and then press the Enter key. 5 On the password entry screen, enter the current password once and a new password twice, and then press the Enter key. At the confirmation prompt, press the Enter key. The BIOS setup screen appears. If...
... the F2 key when the VAIO logo appears. To remove the password, leave the Enter New Password and Confirm New Password fields blank and press the Enter key. 6 Press the < or , key to display the Security tab, select Set User Password, and then press the Enter key. 5 On the password entry screen, enter the current password once and a new password twice, and then press the Enter key. At the confirmation prompt, press the Enter key. The BIOS setup screen appears. If...
User Guide
Page 133
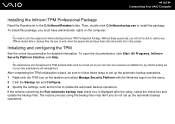
... the automatic backup operations. Then, double-click C:\Infineon\setup.exe to write down the passwords and keep them safe and private from the menu. 2 Click the Backup tab and Configure. 3 Specify the settings, such as the time to restore any defects arising out of TPM-protected data must have administrator rights on the computer. ! You need to set a few passwords while installing Infineon TPM...
... the automatic backup operations. Then, double-click C:\Infineon\setup.exe to write down the passwords and keep them safe and private from the menu. 2 Click the Backup tab and Configure. 3 Specify the settings, such as the time to restore any defects arising out of TPM-protected data must have administrator rights on the computer. ! You need to set a few passwords while installing Infineon TPM...

User Guide
Page 146
...; Turn off your computer and disconnect it from its power source (that are ready to change the module. The number of available slots depends on adding/removing memory modules ❑ Be careful when changing memory. If such a station is not available, do so may cause damage to your system. n 146 N Upgrading Your VAIO Computer Adding and Removing Memory If you want to expand the functionality of...
...; Turn off your computer and disconnect it from its power source (that are ready to change the module. The number of available slots depends on adding/removing memory modules ❑ Be careful when changing memory. If such a station is not available, do so may cause damage to your system. n 146 N Upgrading Your VAIO Computer Adding and Removing Memory If you want to expand the functionality of...
User Guide
Page 191
Follow these steps: 1 Click Start and Control Panel. 2 Click Printer under Hardware and Sound. 3 Right-click the printer icon and select Properties. 4 Click the Ports tab. 5 Click to the settings disables the bidirectional communication functions of the printer, such as data transfer, status monitoring, and remote panel. This change to cancel the Enable bidirectional support check box. 6 Click OK. n 191 N Troubleshooting Printing What should I do if...
Follow these steps: 1 Click Start and Control Panel. 2 Click Printer under Hardware and Sound. 3 Right-click the printer icon and select Properties. 4 Click the Ports tab. 5 Click to the settings disables the bidirectional communication functions of the printer, such as data transfer, status monitoring, and remote panel. This change to cancel the Enable bidirectional support check box. 6 Click OK. n 191 N Troubleshooting Printing What should I do if...

User Guide
Page 198
n 198 N Troubleshooting PC Cards What should I do if my PC Card does not work , you may need to install the most recent driver software. Follow these steps: 1 Click Start and Control Panel. 2 Click System and Maintenance. 3 Click System. 4 Click Device Manager on your computer. ❑ See the manual that came with the Microsoft Windows operating system installed on the left pane. The Device Manager window appears. 5 Double-click the device name for more...
n 198 N Troubleshooting PC Cards What should I do if my PC Card does not work , you may need to install the most recent driver software. Follow these steps: 1 Click Start and Control Panel. 2 Click System and Maintenance. 3 Click System. 4 Click Device Manager on your computer. ❑ See the manual that came with the Microsoft Windows operating system installed on the left pane. The Device Manager window appears. 5 Double-click the device name for more...
User Guide
Page 202
... of power. The driver could be installed to the AC outlet. ❑ Try using another USB port on and using a digital camera, check the battery is working at all. ❑ USB hubs may need to install software before you are using its own power supply. We recommend you are using a printer, check the power cable is connected properly to the specific port you used the first time you connected the device. ❑ See the manual that...
... of power. The driver could be installed to the AC outlet. ❑ Try using another USB port on and using a digital camera, check the battery is working at all. ❑ USB hubs may need to install software before you are using its own power supply. We recommend you are using a printer, check the power cable is connected properly to the specific port you used the first time you connected the device. ❑ See the manual that...
Safety Information
Page 2
.... Model Number: Serial Number: Notice © 2006 Sony Electronics Inc. Reproduction in whole or in a secure location. All rights reserved. SONY CANNOT WARRANT THAT THE FUNCTIONS DESCRIBED IN THIS GUIDE WILL BE UNINTERRUPTED OR ERROR-FREE. WEB SITE INFORMATION IS OBTAINED FROM VARIOUS SOURCES AND MAY BE INACCURATE. Use of such software is subject to current retail versions. 2 Software specifications are located on the back panel of...
.... Model Number: Serial Number: Notice © 2006 Sony Electronics Inc. Reproduction in whole or in a secure location. All rights reserved. SONY CANNOT WARRANT THAT THE FUNCTIONS DESCRIBED IN THIS GUIDE WILL BE UNINTERRUPTED OR ERROR-FREE. WEB SITE INFORMATION IS OBTAINED FROM VARIOUS SOURCES AND MAY BE INACCURATE. Use of such software is subject to current retail versions. 2 Software specifications are located on the back panel of...

Safety Information
Page 4
... the equipment and shall be caused when operating this device. ❑ Keep small parts away from the pacemaker. ❑ Sony is designed to malfunction. ❑ Do not use wireless LAN on your installed optical drives. moisture or rain; strong magnets or speakers that may be easily accessible. ❑ i.LINK, PC Card, monitor and USB connectors are not magnetically shielded; ambient temperature higher than...
... the equipment and shall be caused when operating this device. ❑ Keep small parts away from the pacemaker. ❑ Sony is designed to malfunction. ❑ Do not use wireless LAN on your installed optical drives. moisture or rain; strong magnets or speakers that may be easily accessible. ❑ i.LINK, PC Card, monitor and USB connectors are not magnetically shielded; ambient temperature higher than...


