User Guide
Page 3
... Connecting External Speakers ...65 Connecting an External Display ...66 Selecting Display Modes...69 Using the Multiple Monitors Function ...70 Connecting an External Microphone ...72 Connecting a Universal Serial Bus (USB) Device...73 Connecting a Printer ...76 Connecting an i.LINK Device ...77 Connecting to a Network (LAN) ...79 Customizing Your VAIO Computer ...80 Setting the Password ...81...
... Connecting External Speakers ...65 Connecting an External Display ...66 Selecting Display Modes...69 Using the Multiple Monitors Function ...70 Connecting an External Microphone ...72 Connecting a Universal Serial Bus (USB) Device...73 Connecting a Printer ...76 Connecting an i.LINK Device ...77 Connecting to a Network (LAN) ...79 Customizing Your VAIO Computer ...80 Setting the Password ...81...
User Guide
Page 4
n4 N Precautions ...101 Handling the LCD Screen ...102 Using the Power Source ...103 Handling Your Computer ...104 Handling the Built-in MOTION EYE Camera...106 Handling Floppy Disks ...107 Handling Discs ...108 Using the Battery Pack ...109 Using Headphones ...111 Handling the Memory Stick ...112 Handling the Hard Disk ...113 Updating Your Computer ...114 Troubleshooting ...115 Computer ...117 System Security ...123 Battery...124 Built-in MOTION EYE Camera...126 Internet ...129 Networking ...131 Optical Discs ...134 Display ...138 Printing ...142 Microphone ...143 Mouse ...144
n4 N Precautions ...101 Handling the LCD Screen ...102 Using the Power Source ...103 Handling Your Computer ...104 Handling the Built-in MOTION EYE Camera...106 Handling Floppy Disks ...107 Handling Discs ...108 Using the Battery Pack ...109 Using Headphones ...111 Handling the Memory Stick ...112 Handling the Hard Disk ...113 Updating Your Computer ...114 Troubleshooting ...115 Computer ...117 System Security ...123 Battery...124 Built-in MOTION EYE Camera...126 Internet ...129 Networking ...131 Optical Discs ...134 Display ...138 Printing ...142 Microphone ...143 Mouse ...144
User Guide
Page 11
...glare and reflection on the display. n 11 N Before Use ❑ Viewing angle of the display as well. ❑ Lighting - Adjust the brightness level of the computer's display - Proper lighting adds to find the best position. When using an external display, set the display at eye level or ...slightly lower when you are sitting in front of the display to avoid bright spots on the display. Use indirect lighting to the proper position. Make sure the display screen is at a comfortable viewing ...
...glare and reflection on the display. n 11 N Before Use ❑ Viewing angle of the display as well. ❑ Lighting - Adjust the brightness level of the computer's display - Proper lighting adds to find the best position. When using an external display, set the display at eye level or ...slightly lower when you are sitting in front of the display to avoid bright spots on the display. Use indirect lighting to the proper position. Make sure the display screen is at a comfortable viewing ...
User Guide
Page 19
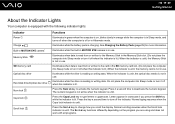
... Sleep mode or turn it off when this indicator is lit. Press the Caps Lock key to type letters in lowercase if you scroll the display. Press the Scr Lk key to the card in use . The Scr Lk key functions differently depending on the program you are using and does...
... Sleep mode or turn it off when this indicator is lit. Press the Caps Lock key to type letters in lowercase if you scroll the display. Press the Scr Lk key to the card in use . The Scr Lk key functions differently depending on the program you are using and does...
User Guide
Page 31
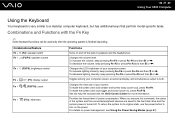
...-specific tasks. Combinations/Feature Fn + % (F2): speaker switch Fn + 2 (F3/F4): speaker volume Fn + 8 (F5/F6): brightness control Fn + /T (F7): display output Fn + / (F9/F10): zoom Fn + (F12): hibernate Functions Turns on and off the built-in speakers and the headphones. Changes the volume level. n 31... N Using Your VAIO Computer Using the Keyboard Your keyboard is finished launching. To increase the volume, keep pressing Fn+F3 or press Fn+F3 and then m or To...
...-specific tasks. Combinations/Feature Fn + % (F2): speaker switch Fn + 2 (F3/F4): speaker volume Fn + 8 (F5/F6): brightness control Fn + /T (F7): display output Fn + / (F9/F10): zoom Fn + (F12): hibernate Functions Turns on and off the built-in speakers and the headphones. Changes the volume level. n 31... N Using Your VAIO Computer Using the Keyboard Your keyboard is finished launching. To increase the volume, keep pressing Fn+F3 or press Fn+F3 and then m or To...
User Guide
Page 32
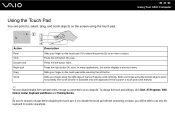
...can point to, select, drag, and scroll objects on the screen using the touch pad. Press the left button. In many applications, this action displays a shortcut menu. Be sure to use only the keyboard for pointer operations. If you disable the touch pad without connecting a mouse, you will... pointer (2) on an item or object. To change the touch pad settings, click Start, All Programs, VAIO Control Center, Keyboard and Mouse and Pointing Device. ! n 32 N Using Your VAIO Computer Action Point Click Double-click Right-click Drag Scroll Description Slide your finger on the touch pad (1) ...
...can point to, select, drag, and scroll objects on the screen using the touch pad. Press the left button. In many applications, this action displays a shortcut menu. Be sure to use only the keyboard for pointer operations. If you disable the touch pad without connecting a mouse, you will... pointer (2) on an item or object. To change the touch pad settings, click Start, All Programs, VAIO Control Center, Keyboard and Mouse and Pointing Device. ! n 32 N Using Your VAIO Computer Action Point Click Double-click Right-click Drag Scroll Description Slide your finger on the touch pad (1) ...
User Guide
Page 33
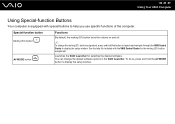
... with special buttons to display the setup window. Launches the VAIO Launcher for the muting (S1) button assignment. To do so, press and hold the button or launch and navigate through the VAIO Control Center to display the setup window. n 33 N Using Your VAIO Computer Using Special-function ...Buttons Your computer is equipped with the VAIO Control Center for selecting the desired software. See the help you use ...
... with special buttons to display the setup window. Launches the VAIO Launcher for the muting (S1) button assignment. To do so, press and hold the button or launch and navigate through the VAIO Control Center to display the setup window. n 33 N Using Your VAIO Computer Using Special-function ...Buttons Your computer is equipped with the VAIO Control Center for selecting the desired software. See the help you use ...
User Guide
Page 35
See the help file included with the software for more features. n 35 N Using Your VAIO Computer Capturing Still Images To capture a still image 1 Click Start, All Programs, ArcSoft WebCam Companion 2, and WebCam Companion 2 to launch the WebCam Companion 2. 2 Click the ... the WebCam Settings icon after step 2 and select the low light or low light compensation option in the viewfinder. 4 Click the Capture button below the displayed image.
See the help file included with the software for more features. n 35 N Using Your VAIO Computer Capturing Still Images To capture a still image 1 Click Start, All Programs, ArcSoft WebCam Companion 2, and WebCam Companion 2 to launch the WebCam Companion 2. 2 Click the ... the WebCam Settings icon after step 2 and select the low light or low light compensation option in the viewfinder. 4 Click the Capture button below the displayed image.
User Guide
Page 36
...icon after step 2 and select the low light or low light compensation option in the viewfinder. 4 Click the Record Video button below the displayed image to start movie recording. 5 When finished, click the Record Video button once again to launch the WebCam Companion 2. 2 Click the...main window. 3 Frame your subject in the properties window. See the help file included with the software for more features. n 36 N Using Your VAIO Computer Capturing Movies To capture a movie 1 Click Start, All Programs, ArcSoft WebCam Companion 2, and WebCam Companion 2 to stop movie recording. The WebCam...
...icon after step 2 and select the low light or low light compensation option in the viewfinder. 4 Click the Record Video button below the displayed image to start movie recording. 5 When finished, click the Record Video button once again to launch the WebCam Companion 2. 2 Click the...main window. 3 Frame your subject in the properties window. See the help file included with the software for more features. n 36 N Using Your VAIO Computer Capturing Movies To capture a movie 1 Click Start, All Programs, ArcSoft WebCam Companion 2, and WebCam Companion 2 to stop movie recording. The WebCam...
User Guide
Page 41
...writing is strongly recommended that are required for optimum compatibility and viewing quality. As with your external display is a two sided disc product with the High-bandwidth Digital Content Protection (HDCP) standard, you... support movie playback on DVDs and BD-ROM Disc media. This product is not possible. VAIO computers may restrict video output to the Compact Disc Digital Audio standard specifications (CD Standard). Be...the AACS key update requires Internet access. Sony does NOT guarantee the compatibility of a DualDisc may limit compatibility or prevent Blu-ray Disc ...
...writing is strongly recommended that are required for optimum compatibility and viewing quality. As with your external display is a two sided disc product with the High-bandwidth Digital Content Protection (HDCP) standard, you... support movie playback on DVDs and BD-ROM Disc media. This product is not possible. VAIO computers may restrict video output to the Compact Disc Digital Audio standard specifications (CD Standard). Be...the AACS key update requires Internet access. Sony does NOT guarantee the compatibility of a DualDisc may limit compatibility or prevent Blu-ray Disc ...

User Guide
Page 52
... arrow facing upward and pointing toward the slot. 3 Carefully slide the Memory Stick into the slot until it clicks into the slot. n 52 N Using Your VAIO Computer Inserting a Memory Stick To insert a Memory Stick 1 Locate the Memory Stick slot. 2 Hold the Memory Stick with the arrow pointing in the correct direction...
... arrow facing upward and pointing toward the slot. 3 Carefully slide the Memory Stick into the slot until it clicks into the slot. n 52 N Using Your VAIO Computer Inserting a Memory Stick To insert a Memory Stick 1 Locate the Memory Stick slot. 2 Hold the Memory Stick with the arrow pointing in the correct direction...

User Guide
Page 63
... software in use . Taking this into consideration, the IEEE 802.11g products are designed to reduce the communication speed to radio interference. n 63 N Using Your VAIO Computer The communication speed varies depending on the distance between communication devices, existence of obstacles between such devices, the radio conditions, the ambient environment that... network may be as fast as expected, changing the wireless channel on your computer. When the communication speed is not as fast as the one displayed on the access point may increase the communication speed.
... software in use . Taking this into consideration, the IEEE 802.11g products are designed to reduce the communication speed to radio interference. n 63 N Using Your VAIO Computer The communication speed varies depending on the distance between communication devices, existence of obstacles between such devices, the radio conditions, the ambient environment that... network may be as fast as expected, changing the wireless channel on your computer. When the communication speed is not as fast as the one displayed on the access point may increase the communication speed.
User Guide
Page 64
Using Peripheral Devices You can add functionality to your VAIO computer by using the various ports on the computer. ❑ Connecting External Speakers (page 65) ❑ Connecting an External Display (page 66) ❑ Selecting Display Modes (page 69) ❑ Using the Multiple Monitors Function (page 70) ❑ Connecting an External Microphone (page 72) ❑...
Using Peripheral Devices You can add functionality to your VAIO computer by using the various ports on the computer. ❑ Connecting External Speakers (page 65) ❑ Connecting an External Display (page 66) ❑ Selecting Display Modes (page 69) ❑ Using the Multiple Monitors Function (page 70) ❑ Connecting an External Microphone (page 72) ❑...
User Guide
Page 66
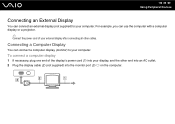
... other end into an AC outlet. 2 Plug the display cable (2) (not supplied) into your external display after connecting all other cables. Connecting a Computer Display You can connect an external display (not supplied) to your computer. n 66 N Using Peripheral Devices Connecting an External Display You can connect a computer display (monitor) to your computer. For example, you can...
... other end into an AC outlet. 2 Plug the display cable (2) (not supplied) into your external display after connecting all other cables. Connecting a Computer Display You can connect an external display (not supplied) to your computer. n 66 N Using Peripheral Devices Connecting an External Display You can connect a computer display (monitor) to your computer. For example, you can...
User Guide
Page 67
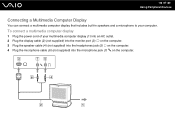
To connect a multimedia computer display 1 Plug the power cord of your computer. n 67 N Using Peripheral Devices Connecting a Multimedia Computer Display You can connect a multimedia computer display that includes built-in speakers and a microphone to your multimedia computer display (1) into an AC outlet. 2 Plug the display cable (2) (not supplied) into the monitor port (3) a on the computer. 3 Plug the speaker cable (4) (not supplied) into the headphones jack (5) i on the computer. 4 Plug the microphone cable (6) (not supplied) into the microphone jack (7) m on the computer.
To connect a multimedia computer display 1 Plug the power cord of your computer. n 67 N Using Peripheral Devices Connecting a Multimedia Computer Display You can connect a multimedia computer display that includes built-in speakers and a microphone to your multimedia computer display (1) into an AC outlet. 2 Plug the display cable (2) (not supplied) into the monitor port (3) a on the computer. 3 Plug the speaker cable (4) (not supplied) into the headphones jack (5) i on the computer. 4 Plug the microphone cable (6) (not supplied) into the microphone jack (7) m on the computer.
User Guide
Page 68
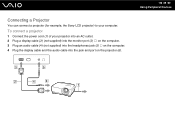
Connecting a Projector You can connect a projector (for example, the Sony LCD projector) to your projector into an AC outlet. 2 Plug a display cable (2) (not supplied) into the monitor port (3) a on the computer. 3 Plug an audio cable (4) (not supplied) into the headphones jack (5) i on the computer. 4 Plug the display cable and the audio cable into the jack and port on the projector (6). n 68 N Using Peripheral Devices To connect a projector 1 Connect the power cord (1) of your computer.
Connecting a Projector You can connect a projector (for example, the Sony LCD projector) to your projector into an AC outlet. 2 Plug a display cable (2) (not supplied) into the monitor port (3) a on the computer. 3 Plug an audio cable (4) (not supplied) into the headphones jack (5) i on the computer. 4 Plug the display cable and the audio cable into the jack and port on the projector (6). n 68 N Using Peripheral Devices To connect a projector 1 Connect the power cord (1) of your computer.

User Guide
Page 69
...settings. ✍ You may not be able to work on your computer screen and the external display at the same time, depending on the type of your computer screen and the external display or projector at the same time, see Using the Multiple Monitors Function (page 70) for more... information. n 69 N Using Peripheral Devices Selecting Display Modes You can select which display to use as the primary monitor when an external display (desktop monitor, etc.) is ...
...settings. ✍ You may not be able to work on your computer screen and the external display at the same time, depending on the type of your computer screen and the external display or projector at the same time, see Using the Multiple Monitors Function (page 70) for more... information. n 69 N Using Peripheral Devices Selecting Display Modes You can select which display to use as the primary monitor when an external display (desktop monitor, etc.) is ...
User Guide
Page 70
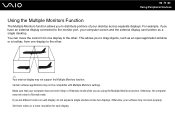
... You can function as an open application window or a toolbar, from one display to the other . Set fewer colors or a lower resolution for each display, do not expand a single window across separate displays. This allows you to drag objects, such as a single desktop. Make ... computer screen and the external display can move the cursor from one display to the other . ✍ Your external display may not support the Multiple Monitors function. Otherwise, your desktop across two displays. If you set different colors on each display. Certain software applications may not...
... You can function as an open application window or a toolbar, from one display to the other . Set fewer colors or a lower resolution for each display, do not expand a single window across separate displays. This allows you to drag objects, such as a single desktop. Make ... computer screen and the external display can move the cursor from one display to the other . ✍ Your external display may not support the Multiple Monitors function. Otherwise, your desktop across two displays. If you set different colors on each display. Certain software applications may not...

User Guide
Page 71
For details on -screen instructions to change the settings. ✍ You can set the display colors and resolution for changing the assignment. Additionally, you can also change the muting (S1) button assignment, press and hold the muting (S1) button to... activate the Multiple Monitors function with the muting (S1) button. To change the muting (S1) button assignment to display the window for each display and customize the Multiple Monitors function. n 71 N Using Peripheral Devices To use the Multiple Monitors function 1 Right-click on the desktop and select...
For details on -screen instructions to change the settings. ✍ You can set the display colors and resolution for changing the assignment. Additionally, you can also change the muting (S1) button assignment, press and hold the muting (S1) button to... activate the Multiple Monitors function with the muting (S1) button. To change the muting (S1) button assignment to display the window for each display and customize the Multiple Monitors function. n 71 N Using Peripheral Devices To use the Multiple Monitors function 1 Right-click on the desktop and select...
User Guide
Page 82
The BIOS setup screen appears. If not, restart the computer and press the F2 key several times when the VAIO logo appears. 3 Press the < or , key to select Security to select Exit, select Exit Setup, and then press the Enter key. At the confirmation prompt, ...) long. 5 Select Password when Power On under Security and press the Enter key. 6 Change the setting from Disabled to Enabled. 7 Press the < or , key to display the Security tab, select Set Machine Password, and then press the Enter key. 4 On the password entry screen, enter the password twice and press the...
The BIOS setup screen appears. If not, restart the computer and press the F2 key several times when the VAIO logo appears. 3 Press the < or , key to select Security to select Exit, select Exit Setup, and then press the Enter key. At the confirmation prompt, ...) long. 5 Select Password when Power On under Security and press the Enter key. 6 Change the setting from Disabled to Enabled. 7 Press the < or , key to display the Security tab, select Set Machine Password, and then press the Enter key. 4 On the password entry screen, enter the password twice and press the...


