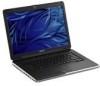

User Guide
Page 3
... Connecting External Speakers ...73 Connecting an External Display ...74 Selecting Display Modes...78 Using the Multiple Monitors Function ...80 Connecting an External Microphone ...82 Connecting a Universal Serial Bus (USB) Device...83 Connecting a Printer ...86 Connecting an i.LINK Device ...87 Connecting to a Network (LAN) ...89 Customizing Your VAIO Computer ...90 Setting the Password ...91...
... Connecting External Speakers ...73 Connecting an External Display ...74 Selecting Display Modes...78 Using the Multiple Monitors Function ...80 Connecting an External Microphone ...82 Connecting a Universal Serial Bus (USB) Device...83 Connecting a Printer ...86 Connecting an i.LINK Device ...87 Connecting to a Network (LAN) ...89 Customizing Your VAIO Computer ...90 Setting the Password ...91...

User Guide
Page 4
... Troubleshooting ...134 Computer ...136 System Security ...143 Battery...144 Built-in MOTION EYE Camera...146 Internet ...149 Networking ...151 Bluetooth Technology ...154 Optical Discs ...158 Display ...162 Printing ...168 Microphone ...169
... Troubleshooting ...134 Computer ...136 System Security ...143 Battery...144 Built-in MOTION EYE Camera...146 Internet ...149 Networking ...151 Bluetooth Technology ...154 Optical Discs ...158 Display ...162 Printing ...168 Microphone ...169

User Guide
Page 11
... do not create glare and reflection on the display. Make sure the display screen is at a comfortable viewing distance. Adjust the brightness setting of the display to avoid bright spots on the display. Proper lighting adds to find the best position. When using an external display, set the display at eye level or slightly lower when...
... do not create glare and reflection on the display. Make sure the display screen is at a comfortable viewing distance. Adjust the brightness setting of the display to avoid bright spots on the display. Proper lighting adds to find the best position. When using an external display, set the display at eye level or slightly lower when...

User Guide
Page 14
A Play/Pause button (page 31) B Stop button (page 31) C Previous track button (page 31) D Next track button (page 31) E Built-in speakers (stereo) F AV MODE button (page 31) G Muting button (page 31) H Volume buttons (page 31) I CAPTURE button (page 31) J DISPLAY OFF button (page 31) n 14 N Getting Started
A Play/Pause button (page 31) B Stop button (page 31) C Previous track button (page 31) D Next track button (page 31) E Built-in speakers (stereo) F AV MODE button (page 31) G Muting button (page 31) H Volume buttons (page 31) I CAPTURE button (page 31) J DISPLAY OFF button (page 31) n 14 N Getting Started

User Guide
Page 19
... the Shift key while the indicator is on .) When the indicator is off the computer when this indicator is on the program you scroll the display. Letters appear in the SD memory card slot. (Do not enter Sleep mode or turn off , the optical disc media is on . Illuminates when data...
... the Shift key while the indicator is on .) When the indicator is off the computer when this indicator is on the program you scroll the display. Letters appear in the SD memory card slot. (Do not enter Sleep mode or turn off , the optical disc media is on . Illuminates when data...
User Guide
Page 29
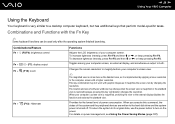
...intensity, press Fn+F6 and then M or ,, or keep pressing Fn+F6. Combinations/Feature Fn + 8 (F5/F6): brightness control Fn + /T (F7): display output Fn + (F10): zoom Fn + (F12): Hibernate Functions Adjusts the LCD brightness of your computer screen. Combinations and Functions with the Fn Key ✍ ...used only after the operating system finished launching. To decrease lightness intensity, press Fn+F5 and then m or n 29 N Using Your VAIO Computer Using the Keyboard Your keyboard is very similar to a desktop computer keyboard, but has additional keys that perform model-specific tasks.
...intensity, press Fn+F6 and then M or ,, or keep pressing Fn+F6. Combinations/Feature Fn + 8 (F5/F6): brightness control Fn + /T (F7): display output Fn + (F10): zoom Fn + (F12): Hibernate Functions Adjusts the LCD brightness of your computer screen. Combinations and Functions with the Fn Key ✍ ...used only after the operating system finished launching. To decrease lightness intensity, press Fn+F5 and then m or n 29 N Using Your VAIO Computer Using the Keyboard Your keyboard is very similar to a desktop computer keyboard, but has additional keys that perform model-specific tasks.

User Guide
Page 30
... finger on the touch pad (1) to scroll horizontally (the scroll function is available only with applications that support a touch pad scroll feature). n 30 N Using Your VAIO Computer Action Point Click Double-click Right-click Drag Scroll Description Slide your finger along the bottom edge to place the pointer (2) on an item...
... finger on the touch pad (1) to scroll horizontally (the scroll function is available only with applications that support a touch pad scroll feature). n 30 N Using Your VAIO Computer Action Point Click Double-click Right-click Drag Scroll Description Slide your finger along the bottom edge to place the pointer (2) on an item...

User Guide
Page 31
... for more information on the Instant Mode. Turns off or in the finder view with special buttons to display the setup window. CAPTURE button DISPLAY OFF button Launches VAIO Camera Capture Utility to capture still images and movies in Hibernate mode. To activate Instant Mode, the computer... must be off the LCD backlight. To do so, press and hold the AV MODE button to help file on VAIO Camera Capture...
... for more information on the Instant Mode. Turns off or in the finder view with special buttons to display the setup window. CAPTURE button DISPLAY OFF button Launches VAIO Camera Capture Utility to capture still images and movies in Hibernate mode. To activate Instant Mode, the computer... must be off the LCD backlight. To do so, press and hold the AV MODE button to help file on VAIO Camera Capture...
User Guide
Page 40
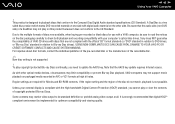
Be aware that are required for Movies and BD-ROM contents. Sony does NOT guarantee the compatibility of VAIO CD drives with discs that the audio side (non-DVD side) of copyright protected Blu-ray Discs. To play copyright protected Blu-ray Discs continually... Audio standard specifications (CD Standard). If the region setting and the region of the disc do not match, playback is compliant with your external display is not possible. Unless your computer's optical disc drives. Note that conform to check both playback and recording compatibility with the High-bandwidth Digital ...
Be aware that are required for Movies and BD-ROM contents. Sony does NOT guarantee the compatibility of VAIO CD drives with discs that the audio side (non-DVD side) of copyright protected Blu-ray Discs. To play copyright protected Blu-ray Discs continually... Audio standard specifications (CD Standard). If the region setting and the region of the disc do not match, playback is compliant with your external display is not possible. Unless your computer's optical disc drives. Note that conform to check both playback and recording compatibility with the High-bandwidth Digital ...

User Guide
Page 50
n 50 N Using Your VAIO Computer Inserting a Memory Stick Media To insert a Memory Stick media 1 Locate the Memory Stick PRO/Duo media slot. 2 Hold the Memory Stick media with the ... Memory Stick media, do not force the Memory Stick media into the slot if you insert it into the slot. The Memory Stick media is displayed.
n 50 N Using Your VAIO Computer Inserting a Memory Stick Media To insert a Memory Stick media 1 Locate the Memory Stick PRO/Duo media slot. 2 Hold the Memory Stick media with the ... Memory Stick media, do not force the Memory Stick media into the slot if you insert it into the slot. The Memory Stick media is displayed.

User Guide
Page 62
.... 7 Follow the on the left pane. The Set up a connection or network on -screen instructions. ✍ See the online Specifications to display the Wireless Device Switch window. n 62 N Using Your VAIO Computer To communicate without an access point (ad-hoc) ! Select your model supports the Bluetooth functionality and/or the IEEE 802...
.... 7 Follow the on the left pane. The Set up a connection or network on -screen instructions. ✍ See the online Specifications to display the Wireless Device Switch window. n 62 N Using Your VAIO Computer To communicate without an access point (ad-hoc) ! Select your model supports the Bluetooth functionality and/or the IEEE 802...
User Guide
Page 64
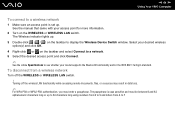
...point for more information. 2 Turn on the WIRELESS or WIRELESS LAN switch. Turning off the WIRELESS or WIRELESS LAN switch. ! n 64 N Using Your VAIO Computer To connect to a wireless network 1 Make sure an access point is case sensitive and must enter a passphrase. To disconnect from A to F. ...The passphrase is set up to 64 characters long using numbers from 0 to display the Wireless Device Switch window. See the manual that came with your desired wireless option(s) and click OK. 4 Right-click or on the ...
...point for more information. 2 Turn on the WIRELESS or WIRELESS LAN switch. Turning off the WIRELESS or WIRELESS LAN switch. ! n 64 N Using Your VAIO Computer To connect to a wireless network 1 Make sure an access point is case sensitive and must enter a passphrase. To disconnect from A to F. ...The passphrase is set up to 64 characters long using numbers from 0 to display the Wireless Device Switch window. See the manual that came with your desired wireless option(s) and click OK. 4 Right-click or on the ...

User Guide
Page 65
To connect to a Bluetooth device 1 Turn on the taskbar to display the Wireless Device Switch window. 3 Select the Enable Bluetooth Device option. 4 Click OK. You can transfer data between your model supports the Bluetooth functionality. ... or a mobile phone. You can establish wireless communication between these devices without cables and up . 2 Double-click ( / ) on the WIRELESS switch. n 65 N Using Your VAIO Computer Using the Bluetooth Functionality The Bluetooth functionality is available on selected models only. See the online Specifications to 33 feet (10 meters) range in...
To connect to a Bluetooth device 1 Turn on the taskbar to display the Wireless Device Switch window. 3 Select the Enable Bluetooth Device option. 4 Click OK. You can transfer data between your model supports the Bluetooth functionality. ... or a mobile phone. You can establish wireless communication between these devices without cables and up . 2 Double-click ( / ) on the WIRELESS switch. n 65 N Using Your VAIO Computer Using the Bluetooth Functionality The Bluetooth functionality is available on selected models only. See the online Specifications to 33 feet (10 meters) range in...

User Guide
Page 72
Using Peripheral Devices You can add functionality to your VAIO computer by using the various ports on the computer. ❑ Connecting External Speakers (page 73) ❑ Connecting an External Display (page 74) ❑ Selecting Display Modes (page 78) ❑ Using the Multiple Monitors Function (page 80) ❑ Connecting an External Microphone (page 82) ❑...
Using Peripheral Devices You can add functionality to your VAIO computer by using the various ports on the computer. ❑ Connecting External Speakers (page 73) ❑ Connecting an External Display (page 74) ❑ Selecting Display Modes (page 78) ❑ Using the Multiple Monitors Function (page 80) ❑ Connecting an External Microphone (page 82) ❑...

User Guide
Page 74
On the Windows operating system, you can use an external display to set up multiple monitors. To connect a computer display 1 If necessary, plug one end of the display's power cord (1) into the monitor (VGA) port (3) a on the computer. Connecting a Computer Display You can connect a computer display (monitor) to your computer. For example, you can also use...
On the Windows operating system, you can use an external display to set up multiple monitors. To connect a computer display 1 If necessary, plug one end of the display's power cord (1) into the monitor (VGA) port (3) a on the computer. Connecting a Computer Display You can connect a computer display (monitor) to your computer. For example, you can also use...

User Guide
Page 75
n 75 N Using Peripheral Devices Connecting a Multimedia Computer Display You can connect a multimedia computer display that includes built-in speakers and a microphone to your multimedia computer display (1) into an AC outlet. 2 Plug the display cable (2) (not supplied) into the monitor (VGA) port (3) a on the computer. 3 Plug the speaker cable (4) into the headphones jack (5) i on the computer. 4 Plug the microphone cable (6) into the microphone jack (7) m on the computer. To connect a multimedia computer display 1 Plug the power cord of your computer.
n 75 N Using Peripheral Devices Connecting a Multimedia Computer Display You can connect a multimedia computer display that includes built-in speakers and a microphone to your multimedia computer display (1) into an AC outlet. 2 Plug the display cable (2) (not supplied) into the monitor (VGA) port (3) a on the computer. 3 Plug the speaker cable (4) into the headphones jack (5) i on the computer. 4 Plug the microphone cable (6) into the microphone jack (7) m on the computer. To connect a multimedia computer display 1 Plug the power cord of your computer.

User Guide
Page 76
... of your computer is more information on your TV. If you want to display the full image, change the display resolution of the computer to external input. 5 Set up the TV configuration system. ✍ See the manual that came with your computer. n 76 N Using Peripheral ...Devices Connecting a TV You can connect a TV to your peripheral for more than 1024 x 768 pixels, a part of the image cannot be displayed on installation and use. To connect a TV to your computer 1 Plug the power cord of your TV into an AC outlet. 2 Plug one end of...
... of your computer is more information on your TV. If you want to display the full image, change the display resolution of the computer to external input. 5 Set up the TV configuration system. ✍ See the manual that came with your computer. n 76 N Using Peripheral ...Devices Connecting a TV You can connect a TV to your peripheral for more than 1024 x 768 pixels, a part of the image cannot be displayed on installation and use. To connect a TV to your computer 1 Plug the power cord of your TV into an AC outlet. 2 Plug one end of...

User Guide
Page 78
See the online Specifications for more information. If you want to work on the video controller. n 78 N Using Peripheral Devices Selecting Display Modes You can select which display to be used in the computer. The procedure for selecting a display depends on the video controller used as the primary monitor when an external display (desktop monitor, etc.) is connected to your computer screen and the external display at the same time, see Using the Multiple Monitors Function (page 80) for detailed information on your computer.
See the online Specifications for more information. If you want to work on the video controller. n 78 N Using Peripheral Devices Selecting Display Modes You can select which display to be used in the computer. The procedure for selecting a display depends on the video controller used as the primary monitor when an external display (desktop monitor, etc.) is connected to your computer screen and the external display at the same time, see Using the Multiple Monitors Function (page 80) for detailed information on your computer.

User Guide
Page 79
..., turn on the desktop and select Personalize from the shortcut menu. 2 Click Display Settings. n 79 N Using Peripheral Devices To select a display Models with the ATI video controller When the computer has an external display connected, you can change the Main/Clone setting as follows: 1 Click Start,... information. ✍ You may not be able to display the same contents on your computer screen and the external display or projector at the same time, depending on the type of your external display or projector. The Display Settings window appears. 3 Follow the on-screen instructions ...
..., turn on the desktop and select Personalize from the shortcut menu. 2 Click Display Settings. n 79 N Using Peripheral Devices To select a display Models with the ATI video controller When the computer has an external display connected, you can change the Main/Clone setting as follows: 1 Click Start,... information. ✍ You may not be able to display the same contents on your computer screen and the external display or projector at the same time, depending on the type of your external display or projector. The Display Settings window appears. 3 Follow the on-screen instructions ...

User Guide
Page 80
...of your computer screen and the external display can move the cursor from one display to the other . Set fewer colors or a lower resolution for each display, do not expand a single window across separate displays. For example, if you have an external display attached to the monitor (VGA) port...mode while you are using Multiple Monitors mode; You can function as an open application window or a toolbar, from one display to the other . ✍ Your external display may not be compatible with Multiple Monitors settings. This allows you to drag objects, such as a single desktop. n ...
...of your computer screen and the external display can move the cursor from one display to the other . Set fewer colors or a lower resolution for each display, do not expand a single window across separate displays. For example, if you have an external display attached to the monitor (VGA) port...mode while you are using Multiple Monitors mode; You can function as an open application window or a toolbar, from one display to the other . ✍ Your external display may not be compatible with Multiple Monitors settings. This allows you to drag objects, such as a single desktop. n ...


