User Guide
Page 14
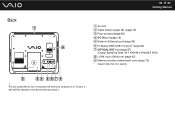
Back n 14 N Getting Started A Air vent B Cable clamps (page 18), (page 19) C Prop-up stand (page 85) D DC IN port (page 19) E Network (Ethernet) port (page 64) F Hi-Speed USB (USB 2.0) ports* (page 59) G OPTICAL OUT port (page 57) (Output Sampling Rate: 44.1 KHz/48.0 KHz/96.0 KHz) H i.LINK 4-pin (S400) port (page 62) I Memory module compartment cover (page 75) * Support high-/full-/low- speeds. ! The area around the air vent (1) becomes hot while your computer is on. Be sure to wait until the computer cools down before you touch it.
Back n 14 N Getting Started A Air vent B Cable clamps (page 18), (page 19) C Prop-up stand (page 85) D DC IN port (page 19) E Network (Ethernet) port (page 64) F Hi-Speed USB (USB 2.0) ports* (page 59) G OPTICAL OUT port (page 57) (Output Sampling Rate: 44.1 KHz/48.0 KHz/96.0 KHz) H i.LINK 4-pin (S400) port (page 62) I Memory module compartment cover (page 75) * Support high-/full-/low- speeds. ! The area around the air vent (1) becomes hot while your computer is on. Be sure to wait until the computer cools down before you touch it.

User Guide
Page 74
... ❑ You should not touch the connectors or open the memory module compartment cover. To find the nearest center or agent, see the online specifications. For assistance, contact an authorized Sony Service Center. To avoid invalidation of memory installed on a computer. ❑ ...should not install it yourself, if you are not familiar with upgrading memory on your model, see Sony Support Information (page 130). n 74 N Upgrading Your VAIO Computer Upgrading Your VAIO Computer Your VAIO computer and memory modules use high precision components and electronic connectors technology.
... ❑ You should not touch the connectors or open the memory module compartment cover. To find the nearest center or agent, see the online specifications. For assistance, contact an authorized Sony Service Center. To avoid invalidation of memory installed on a computer. ❑ ...should not install it yourself, if you are not familiar with upgrading memory on your model, see Sony Support Information (page 130). n 74 N Upgrading Your VAIO Computer Upgrading Your VAIO Computer Your VAIO computer and memory modules use high precision components and electronic connectors technology.

User Guide
Page 75
... the manufacturer of your computer, you can increase the amount of your memory module. ❑ Electrostatic discharge (ESD) can damage electronic components. n 75 N Upgrading Your VAIO Computer Adding and Removing Memory If you want to do not handle materials that are ready to your computer and disconnect it from the AC...
... the manufacturer of your computer, you can increase the amount of your memory module. ❑ Electrostatic discharge (ESD) can damage electronic components. n 75 N Upgrading Your VAIO Computer Adding and Removing Memory If you want to do not handle materials that are ready to your computer and disconnect it from the AC...
User Guide
Page 76
n 76 N Upgrading Your VAIO Computer ❑ Use the special bag supplied with the memory module or wrap the module in aluminum foil to protect it from ESD. ❑ Introducing ... the memory module slots or other internal components of your computer will result in damage to the computer and any repair costs will not be covered by the warranty. ❑ Do not place the memory module in a location subject to your computer. To avoid injuries to : ❑ Heat sources such as...
n 76 N Upgrading Your VAIO Computer ❑ Use the special bag supplied with the memory module or wrap the module in aluminum foil to protect it from ESD. ❑ Introducing ... the memory module slots or other internal components of your computer will result in damage to the computer and any repair costs will not be covered by the warranty. ❑ Do not place the memory module in a location subject to your computer. To avoid injuries to : ❑ Heat sources such as...
User Guide
Page 77
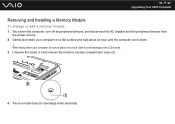
n 77 N Upgrading Your VAIO Computer Removing and Installing a Memory Module To change or add a memory module 1 Shut down the computer, turn off all peripheral devices, and disconnect the AC adapter and the peripheral devices from the power source. 2 Gently face down . ! When facing down your computer on a soft cloth to avoid damage to the LCD screen. 3 Unscrew the screw (1) and remove the memory module compartment cover (2). 4 Touch a metal object to place it on a flat surface and wait about an hour until the computer cools down your computer, be sure to discharge static electricity.
n 77 N Upgrading Your VAIO Computer Removing and Installing a Memory Module To change or add a memory module 1 Shut down the computer, turn off all peripheral devices, and disconnect the AC adapter and the peripheral devices from the power source. 2 Gently face down . ! When facing down your computer on a soft cloth to avoid damage to the LCD screen. 3 Unscrew the screw (1) and remove the memory module compartment cover (2). 4 Touch a metal object to place it on a flat surface and wait about an hour until the computer cools down your computer, be sure to discharge static electricity.

User Guide
Page 79
...small projection in a wrong orientation, as it clicks into place. ! If you want to install only one memory module, be sure to the power source. 10 Turn on all peripheral devices and then the computer... Do not force the memory module into the slot in the open slot. n 79 N Upgrading Your VAIO Computer 7 Slide the memory module into the memory module slot and push it in until it may cause... damage to the slot and the module. 8 Replace the memory module compartment cover and tighten the screw. 9 Connect the AC adapter and the peripheral devices to the computer, and then...
...small projection in a wrong orientation, as it clicks into place. ! If you want to install only one memory module, be sure to the power source. 10 Turn on all peripheral devices and then the computer... Do not force the memory module into the slot in the open slot. n 79 N Upgrading Your VAIO Computer 7 Slide the memory module into the memory module slot and push it in until it may cause... damage to the slot and the module. 8 Replace the memory module compartment cover and tighten the screw. 9 Connect the AC adapter and the peripheral devices to the computer, and then...
User Guide
Page 86
... off with a blower brush or a soft brush. n 86 N Precautions Handling the Built-in MOTION EYE Camera ❑ Do not touch the lens protection cover of the built-in MOTION EYE camera, as it may cause the camera to malfunction. ❑ The built-in MOTION EYE camera is disabled while ... from an i.LINK-compatible device connected to the i.LINK port. ❑ Clean the lens protection cover of your computer's power state, as it is extremely dirty, wipe it may cause scratches on the cover and such scratches will appear on the captured images. ❑ Do not let the direct sunlight ...
... off with a blower brush or a soft brush. n 86 N Precautions Handling the Built-in MOTION EYE Camera ❑ Do not touch the lens protection cover of the built-in MOTION EYE camera, as it may cause the camera to malfunction. ❑ The built-in MOTION EYE camera is disabled while ... from an i.LINK-compatible device connected to the i.LINK port. ❑ Clean the lens protection cover of your computer's power state, as it is extremely dirty, wipe it may cause scratches on the cover and such scratches will appear on the captured images. ❑ Do not let the direct sunlight ...
User Guide
Page 101
... the built-in MOTION EYE camera. ❑ The video memory of your computer can handle. Clean the cover. See the help . ❑ The viewer window may be shared by more software applications running than one software application. Check the CPU performance. If another software application is normal and does not indicate a malfunction...
... the built-in MOTION EYE camera. ❑ The video memory of your computer can handle. Clean the cover. See the help . ❑ The viewer window may be shared by more software applications running than one software application. Check the CPU performance. If another software application is normal and does not indicate a malfunction...


