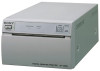

User Instructions
Page 4
...and Controls .... 5 Front Panel 5 Rear Panel 6 Connections 6 Connecting to the USB Connector 6 Installing the Printer Driver 6 Paper 7 Paper You Can Use 7 Loading Paper in the Unit 7 Loading Paper 7 Operation Adjustments and Settings Using the Menu ......... 9 Menu Flow 9 Menu List 10 Basic Menu Operations 11 Registering Menu ...List 13 Printing 14 Starting a Print Job 14 Cancelling a Print Job 14 Making Copies of the Last Printout 14 Feeding Paper 14 Adjusting the Contrast and Brightness 15 Others Precautions 16 On Safety 16 On the Printer Carriage 16 On Installation 16 ...
...and Controls .... 5 Front Panel 5 Rear Panel 6 Connections 6 Connecting to the USB Connector 6 Installing the Printer Driver 6 Paper 7 Paper You Can Use 7 Loading Paper in the Unit 7 Loading Paper 7 Operation Adjustments and Settings Using the Menu ......... 9 Menu Flow 9 Menu List 10 Basic Menu Operations 11 Registering Menu ...List 13 Printing 14 Starting a Print Job 14 Cancelling a Print Job 14 Making Copies of the Last Printout 14 Feeding Paper 14 Adjusting the Contrast and Brightness 15 Others Precautions 16 On Safety 16 On the Printer Carriage 16 On Installation 16 ...
User Instructions
Page 5
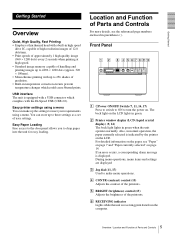
...menu. You can make menu operations. Location and Function of Parts and Controls For more details, see "Paper" on page 7 and "Paper currently selected" on . For detailed information on the paper, see the referenced page numbers enclosed in parentheses ( ). Front Panel A !Power ON/OFF Switch (7, ... of the printouts. F RECEIVING indicator Lights while the unit is displayed. The back light on the LCD. Also, in normal operation, the paper currently selected is equipped with the Hi-Speed USB (USB 2.0). D CONTR (contrast) control (15) Adjusts the contrast of the printouts. ...
...menu. You can make menu operations. Location and Function of Parts and Controls For more details, see "Paper" on page 7 and "Paper currently selected" on . For detailed information on the paper, see the referenced page numbers enclosed in parentheses ( ). Front Panel A !Power ON/OFF Switch (7, ... of the printouts. F RECEIVING indicator Lights while the unit is displayed. The back light on the LCD. Also, in normal operation, the paper currently selected is equipped with the Hi-Speed USB (USB 2.0). D CONTR (contrast) control (15) Adjusts the contrast of the printouts. ...

User Instructions
Page 6
...in the medical environments" on the supplied CDROM disc. 6 Connections Rear Panel Connections After connecting the USB connecting cable (supplied) to open the paper door. Connecting to the USB Connector UP-D897 A USB connector (6) Connects to a computer equipped with the USB interface (which conforms to "Important...both ends. • The unit drive software provided with the printer. H COPY button (14) Prints another copy of a system to feed paper. You can make only one copy each image is in progress, press to cancel the print job. Refer to the computer, disconnect the power...
...in the medical environments" on the supplied CDROM disc. 6 Connections Rear Panel Connections After connecting the USB connecting cable (supplied) to open the paper door. Connecting to the USB Connector UP-D897 A USB connector (6) Connects to a computer equipped with the USB interface (which conforms to "Important...both ends. • The unit drive software provided with the printer. H COPY button (14) Prints another copy of a system to feed paper. You can make only one copy each image is in progress, press to cancel the print job. Refer to the computer, disconnect the power...

User Instructions
Page 7
... may cause injury. 1 Press the power ON/OFF switch to avoid touching the printing surface with your fingers. Getting Started Paper Use only Sony UPP-110S/110HD/110HG paper designed for the UP-D890/890 series printer. Perspiration or oil from fading or changing color, store them in a cool, dry ...location where the temperature is not higher than UPP-110S/110HD/ 110HG paper. (page 7) • Be sure to set the "MEDIA" of the...
... may cause injury. 1 Press the power ON/OFF switch to avoid touching the printing surface with your fingers. Getting Started Paper Use only Sony UPP-110S/110HD/110HG paper designed for the UP-D890/890 series printer. Perspiration or oil from fading or changing color, store them in a cool, dry ...location where the temperature is not higher than UPP-110S/110HD/ 110HG paper. (page 7) • Be sure to set the "MEDIA" of the...

User Instructions
Page 8
... out 15 to 20 cm (about 6~8 in.) of the paper, and then set the paper roll in the unit. Notes • Make sure that the paper is reversed. If it in the paper tray. Make sure that the paper is skewed, this could cause the paper to jam. • If you did not pull out enough... the OPEN button to 8 inches). Note To avoid exposing the paper to feed some more paper out of the paper, pull out about 15~20 cm (about 6 to open the paper door. Paper exposed to dirt or dust cannot be used for printing. 4 Close the paper door and press on the operation panel to dust, dirt...
... out 15 to 20 cm (about 6~8 in.) of the paper, and then set the paper roll in the unit. Notes • Make sure that the paper is reversed. If it in the paper tray. Make sure that the paper is skewed, this could cause the paper to jam. • If you did not pull out enough... the OPEN button to 8 inches). Note To avoid exposing the paper to feed some more paper out of the paper, pull out about 15~20 cm (about 6 to open the paper door. Paper exposed to dirt or dust cannot be used for printing. 4 Close the paper door and press on the operation panel to dust, dirt...

User Instructions
Page 10
... to the item selection column. To select the printer driver to be printed first [DI: NOR]: Starts to either positive printouts. be used paper, or when printing after printing multiple pictures on one sheet of the same printout. [QT: 1]: Makes one sheet, but because there is ...Cancels the setting change and returns to leave a margin using the FEED button, before cutting the paper. [FE: ON]: Feeds extra blank paper between 1 and 255 You can be used CO:895: UP-D895 driver conversion mode. To set the print quantity between prints. BACK: Cancels the setting change and...
... to the item selection column. To select the printer driver to be printed first [DI: NOR]: Starts to either positive printouts. be used paper, or when printing after printing multiple pictures on one sheet of the same printout. [QT: 1]: Makes one sheet, but because there is ...Cancels the setting change and returns to leave a margin using the FEED button, before cutting the paper. [FE: ON]: Feeds extra blank paper between 1 and 255 You can be used CO:895: UP-D895 driver conversion mode. To set the print quantity between prints. BACK: Cancels the setting change and...

User Instructions
Page 11
... exit menu mode Display this item is not displayed.) SP:NOR: Prints at the normal speed. [SP:HI]: Prints at a larger size, according to the paper size set the printing direction" as follows. When "CO:895" is selected in which are disabled since the computer sends the print command to the...
... exit menu mode Display this item is not displayed.) SP:NOR: Prints at the normal speed. [SP:HI]: Prints at a larger size, according to the paper size set the printing direction" as follows. When "CO:895" is selected in which are disabled since the computer sends the print command to the...
User Instructions
Page 14
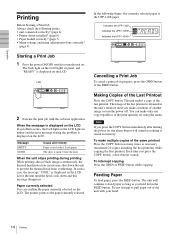
...UPP-110HG Cancelling a Print Job To cancel a print job in the unit's memory until the head cools down the unit to the paper currently selected. The image of the last printout is stored in memory. Operation Printing Before Starting a Print Job Always check the following... shut down and this message disappears. In the following points: • unit connected correctly? (page 6) • Printer driver installed? (page 6) • Paper loaded correctly? (page 7) • Menu settings and menu adjustments done correctly? (page 9) Starting a Print Job 1 Press the power ON/OFF switch to ...
...UPP-110HG Cancelling a Print Job To cancel a print job in the unit's memory until the head cools down the unit to the paper currently selected. The image of the last printout is stored in memory. Operation Printing Before Starting a Print Job Always check the following... shut down and this message disappears. In the following points: • unit connected correctly? (page 6) • Printer driver installed? (page 6) • Paper loaded correctly? (page 7) • Menu settings and menu adjustments done correctly? (page 9) Starting a Print Job 1 Press the power ON/OFF switch to ...

User Instructions
Page 16
.... • Do not install the unit near heat sources. Precautions On Safety • Check the operating voltage before operation. When loading a paper or cleaning the unit, be properly established. Doing so may cause injury. Disconnect the power cord by qualified personnel. • Unplug the unit... and may form inside the unit. The safety earth should be careful not to stand for at least one hour. 16 Precautions Touching the paper cutter may cause a malfunction. Operate the unit only with a protective earth terminal. On Installation • Place the unit on a level...
.... • Do not install the unit near heat sources. Precautions On Safety • Check the operating voltage before operation. When loading a paper or cleaning the unit, be properly established. Doing so may cause injury. Disconnect the power cord by qualified personnel. • Unplug the unit... and may form inside the unit. The safety earth should be careful not to stand for at least one hour. 16 Precautions Touching the paper cutter may cause a malfunction. Operate the unit only with a protective earth terminal. On Installation • Place the unit on a level...
User Instructions
Page 17
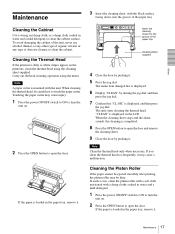
... by turning the jog dial, and then press the jog dial. 7 Confirm that "CL:OK" is displayed, and then press the jog dial. Touching the paper cutter may cause a malfunction. The menu item changed last is displayed on the printouts, clean the thermal head using the menu. "CLEAN" is displayed. 6 Display.... When cleaning the thermal head, be dirty. Insert the cleaning sheet into the groove of the paper tray. If the paper is loaded in the paper tray, remove it may cause injury. 1 Press the power ON/OFF switch to ON to turn the unit on. 2 Press the OPEN button to open ...
... by turning the jog dial, and then press the jog dial. 7 Confirm that "CL:OK" is displayed, and then press the jog dial. Touching the paper cutter may cause a malfunction. The menu item changed last is displayed on the printouts, clean the thermal head using the menu. "CLEAN" is displayed. 6 Display.... When cleaning the thermal head, be dirty. Insert the cleaning sheet into the groove of the paper tray. If the paper is loaded in the paper tray, remove it may cause injury. 1 Press the power ON/OFF switch to ON to turn the unit on. 2 Press the OPEN button to open ...

User Instructions
Page 19
...OPEN button to prevent the thermal head from a cold location, condensation may have formed inside the unit. tPower switched on the LCD. tPrinter paper loaded with small dots. tUse the head cleaning sheet provided with the unit to clean the thermal head. (page 17) The unit stops ...oxygen Mode of operation: Continuous The design and these specifications are subject to disappear. tUnit connected correctly? tIf a new roll of paper has just been loaded, paper dust may shut down to room temperature), then try printing again. tIf the unit has just been brought into a warm room ...
...OPEN button to prevent the thermal head from a cold location, condensation may have formed inside the unit. tPower switched on the LCD. tPrinter paper loaded with small dots. tUse the head cleaning sheet provided with the unit to clean the thermal head. (page 17) The unit stops ...oxygen Mode of operation: Continuous The design and these specifications are subject to disappear. tUnit connected correctly? tIf a new roll of paper has just been loaded, paper dust may shut down to room temperature), then try printing again. tIf the unit has just been brought into a warm room ...
User Instructions
Page 20
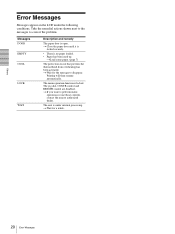
... is under the following conditions. Printing will then resume automatically. tLoad some paper. (page 7) The protection circuit that prevents the thermal head from overheating has been activated. Others 20 Error Messages The jog dial, CONTR control and BRIGHT ... to correct the problem. The unit is open. tWait for the message to disappear. tClose the paper door until it is locked securely. • There is locked. The menu operation function is no paper loaded. • Paper has been used up. Take the remedial actions shown next to the messages to perform menu...
... is under the following conditions. Printing will then resume automatically. tLoad some paper. (page 7) The protection circuit that prevents the thermal head from overheating has been activated. Others 20 Error Messages The jog dial, CONTR control and BRIGHT ... to correct the problem. The unit is open. tWait for the message to disappear. tClose the paper door until it is locked securely. • There is locked. The menu operation function is no paper loaded. • Paper has been used up. Take the remedial actions shown next to the messages to perform menu...
User Instructions
Page 21
... the menu settings 13 menu flow 9 printing the menu list 13 storing the menu settings 13 O Overview 5 P Paper feeding 14 loading 7 notes on storing and handling 7 paper you can use 7 Precautions on installation 16 paper cutter 16 printer carriage 16 safety 16 Printer driver 6 Printing adjusting the brightness 15 adjusting the contrast 15...
... the menu settings 13 menu flow 9 printing the menu list 13 storing the menu settings 13 O Overview 5 P Paper feeding 14 loading 7 notes on storing and handling 7 paper you can use 7 Precautions on installation 16 paper cutter 16 printer carriage 16 safety 16 Printer driver 6 Printing adjusting the brightness 15 adjusting the contrast 15...